In this blog post I’ll take you through how to connect a Raspberry Pi Pico W to a Microsoft Azure IoT Hub using MicroPython and MQTT.
Shopping List
For this tutorial you’ll need the following;
- Raspberry Pi Pico WH (You can buy the headerless one and solder the headers yourself)
- Micro-USB Cable
- An LED
- A 220 Ohm Resistor
- A Push Button
- A Breadboard
- Some Dupont Wires
- The Thonny Python IDE
- The Azure IoT Explorer Tool
Fair warning here… The Amazon links above are my affiliate links and help me to continue creating free content!
Contents:
- What is MQTT?
- What are Microsoft Azure IoT Hubs?
- Step 1: Prepare your Raspberry Pi Pico W
- Step 2: Build the Circuit
- Step 3: Create an Azure IoT Hub
- Step 4: Create an Azure IoT Hub Device
- Step 5: Connect the Azure IoT Explorer Tool
- Step 6: Add the umqtt.simple python package
- Step 7: The Azure IoT Hub MQTT Code
- Explaining the Code
- Step 8: Replacing the Placeholders
- Step 9: Adding the Baltimore Certificate
- Step 10: Sending Telemetry to the IoT Hub
- Step 11: Receiving Cloud to Device Messages
- Final Thoughts
What is MQTT?
MQTT stands for MQ (Message Queue) Telemetry Transport, and is one of the most popular network protocols for IoT Applications due to it’s light-weight nature.
MQTT is a Publish-Subscribe protocol, where Devices are able to publish telemetry messages using a Topic and receiving devices can Subscribe to that topic to receive those messages.
What are Microsoft Azure IoT Hubs?
The Microsoft Azure IoT Hub is a service which sits at the edge of Azure, allowing millions of devices to connect to the IoT Hub and then route those messages to other Azure services along the line.
The IoT Hub has the concept of a Device Registry, where each connecting device has it’s own set of credentials to connect to the IoT Hub.
IoT Hub is based on Azure Event Hubs, however where Event Hub communication is one way from Sender to Receiver, IoT hubs allows bi-directional communication between the IoT Hub and the connected device.
IoT Hub supports communication using both AMQP (Advanced Message Queueing Protocol) and MQTT, which is the protocol we’ll be using today.
Step 1: Prepare your Raspberry Pi Pico W
The first thing we need to do is set up our Raspberry Pi Pico W with the MicroPython Firmware.
I’ve already created a blog post helping you to do this here, where you can follow along until the end of the “Testing MicroPython on the Raspberry Pi Pico W” section.
Step 2: Build the Circuit
Now that you have your Raspberry Pi Pico W all set up it’s time to build the circuit.
We’ll be hooking an LED and a Resistor up to our Pico W so we can send messages when we connect the button and control the LED from the IoT Hub.
The circuit you’ll need to build is;
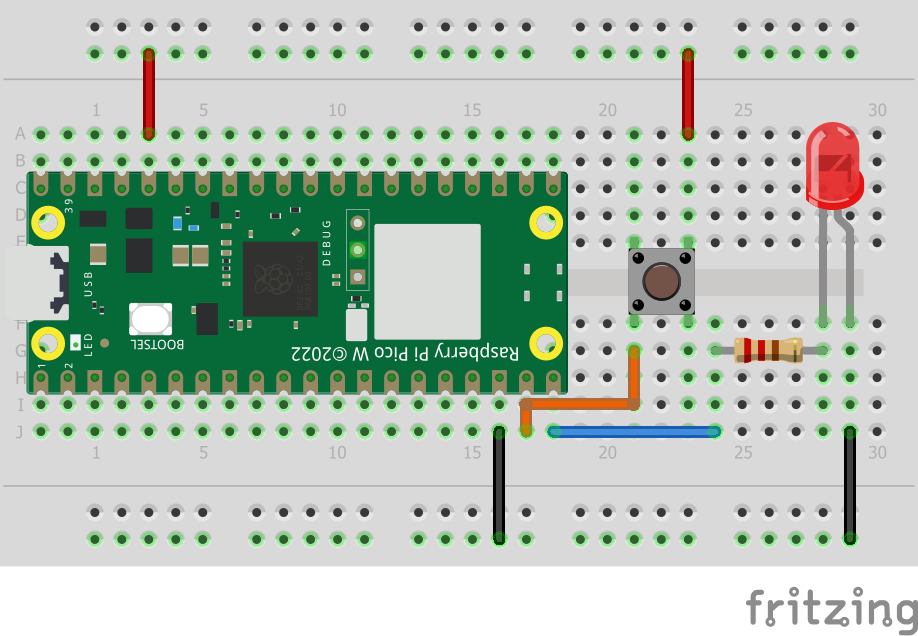
Here we’re connecting a button to Pin 14 and an LED to Pin 15.
Step 3: Create an Azure IoT Hub
In order to complete this tutorial you’ll need an Azure Subscription. You can go ahead and sign up for a free trial here.
We’ll be able to make use of the Free Tier of the Azure IoT Hub, so this won’t cost us a penny.
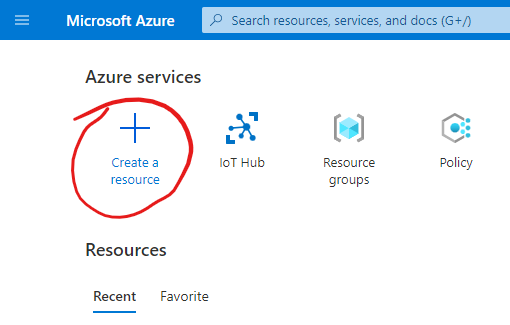
Once you’ve got your Azure Subscription all set up, head to the Azure Portal and click the “+ Create a Resource” button;
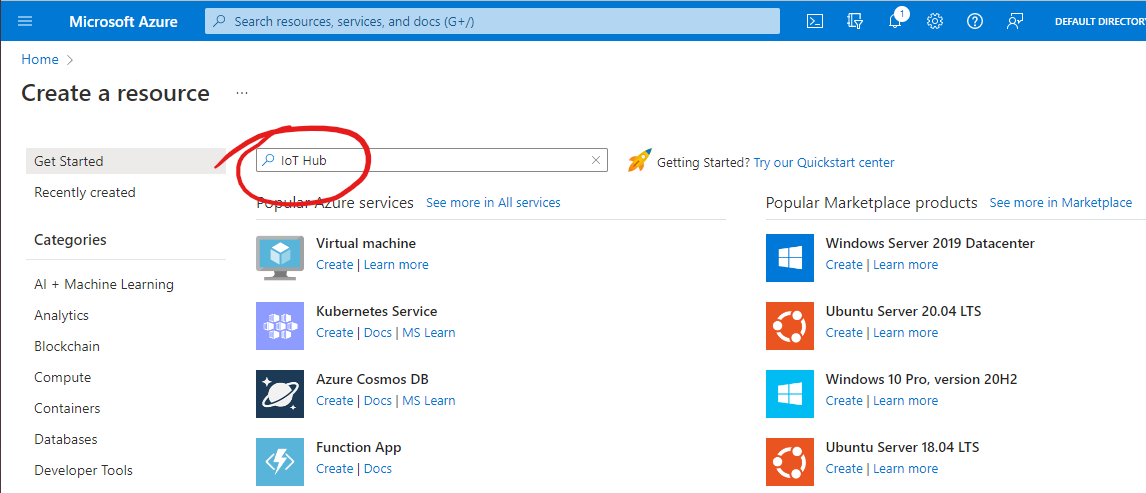
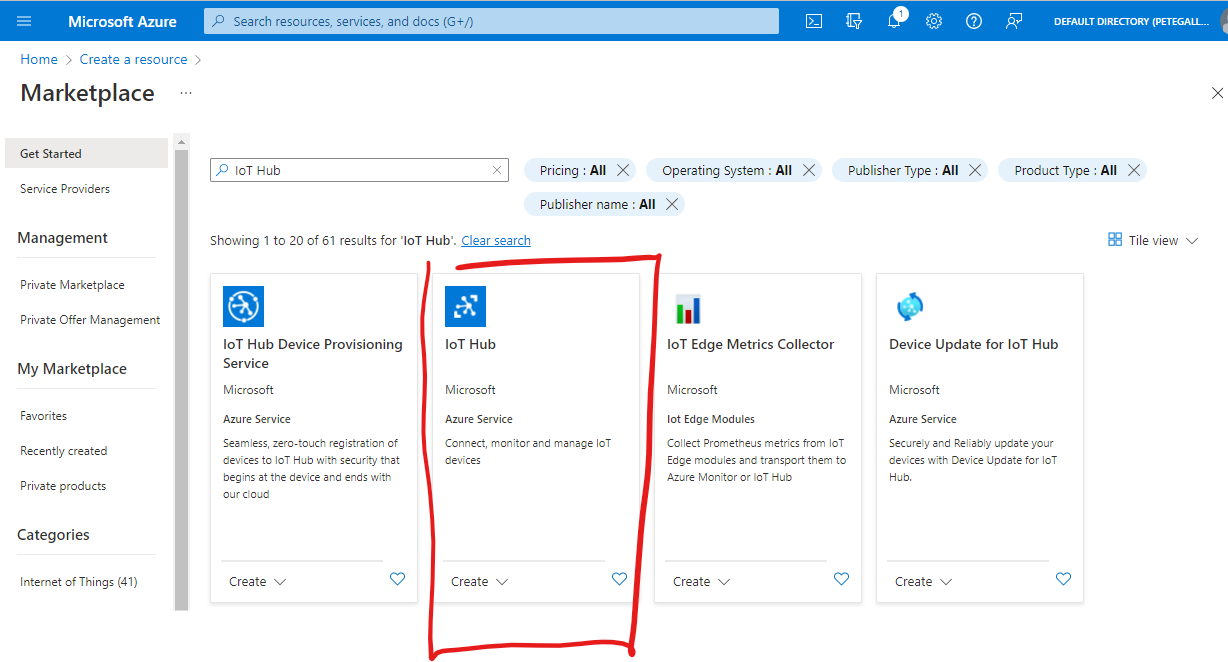
Type “IoT Hub” into the search bar and hit the enter key;
Click on the IoT Hub item in the Marketplace results;
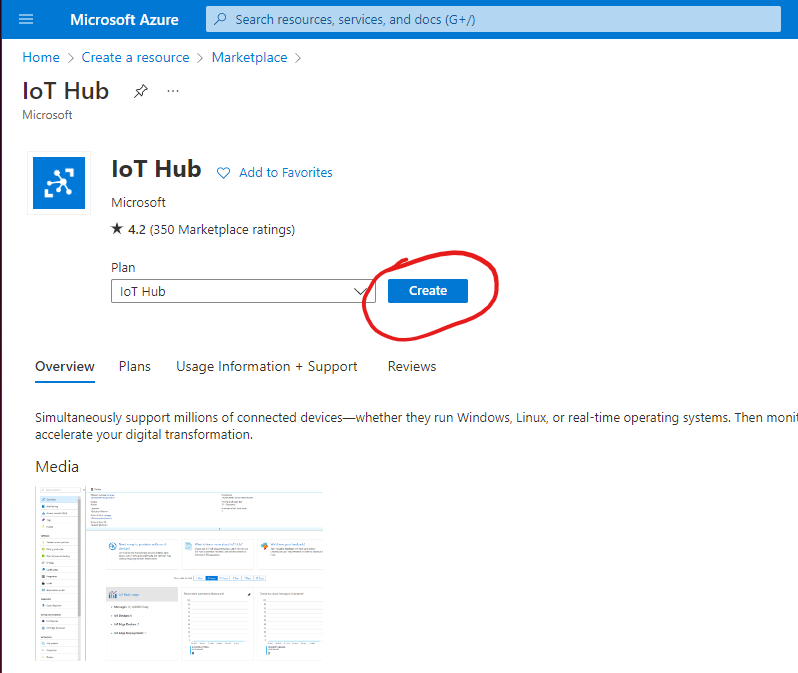
Now click the “Create” button;
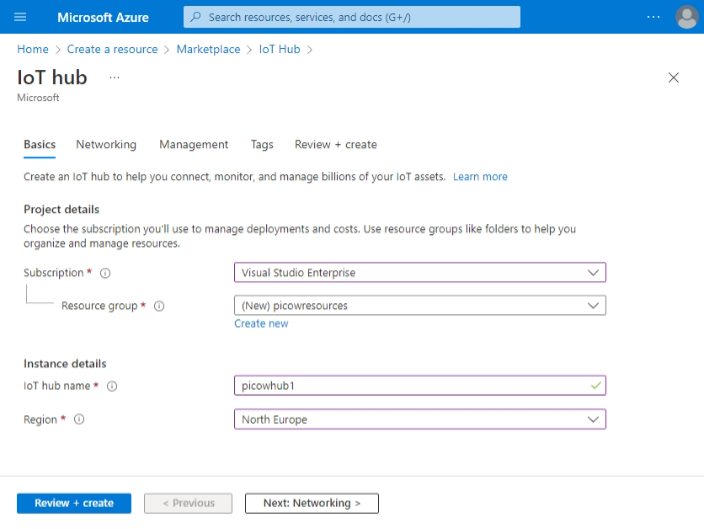
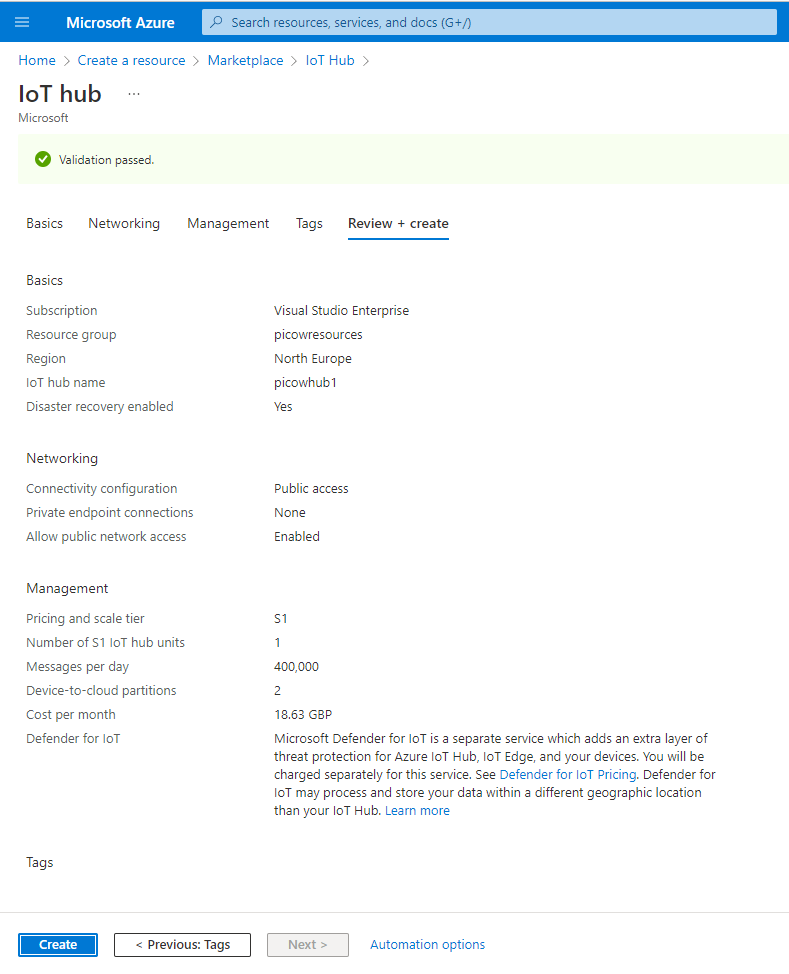
On the IoT Hub Basics page, start by selecting your Subscription.
Next, we need to organise our resources, so create a new resource group… Something like “picowresources“
Next we need to name our IoT Hub, call it something like “picowhub1“. This name must be unique, so choose something with that in mind. The page will warn you if your name isn’t unique.
Next choose a Region which is somewhere near you. I’ve chose “North Europe” here as it is close and tends to have the latest goodies.
You should have something resembling the following;
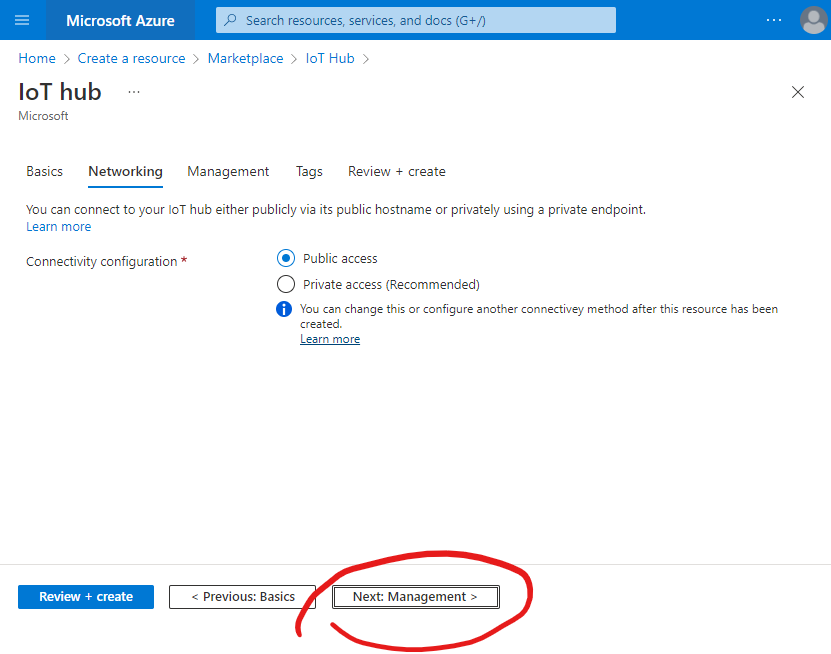
Press the “Next: Networking” button, we can simply skip this page and press the “Next: Management” button;
On the “Management” screen, from the “Pricing and Scale tier” drop down, select “F1: Free tier“.
Note: You can only have one of these per subscription, and the page will warn you if you’ve already used yours.
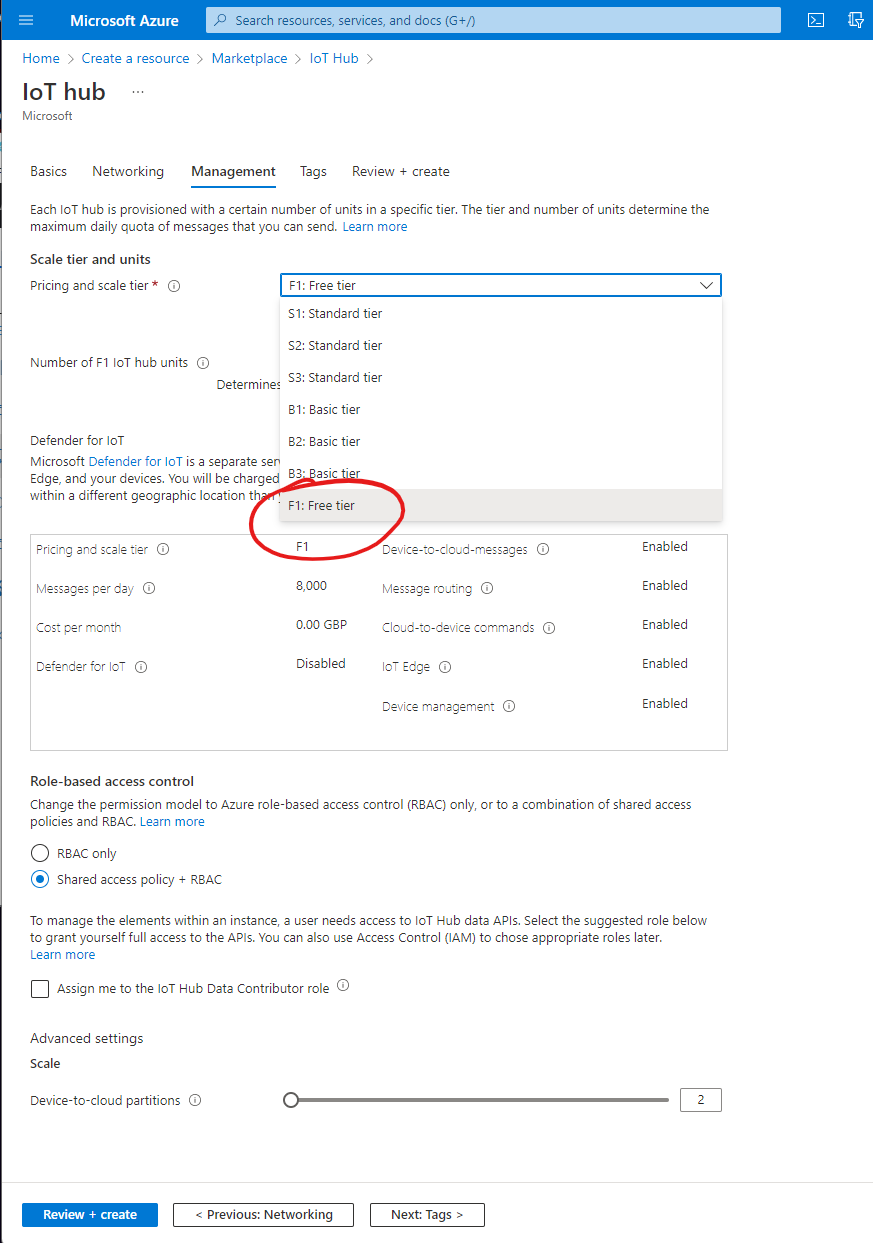
We can now hit the blue “Review + create” button in the bottom left corner to review our choices (I’ve opted for a Standard Tier as I’ve already used my free IoT hub for this subscription!);
Finally, press the blue “Create” button to create your IoT Hub.
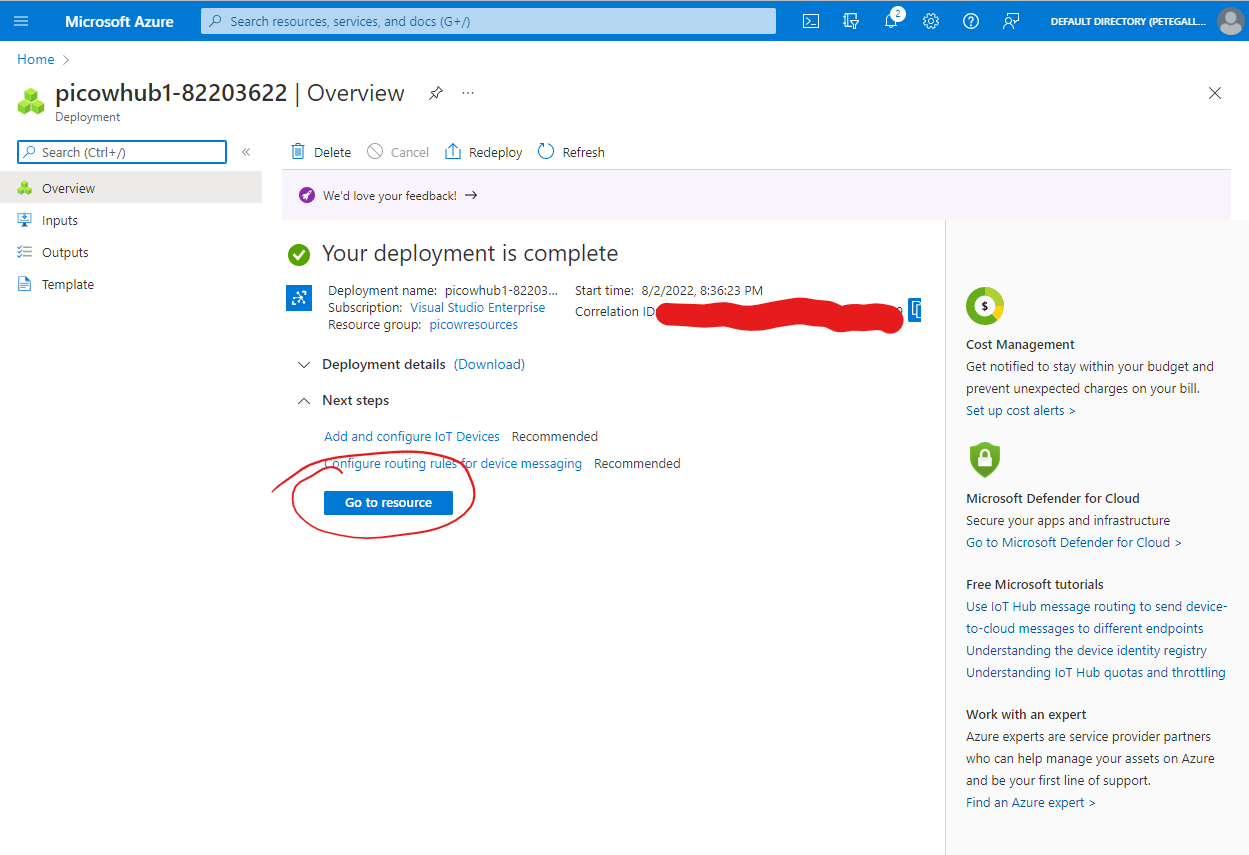
When the process has completed, click the blue “Go to resource” button to navigate to your IoT Hub;
Step 4: Create an Azure IoT Hub Device
Now that we have an IoT Hub, we need to create a Device in the IoT Hub Device Registry which will allow our Pico W to connect and send and receive messages.
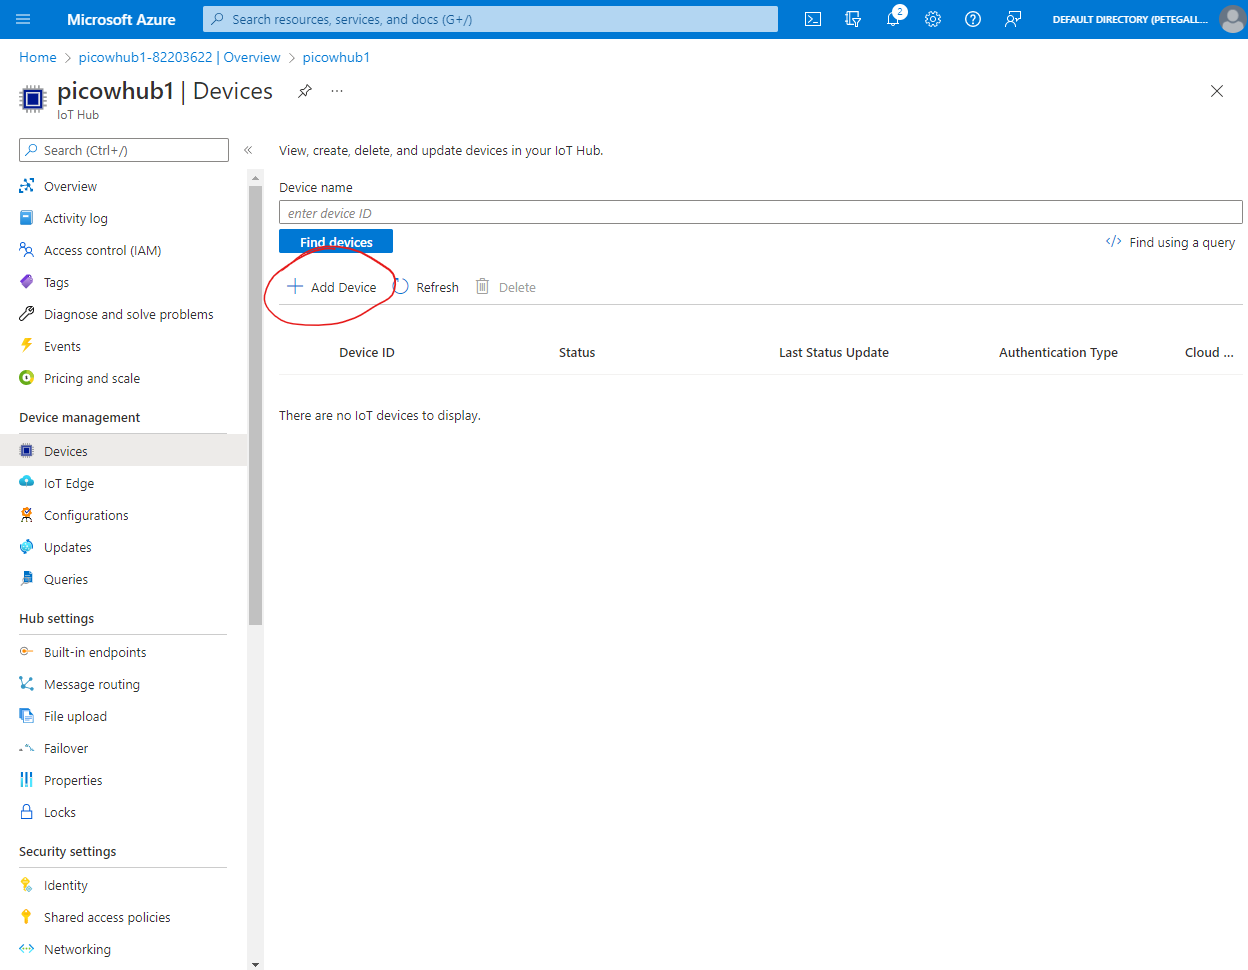
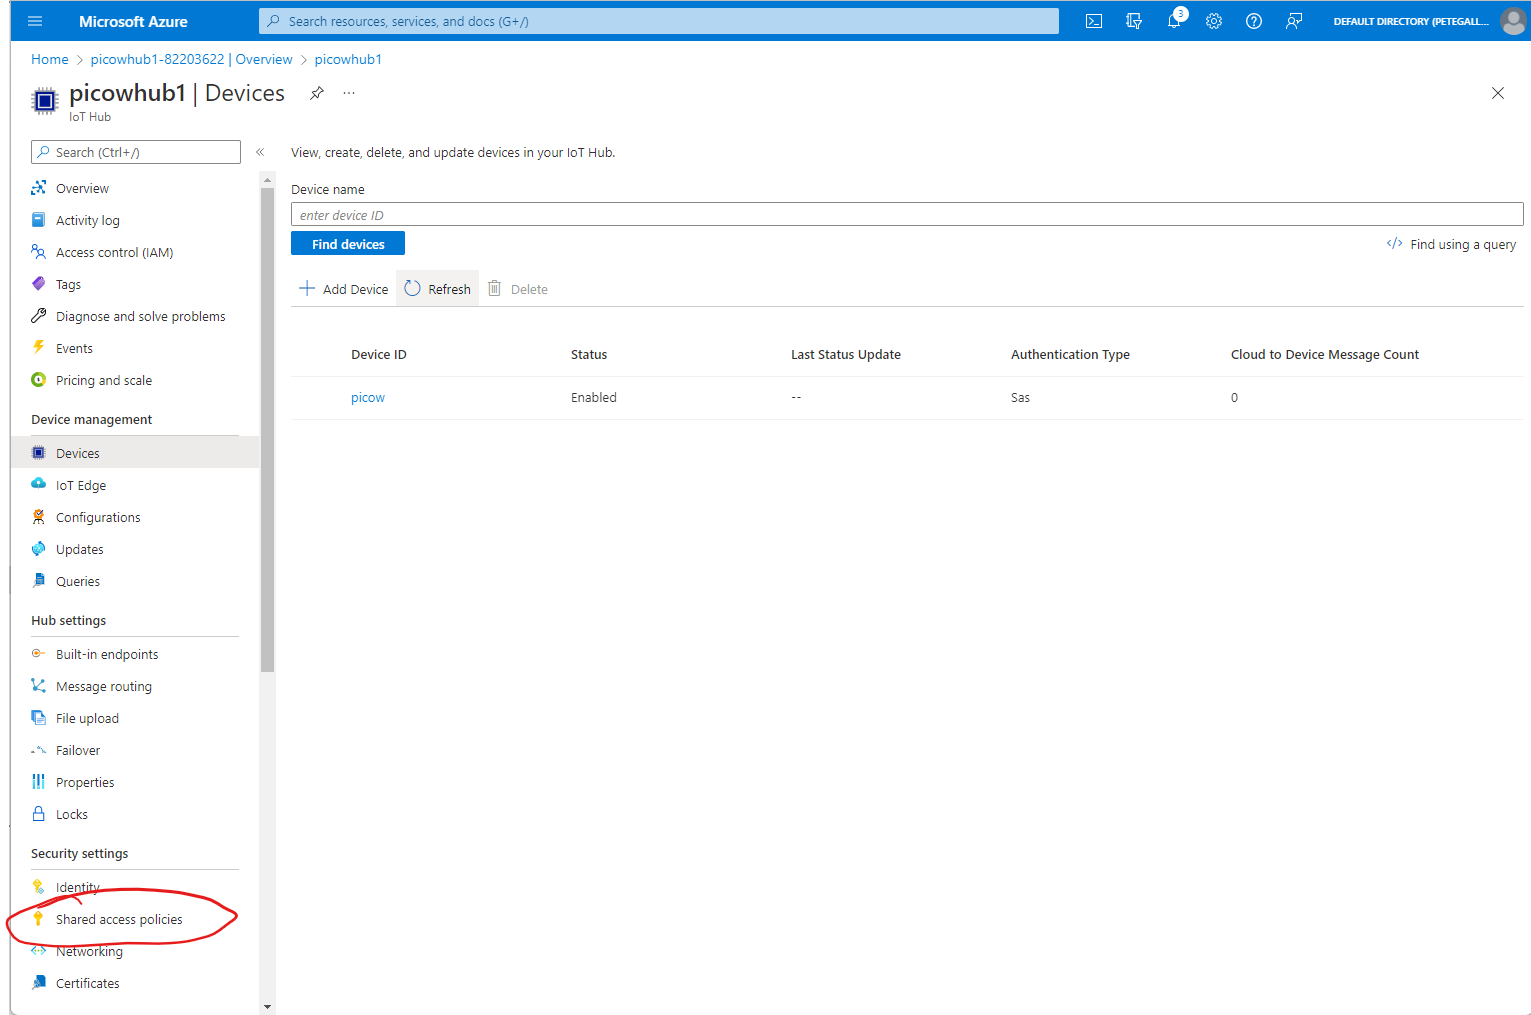
From the IoT Hub page, within the “Device Management” section in the menu on the left hand side, click the “Devices” menu item;
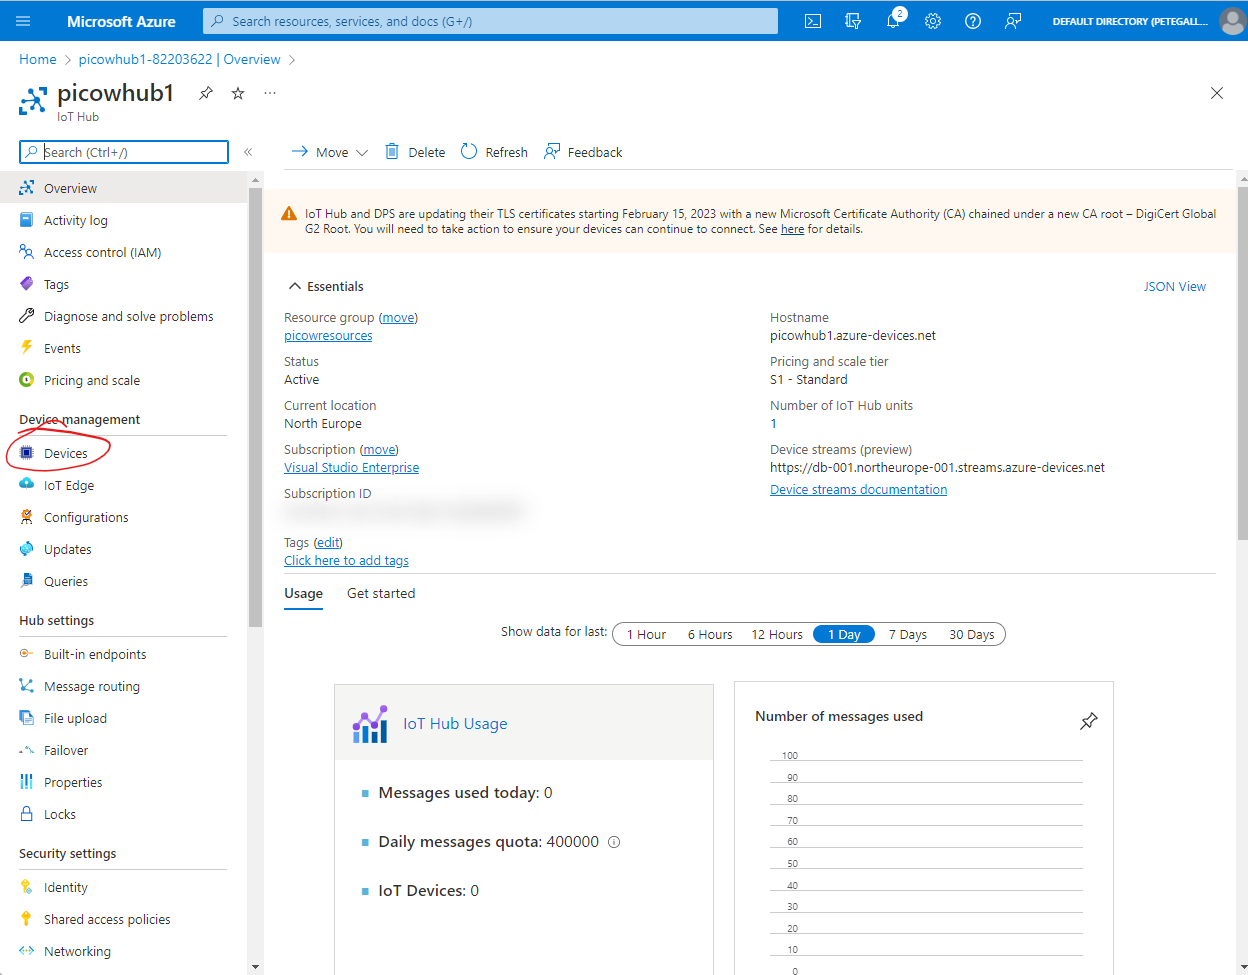
You’ll now be shown the IoT hub Device Registry, which is a list of all of the devices which have been registered with the IoT Hub.
We need to create a new device for our Pico W to connect to, so click the “+ Add Device” button;
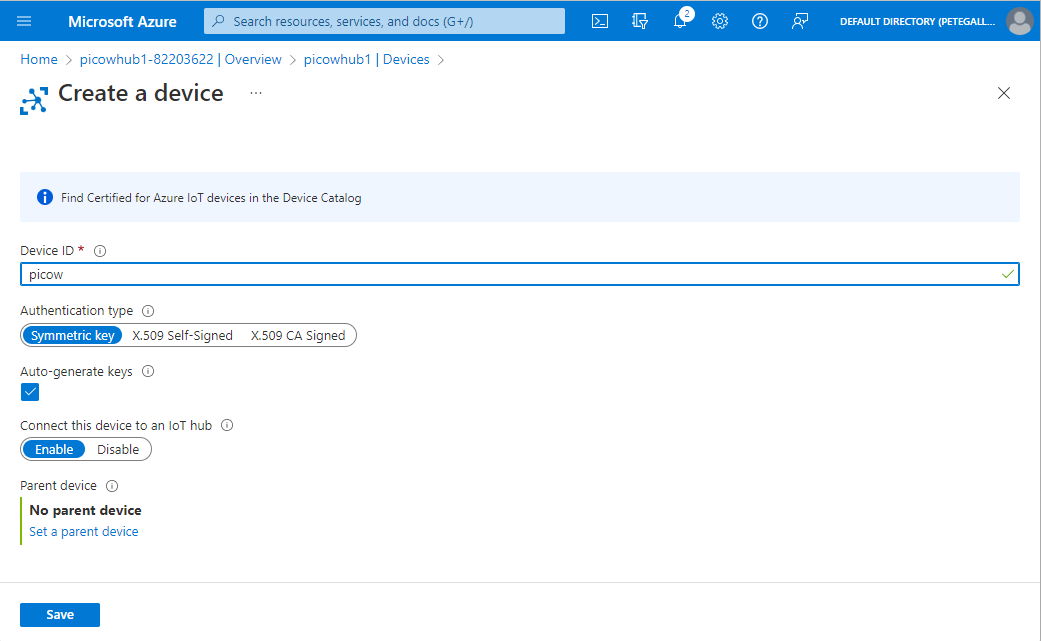
On the “Create a device” page, we can give our device a name, I chose “picow”.
Leave the “Authentication type” set to “Symmetric key”, the “Auto-generate keys” option should be checked, and the “Connect this device to an IoT Hub” set to “Enable”.
Go ahead and press the “Save” button to create your new device;
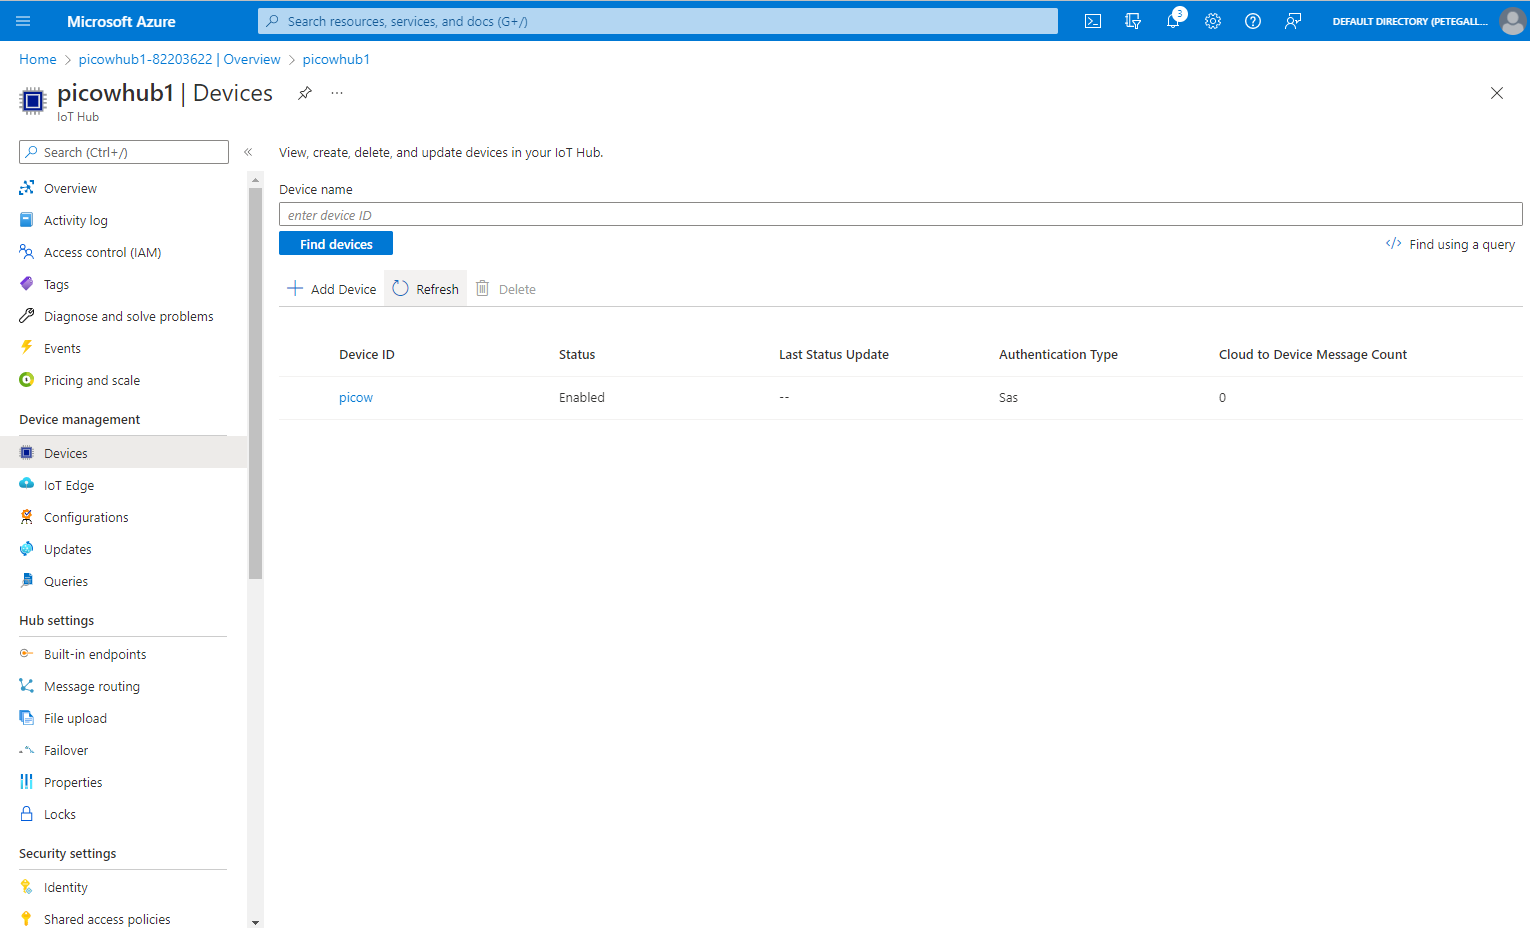
You will then be returned to the “Devices” page, where you should see your new device… You may need to press the “Refresh” button if it’s not showing yet.
Step 5: Connect the Azure IoT Explorer Tool
As part of our solution we’ll be sending telemetry messages from our Raspberry Pi Pico W to the IoT Hub.
In order to monitor those messages we’ll be using a tool called the Azure IoT Explorer.
This app will also let us create the relevant connection details to allow our Pico W to connect to the IoT Hub and authenticate.
Go ahead and download and install the latest version of the Azure IoT Hub Explorer from GitHub. At the time of writing the file to download is Azure.IoT.Explorer.Preview.0.14.10.msi
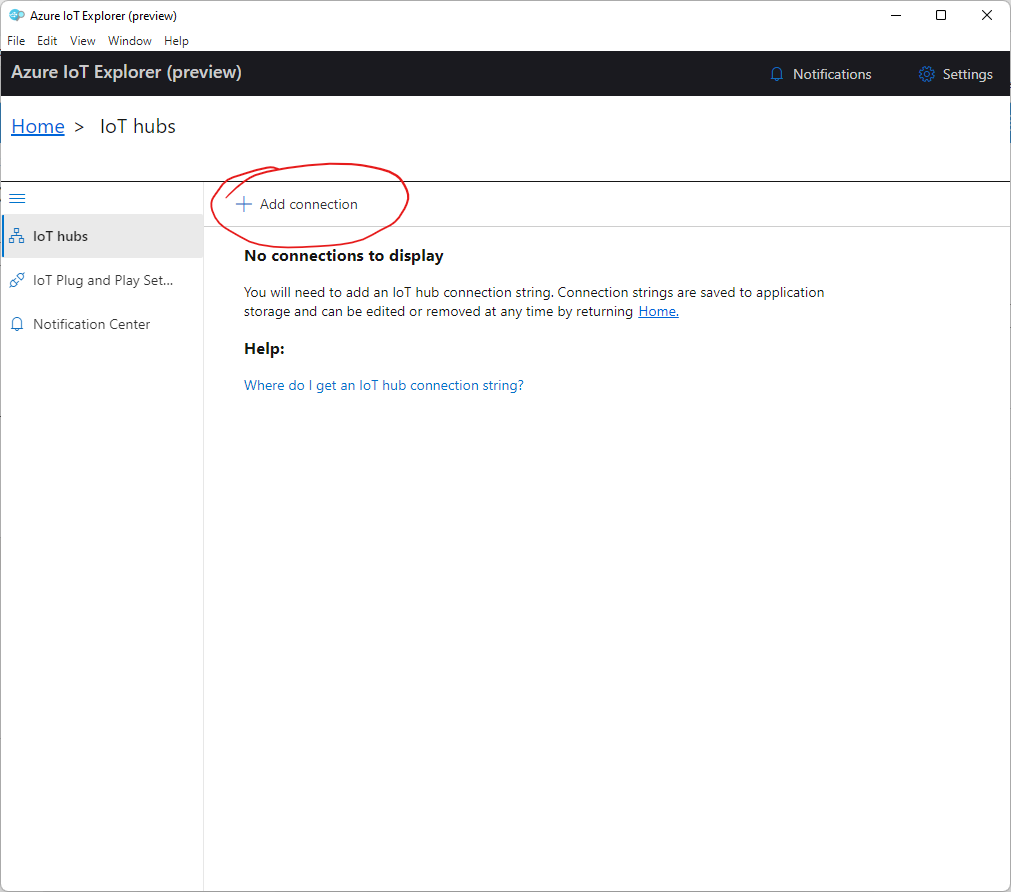
Once you’ve installed the Azure IoT Explorer App, start it up. Once it’s loaded, click the “+ Add connection” button to add a new connection to our IoT hub;
We now need a connection string from the IoT Hub in order to allow the Azure IoT Explorer to connect.
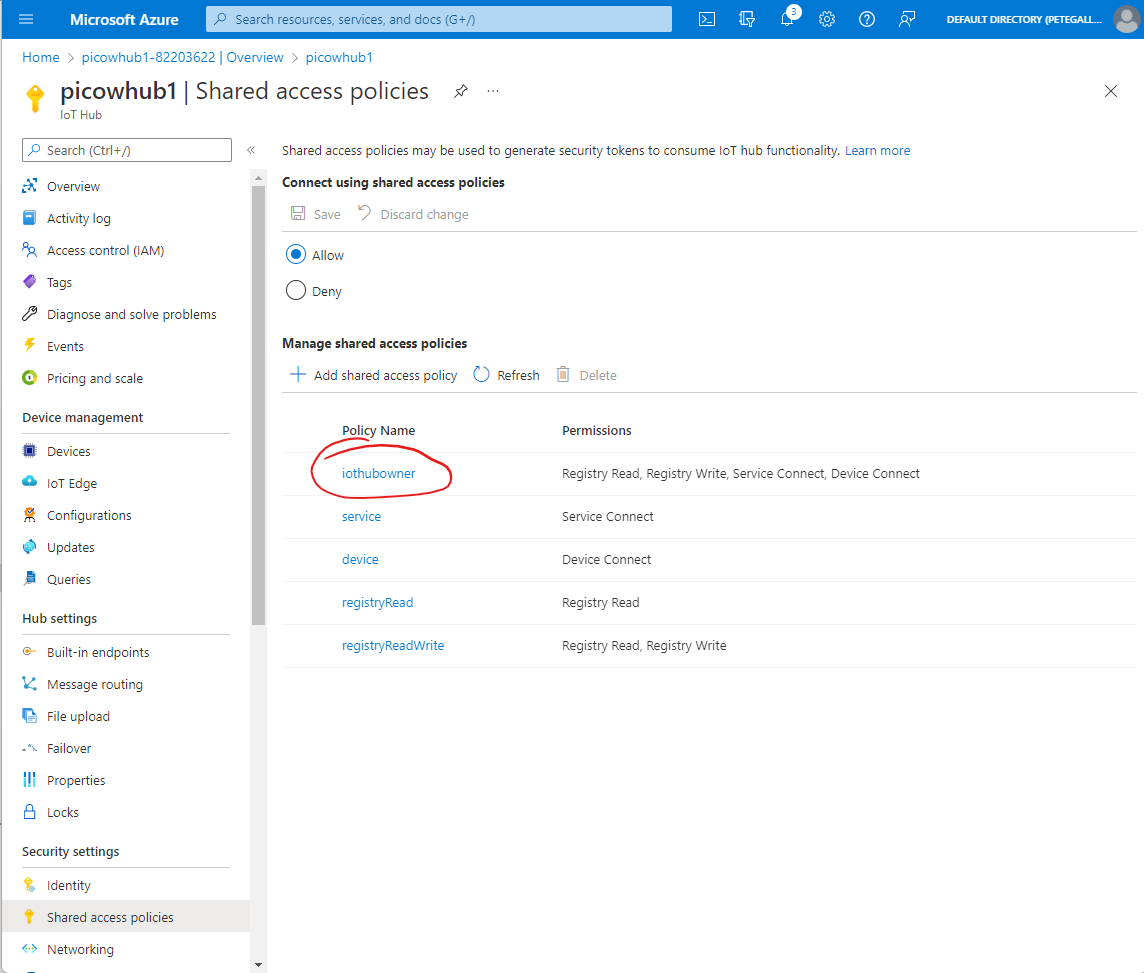
Switch back over to your IoT Hub and from the “Security Settings” menu section, click the “Shared access policies” item;
The “Shared access policies” page allows us to setup authentication for apps and services to connect to our IoT Hub to carry out functions.
We can control the level of access for each app and service by using a “Shared Access policy” with the relevant permissions for the operations we want to perform.
There are a set of built in policies which are created automatically for us when we create an IoT Hub.
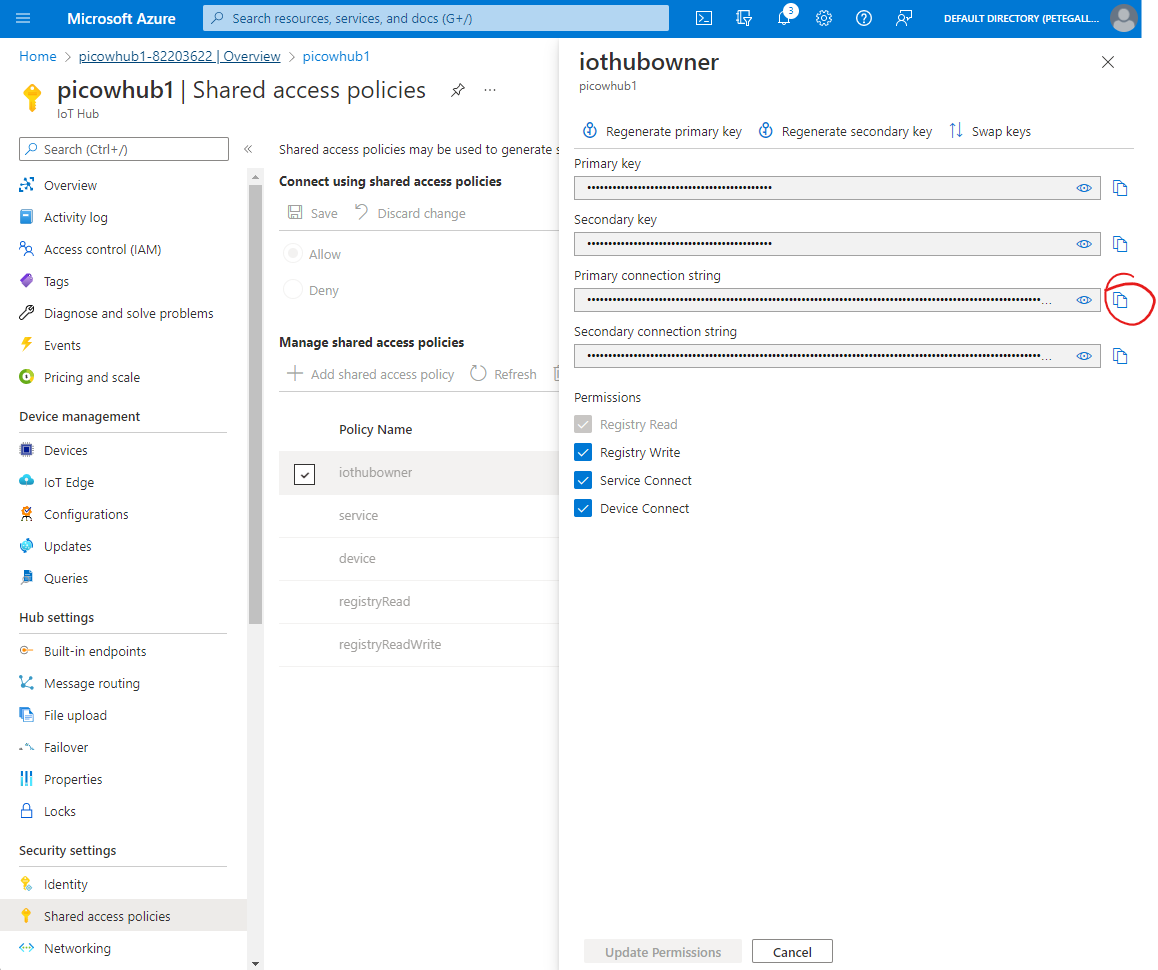
The policy we are going to use for the Azure IoT Explorer tool is the “iothubowner” policy which has full access to all operations. Click the “iothubowner” item in the list of policies;
A fly-out will appear with the various details for this policy.
We need the “Primary connection string”, so press the copy button next to this item;
Return to the Azure IoT Explorer tool and paste in the connection string and press the “Save” button;
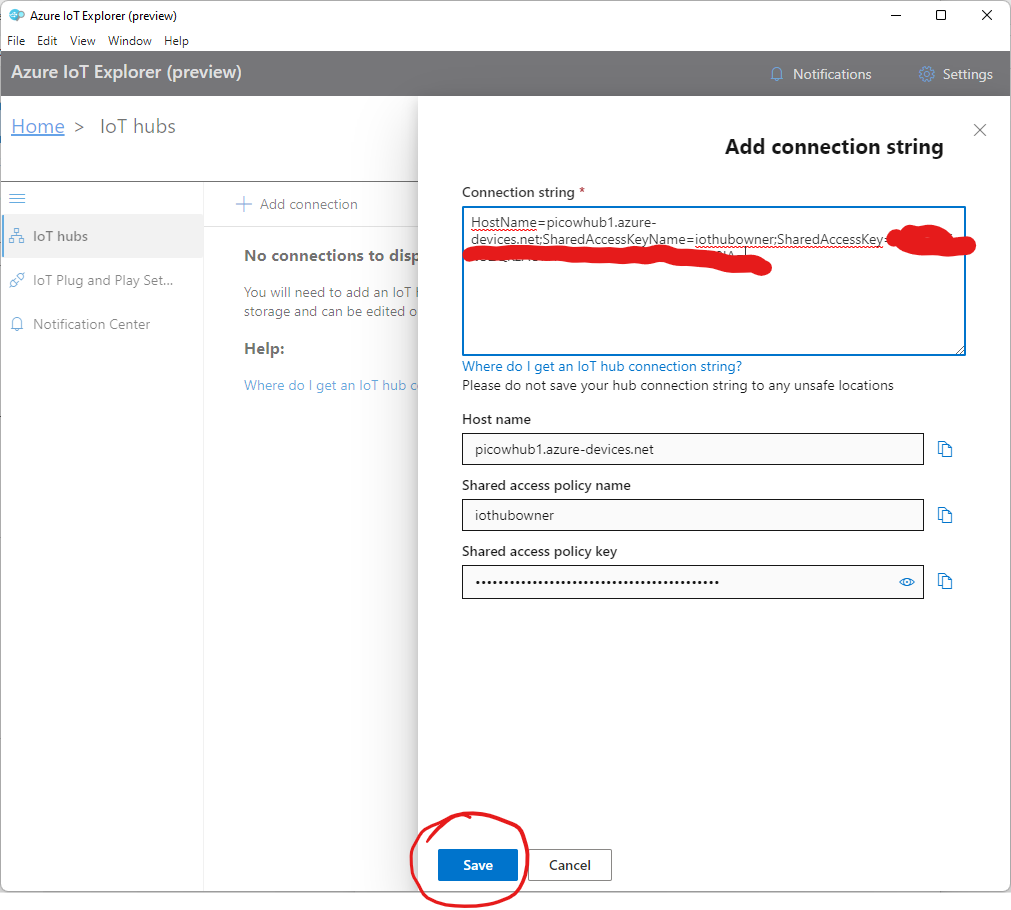
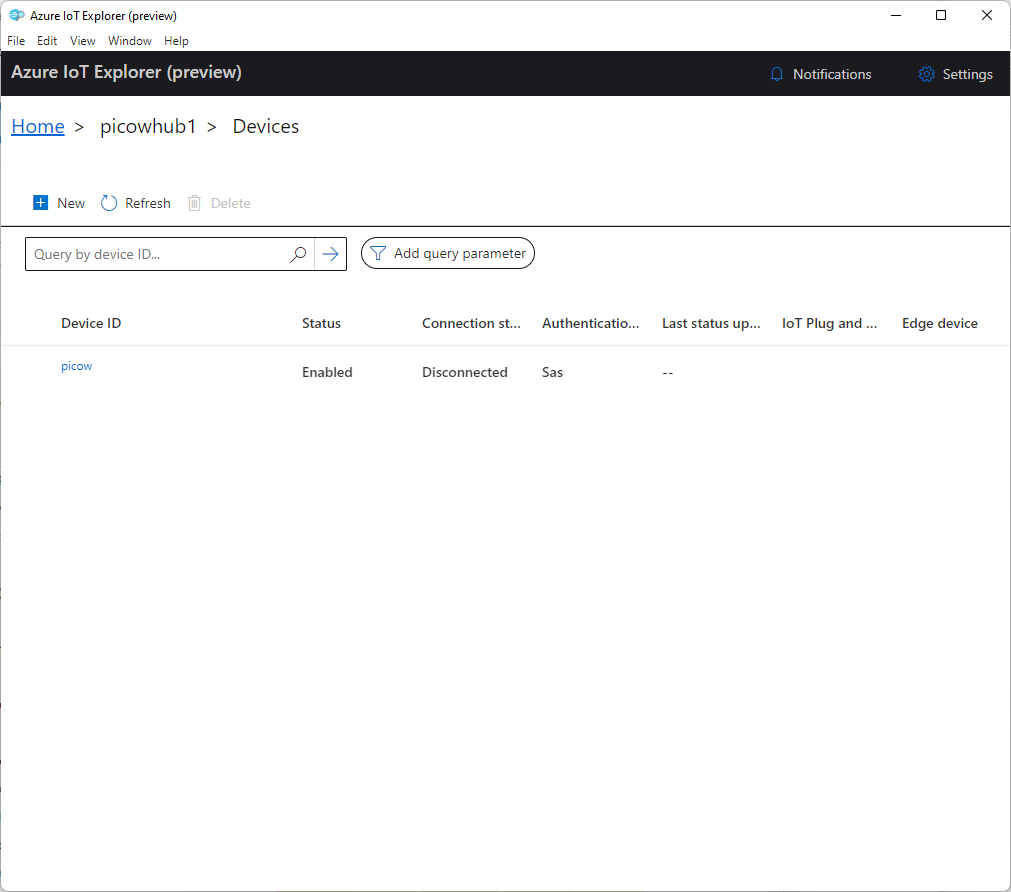
You’ll now be shown your list of devices with your “picow” device showing as the only device;
Step 6: Install the umqtt.simple python package
As i mentioned earlier, to allow us to communicate between our Pico W and the IoT Hub, we’ll be using MQTT.
To enable this, we’re going to be using a MicroPython Module called umqtt.simple.
The easiest way for us to get this Module onto our Pico is to download it directly.
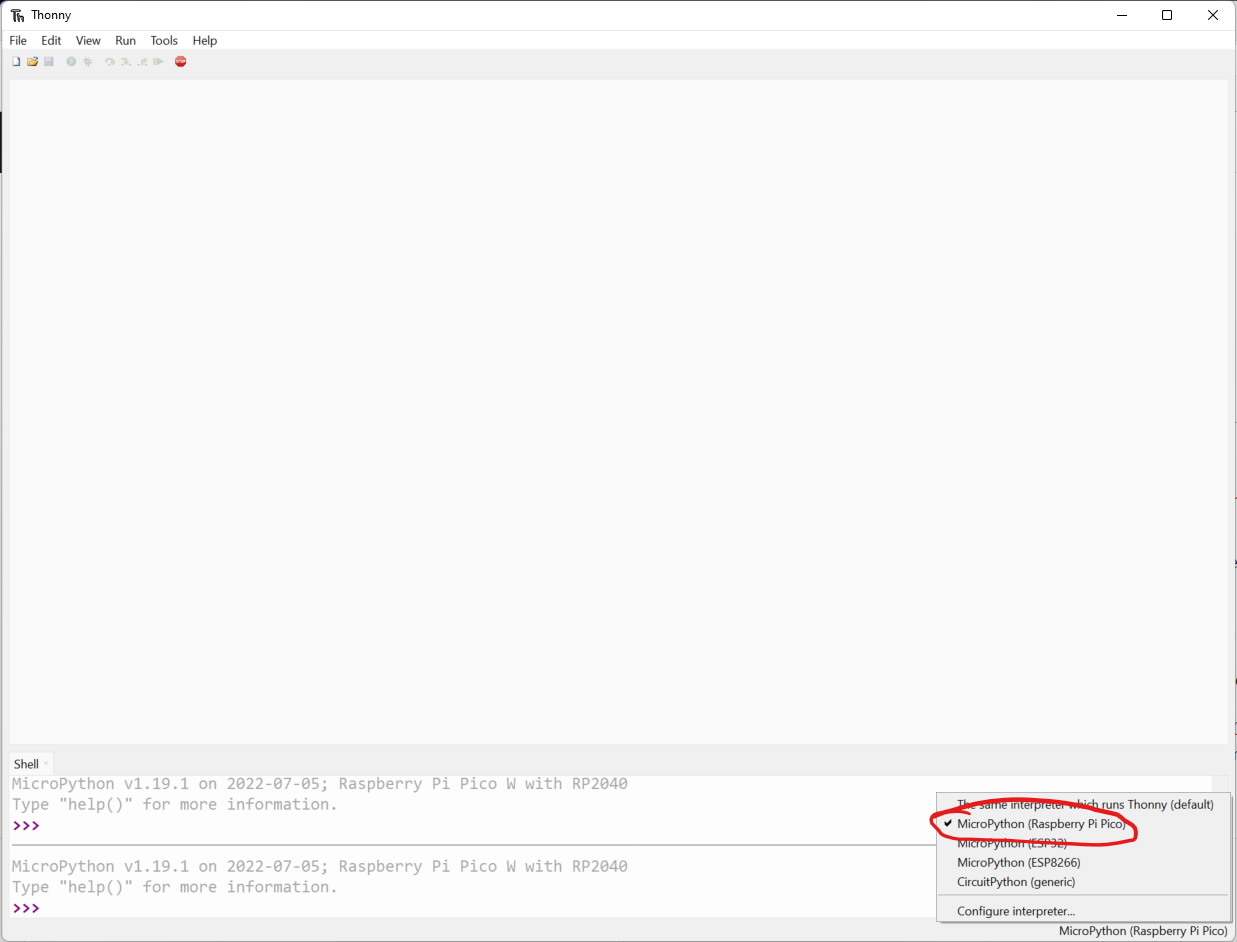
With your Pico W connected to your PC, open up the Thonny IDE and make sure that you’ve selected your Pico W from the Targets in the bottom right corner. It should read “MicroPython (Raspberry Pi Pico)“;
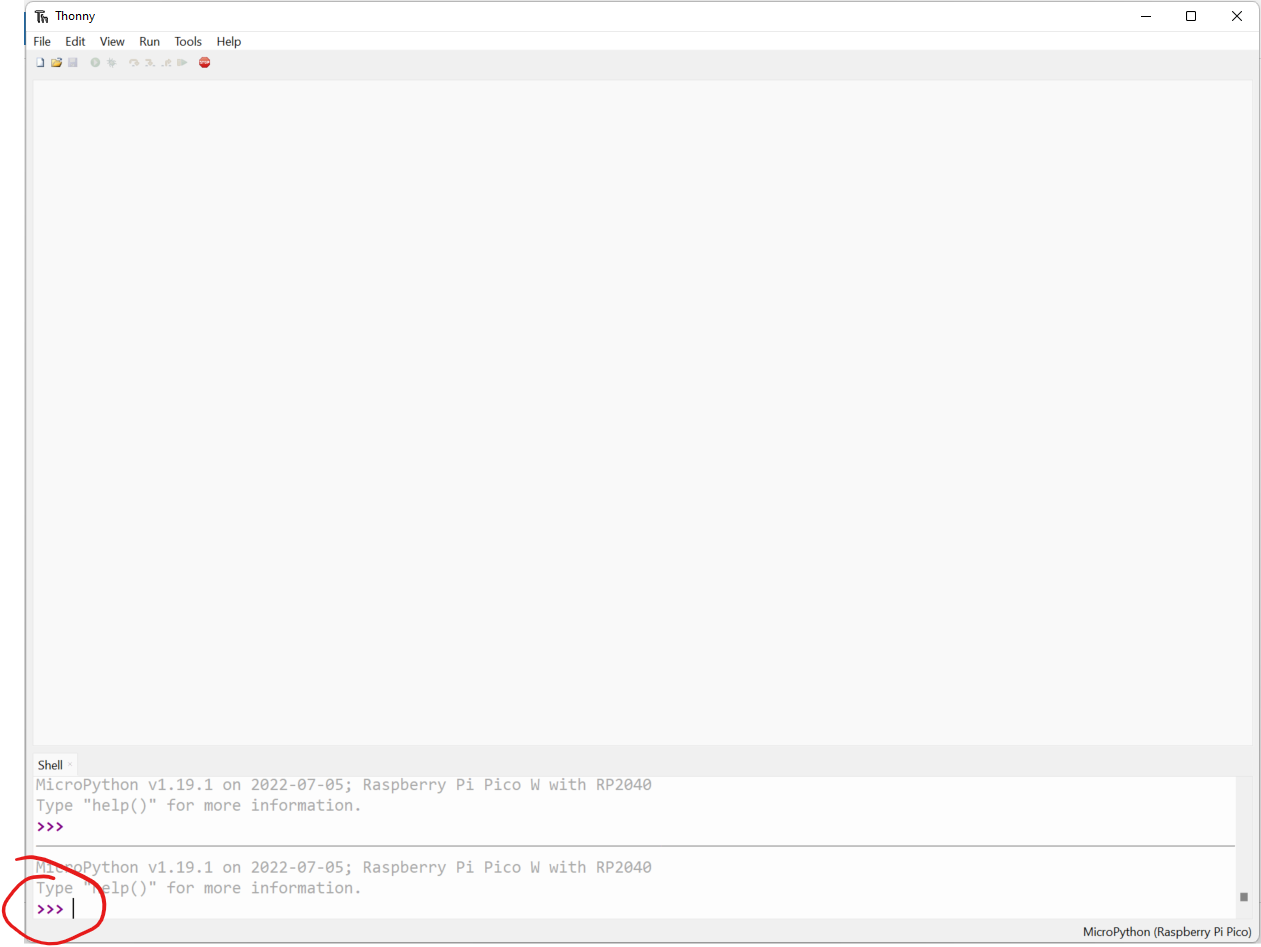
Next we’re going to run some commands in the “Shell” area at the bottom of the screen to connect our Pico W to our local Wi-Fi.
Place your cursor next to the last set of “>>>” brackets in the Shell;
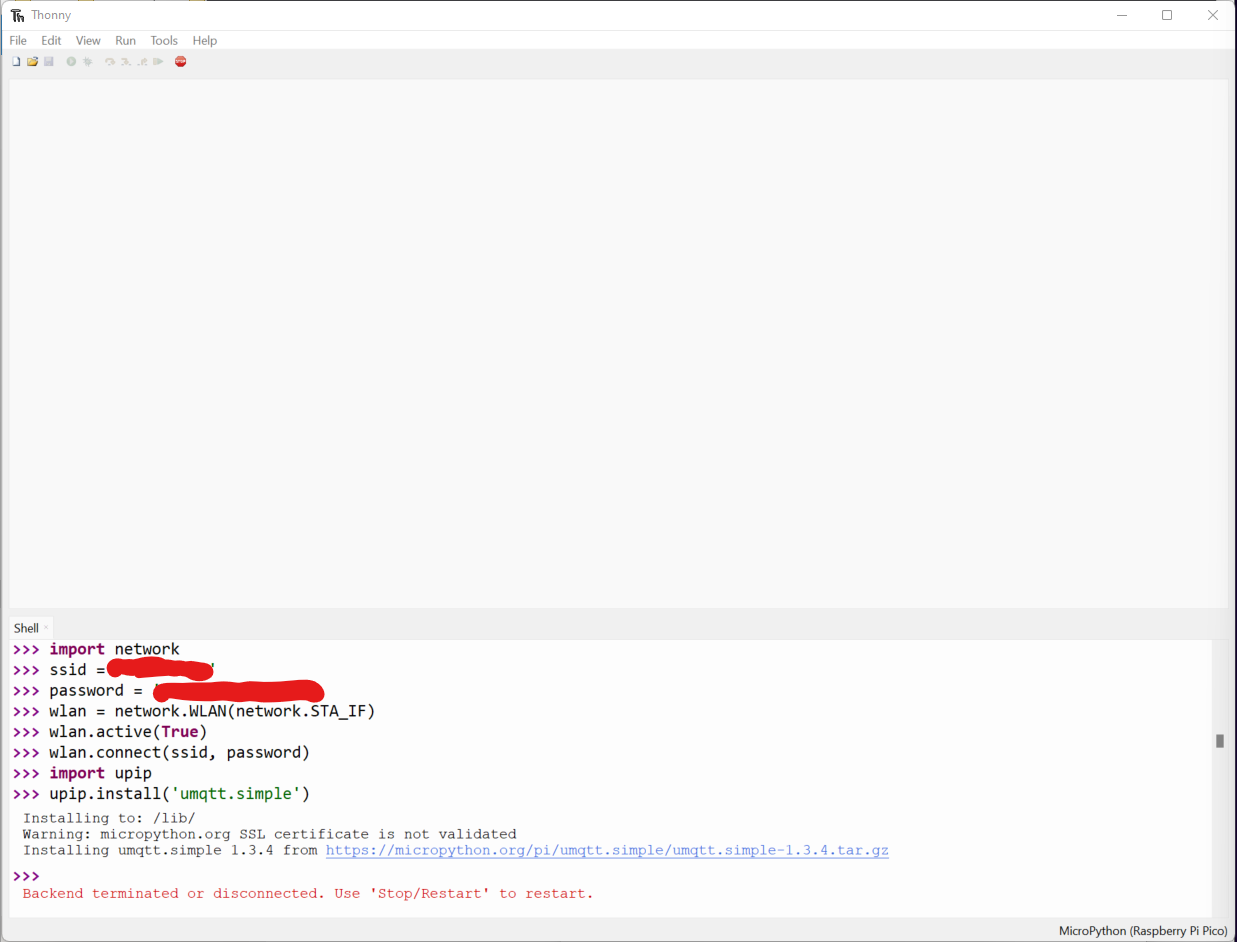
First we need to import the Network Module, so paste in the following and hit enter;
import networkNext we can define the SSID of our Wi-Fi network. Replace SSID_NAME with the name of your Wi-Fi;
ssid = 'SSID_NAME'We can now define the password for our Wi-Fi. Replace WIFI_PASSWORD with your Wi-Fi password;
password = 'WIFI_PASSWORD'Next we can create our Wi-Fi connection;
wlan = network.WLAN(network.STA_IF)We can now activate the Wi-Fi with;
wlan.active(True)Finally we can connect to our Wi-Fi with;
wlan.connect(ssid, password)Now that we’ve connected to our Wi-Fi, we can install the umqtt.simple MicroPython Module.
First we need to import upip which we’ll use to install the Module;
import upipFinally, we can install the umqtt.simple Module with;
upip.install('umqtt.simple')If everything has gone to plan, you should see a message saying “Installing to: /lib/“, followed by an innocious warning about the SSL certificate, and finally that it’s “Installing umqtt.simple“;
You may now need to hit the “Stop/Restart” button in the toolbar to reconnect to the Pico W.
Step 7: The Azure IoT Hub MQTT Code
Create a new file and paste in the following code;
import network
import time
import machine

from umqtt.simple import MQTTClient
from machine import Pin

ssid = 'SSID_NAME'
password = 'WIFI_PASSWORD'

wlan = network.WLAN(network.STA_IF)
wlan.active(True)
wlan.connect(ssid, password)

# Wait for connect or fail
max_wait = 10
while max_wait > 0:
    if wlan.status() < 0 or wlan.status() >= 3:
        break
    max_wait -= 1
    print('waiting for connection...')
    time.sleep(1)

# Handle connection error
if wlan.status() != 3:
    raise RuntimeError('network connection failed')
else:
    print('connected')
    status = wlan.ifconfig()
    print( 'ip = ' + status[0] )

led = Pin(15, Pin.OUT)
button = Pin(14, Pin.IN, Pin.PULL_DOWN)

hostname = 'YOUR_IOT_HUB_NAME.azure-devices.net'
clientid = 'picow'
user_name = 'YOUR_IOT_HUB_NAME.azure-devices.net/picow/?api-version=2021-04-12'
passw = 'YOUR_SAS_TOKEN'
topic_pub = b'devices/picow/messages/events/'
topic_msg = b'{"buttonpressed":"1"}'
port_no = 0
subscribe_topic = "devices/picow/messages/devicebound/#"

def mqtt_connect():

    certificate_path = "baltimore.cer"
    print('Loading Blatimore Certificate')
    with open(certificate_path, 'r') as f:
        cert = f.read()
    print('Obtained Baltimore Certificate')
    sslparams = {'cert':cert}

    client = MQTTClient(client_id=clientid, server=hostname, port=port_no, user=user_name, password=passw, keepalive=3600, ssl=True, ssl_params=sslparams)
    client.connect()
    print('Connected to IoT Hub MQTT Broker')
    return client

def reconnect():
    print('Failed to connect to the MQTT Broker. Reconnecting...')
    time.sleep(5)
    machine.reset()

def callback_handler(topic, message_receive):
    print("Received message")
    print(message_receive)
    if message_receive.strip() == b'led_on':
        led.value(1)
    else:
        led.value(0)

try:
    client = mqtt_connect()
    client.set_callback(callback_handler)
    client.subscribe(topic=subscribe_topic)
except OSError as e:
    reconnect()

while True:

    client.check_msg()

    if button.value():
        client.publish(topic_pub, topic_msg)
        time.sleep(0.5)
    else:
        pass
Explaining the Code
Module Imports
At the start of the code, we import the various modules needed to support our code;
import network
import time
import machine

from umqtt.simple import MQTTClient
from machine import Pin
We make use of the “network” for our Wi-Fi connection, “time” for any delays we need and machine to allow us to interact with the Pico W GPIO.
We also import “MQTTClient” from the “umqtt.simple” Module.
Wi-FI Setup and Connection
Next up we setup and connect to Wi-Fi;
ssid = 'SSID_NAME'
password = 'WIFI_PASSWORD'

wlan = network.WLAN(network.STA_IF)
wlan.active(True)
wlan.connect(ssid, password)

# Wait for connect or fail
max_wait = 10
while max_wait > 0:
    if wlan.status() < 0 or wlan.status() >= 3:
        break
    max_wait -= 1
    print('waiting for connection...')
    time.sleep(1)

# Handle connection error
if wlan.status() != 3:
    raise RuntimeError('network connection failed')
else:
    print('connected')
    status = wlan.ifconfig()
    print( 'ip = ' + status[0] )
There’s a couple of placeholder variables which will need replacing here first, which you’ll do in the next section.
We then setup the Wi-Fi access and connect, before waiting for the connection to complete.
GPIO Setup
Next we setup our GPIO inputs and Outputs;
led = Pin(15, Pin.OUT)
button = Pin(14, Pin.IN, Pin.PULL_DOWN)
We set Pin 15 to be an output for our LED and Pin 14 to be a pulled down input for our button.
MQTT Variables
We then create some variables to house our various MQTT configuration;
hostname = 'YOUR_IOT_HUB_NAME.azure-devices.net'
clientid = 'picow'
user_name = 'YOUR_IOT_HUB_NAME.azure-devices.net/picow/?api-version=2021-04-12'
passw = 'YOUR_SAS_TOKEN'
topic_pub = b'devices/picow/messages/events/'
topic_msg = b'{"buttonpressed":"1"}'
port_no = 0
subscribe_topic = "devices/picow/messages/devicebound/#"
Again, there are several placeholders here which we’ll fill in in the next section.
The MQTT variables we use here are;
| Variable | Usage |
|---|---|
| hostname | The public endpoint for our IoT hub |
| clientid | The Device ID for the IoT Hub Device |
| user_name | Part of the authentication for connection to the IoT Hub |
| passw | A generated SAS token for authentication to the IoT Hub |
| topic_pub | The MQTT topic under wihch to publish our telemetry messages |
| topic_msg | The MQTT Message we’ll be sending to the IoT Hub |
| port_no | The port number we’ll be using to communicate over MQTT to the IoT Hub. 0 will use the default MQTT port, in our case 8883 as we’re using SSL |
| subscribe_topic | The MQTT Topic which allows us to receive IoT Hub to Device (Cloud-to-device) messages |
MQTT Connect Function
The next thing we do is define a routine to connect to the IoT Hub MQTT Broker;
def mqtt_connect():

    certificate_path = "baltimore.cer"
    print('Loading Blatimore Certificate')
    with open(certificate_path, 'r') as f:
        cert = f.read()
    print('Obtained Baltimore Certificate')
    sslparams = {'cert':cert}

    client = MQTTClient(client_id=clientid, server=hostname, port=port_no, user=user_name, password=passw, keepalive=3600, ssl=True, ssl_params=sslparams)
    client.connect()
    print('Connected to IoT Hub MQTT Broker')
    return client
We start by loading the Baltimore SSL certificate from the Pico W storage, we’ll add that certificate to our Pico W in Step 9.
This certificate allows us to connect to the IoT Hub over SSL, encrypting our telemetry traffic.
We then define our MQTT client, passing in the Client ID, Server, Port number, User Name, Password, Keep Alive Time, SSL Switch and SSL Parameters.
Finally, we connect to the IoT Hub MQTT broker and return our MQTT client for use elsewhere in the code.
MQTT Reconnect Procedure
We then define our MQTT Reconnect Routine;
def reconnect():
    print('Failed to connect to the MQTT Broker. Reconnecting...')
    time.sleep(5)
    machine.reset()
If we either can’t connect, or drop the MQTT connection to the IoT Hub, we have a small delay and then reset our Pico W. This has the side effect of dropping the connection to Thonny, so you’ll need to hit the “Stop/Reset” button and run the code again with F5.
MQTT IoT Hub to Pico W (Cloud-to-Device) Message Handler Procedure
When the IoT Hub sends messages to the Device, we can handle that event;
def callback_handler(topic, message_receive):
    print("Received message")
    print(message_receive)
    if message_receive.strip() == b'led_on':
        led.value(1)
    else:
        led.value(0)
When the IoT Hub sends messages to the Device this is known as “Cloud-to-Device” messaging and we can handle those messages.
We’ll hook this handler up in the next block of code.
We start by printing out that we’ve received a message from the IoT hub, and then print it’s contents.
Next, we check if that message is telling us to turn the LED on, if so we do this.
We need to strip out any whitespace from our message with the .strip() string function.
We also make sure that the “led_on” string we’re using to compare against is stored as a Byte Literal to match the Message from the IoT Hub.
Connect to IoT Hub MQTT Broker and Subscribe to Cloud-to-Device Messages
With everything configured, we can then go ahead and connect to the IoT Hub MQTT Broker;
try:
    client = mqtt_connect()
    client.set_callback(callback_handler)
    client.subscribe(topic=subscribe_topic)
except OSError as e:
    reconnect()
We start by calling our “mqtt_connect” function to connect to the IoT Hub MQTT Broker.
Next we set the procedure we’ll call into when we receive messages from our IoT Hub.
We then subscribe to the topic over which the IoT hub will send it’s messages to the Pico W.
Finally, if the connection fails. we attempt to reconnect by calling our “reconnect” procedure
The Main Program Loop
The final part of our code is the main program loop;
while True:

    client.check_msg()

    if button.value():
        client.publish(topic_pub, topic_msg)
        time.sleep(0.5)
    else:
        pass
In the last part of our code, we setup an infinte loop with “while True”.
We then check for any messages from our IoT hub using the “client.check_msg()” procedure call.
We could also use a call which simply waits for a message here, but this would block our code, and we want to check for the button press.
The last block of code check for the value of our button.
If the button is pressed, we publish our MQTT message using the Topic we defined in the MQTT variables above along with a simple message with a property indicating that our button is pressed.
Finally, we delay for half a second before continuing on.
The pass keyword in the else statement is a no-op and can be ignored.
Step 8: Replacing the Placeholders
You’ll need to change the various placeholders in this code. The first thing you need to change is the “ssid” and “password” variables to match your Wi-Fi.
You’ll then need to change the “hostname” to match the name of your IoT Hub, in my case this was “picowhub1”, so my hostname variable reads ‘picowhub1.azure-devices.net‘.
The next thing we’re going to need is the SAS Token which will allow our Pico W to authenticate with the IoT Hub.
To generate this token, we’re going to use the Azure IoT Explorer tool we downloaded and installed in Step 5.
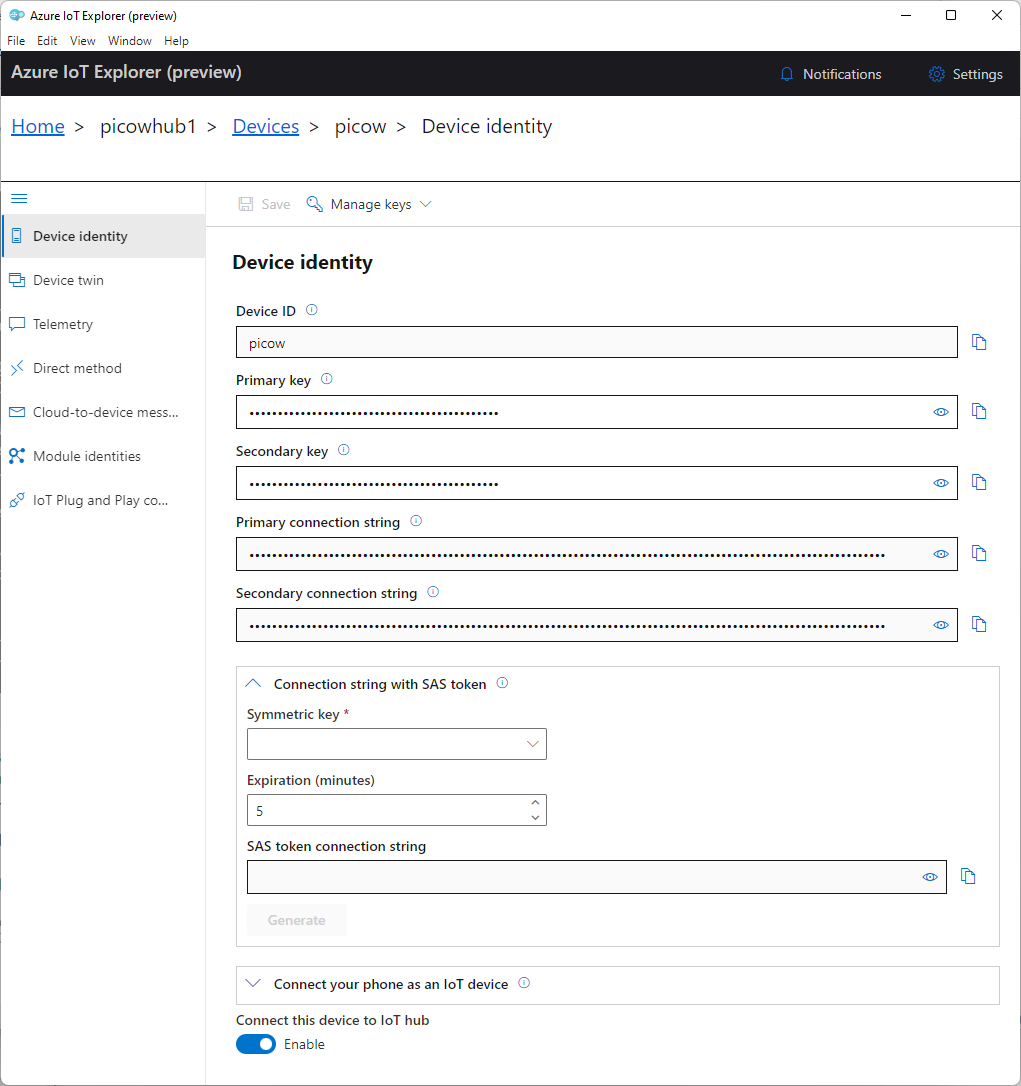
If we click on the “picow” device in the device list, we’ll be taken to the “Device identity” page for our device. This page will show the Device ID as well as the Primary and Secondary Keys and Connections Strings.
Below these we’ll see a pop-out section called “Connecting string with SAS token“. Expanding this section will allow us to specify and create our SAS token;
From the “Symmetric key” drop down, choose “Primary key”, in the “Expiration (minutes) box, replace the default 5 with 60, and hit the blue generate button;
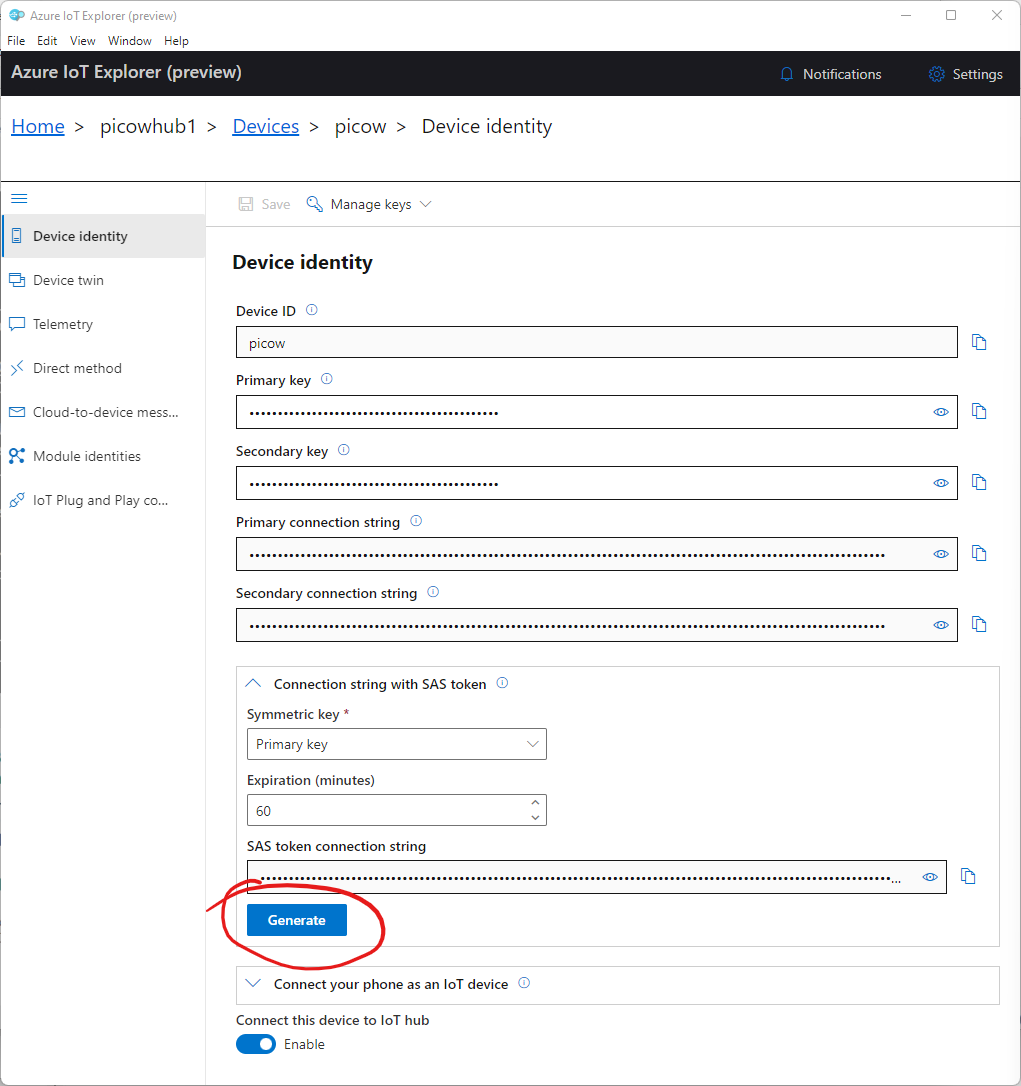
We can now hit the copy button to the right of the “SAS token connection string” box to copy our SAS Token.
My SAS Token looks like the following (I’ve redacted the token itself);
HostName=picowhub1.azure-devices.net;DeviceId=picow;SharedAccessSignature=SharedAccessSignature sr=picowhub1.azure-devices.net%2Fdevices%2Fpicow&sig=<redacted>%3D&se=1659481856We can now replace the “YOUR_SAS_TOKEN” place holder for the “passw” variable with our SAS Token. However, we need to remove some of the pre-amble in this connection string. So remove the “HostName” and “DeviceId” items and also remove “SharedAccessSignature=” from the line.
Your SAS token variable definition should now look like this;
passw = 'SharedAccessSignature sr=picowhub1.azure-devices.net%2Fdevices%2Fpicow&sig=<redacted>%3D&se=1659481856'Note, there’s supposed to be a space between “SharedAccessSignature” and “sr=“
Save the file, choosing to save it to the Raspberry Pi, naming it “iothub1.py”.
Step 9: Adding the Baltimore Certificate
In order for our Pico W to be trusted by the Azure IoT Hub, we’ll be using the Baltimore SSL certificate to encrypt our MQTT connection.
The eagle eyed among you will have spotted that we’re referencing this certificate in the code already, so we now need to add this to our Pico W.
Create a new file and paste in the following;
-----BEGIN CERTIFICATE-----
MIIDdzCCAl+gAwIBAgIEAgAAuTANBgkqhkiG9w0BAQUFADBaMQswCQYDVQQGEwJJ
RTESMBAGA1UEChMJQmFsdGltb3JlMRMwEQYDVQQLEwpDeWJlclRydXN0MSIwIAYD
VQQDExlCYWx0aW1vcmUgQ3liZXJUcnVzdCBSb290MB4XDTAwMDUxMjE4NDYwMFoX
DTI1MDUxMjIzNTkwMFowWjELMAkGA1UEBhMCSUUxEjAQBgNVBAoTCUJhbHRpbW9y
ZTETMBEGA1UECxMKQ3liZXJUcnVzdDEiMCAGA1UEAxMZQmFsdGltb3JlIEN5YmVy
VHJ1c3QgUm9vdDCCASIwDQYJKoZIhvcNAQEBBQADggEPADCCAQoCggEBAKMEuyKr
mD1X6CZymrV51Cni4eiVgLGw41uOKymaZN+hXe2wCQVt2yguzmKiYv60iNoS6zjr
IZ3AQSsBUnuId9Mcj8e6uYi1agnnc+gRQKfRzMpijS3ljwumUNKoUMMo6vWrJYeK
mpYcqWe4PwzV9/lSEy/CG9VwcPCPwBLKBsua4dnKM3p31vjsufFoREJIE9LAwqSu
XmD+tqYF/LTdB1kC1FkYmGP1pWPgkAx9XbIGevOF6uvUA65ehD5f/xXtabz5OTZy
dc93Uk3zyZAsuT3lySNTPx8kmCFcB5kpvcY67Oduhjprl3RjM71oGDHweI12v/ye
jl0qhqdNkNwnGjkCAwEAAaNFMEMwHQYDVR0OBBYEFOWdWTCCR1jMrPoIVDaGezq1
BE3wMBIGA1UdEwEB/wQIMAYBAf8CAQMwDgYDVR0PAQH/BAQDAgEGMA0GCSqGSIb3
DQEBBQUAA4IBAQCFDF2O5G9RaEIFoN27TyclhAO992T9Ldcw46QQF+vaKSm2eT92
9hkTI7gQCvlYpNRhcL0EYWoSihfVCr3FvDB81ukMJY2GQE/szKN+OMY3EU/t3Wgx
jkzSswF07r51XgdIGn9w/xZchMB5hbgF/X++ZRGjD8ACtPhSNzkE1akxehi/oCr0
Epn3o0WC4zxe9Z2etciefC7IpJ5OCBRLbf1wbWsaY71k5h+3zvDyny67G7fyUIhz
ksLi4xaNmjICq44Y3ekQEe5+NauQrz4wlHrQMz2nZQ/1/I6eYs9HRCwBXbsdtTLS
R9I4LtD+gdwyah617jzV/OeBHRnDJELqYzmp
-----END CERTIFICATE-----
Save the file to the Raspberry Pi as “baltimore.cer“, making sure to select the Raspberry Pi Pico as the target.
Step 10: Sending Telemetry to the IoT Hub
With everything now configured we can run up our code and make sure that our Pico W connects to the Wi-Fi and then on to our IoT Hub.
Hit the green “Run current script” button in the toolbar or hit F5 to run the code.
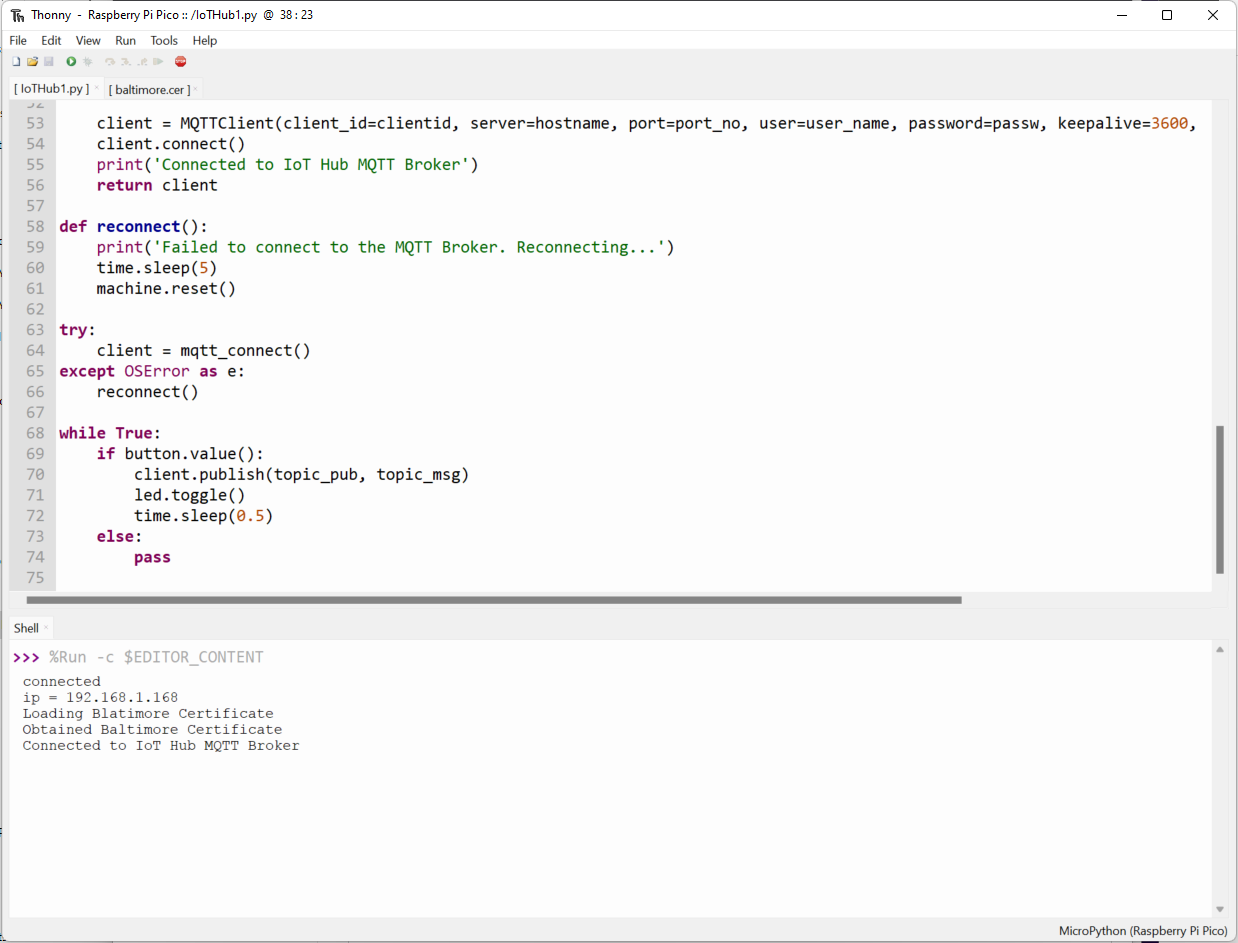
You should see the Pico W connect to the Wi-Fi and print out the IP Address it has been assigned.
It should then load the Baltimore Certificate, followed by connecting to the IoT Hub;
Note: If you receive an error showing “MQTTException: 5”, this is likely that your SAS token has expired. Generate a new token, paste it over the existing one, remove the extra bits from the start, save the code and run the whole lot again.
If that still doesn’t work, check that you’ve configured all the variables correctly and not miss-typed the IoT Hub name for instance.
We now need to monitor the telemetry messages we’ll be sending using the Azure IoT Explorer, so switch back to that.
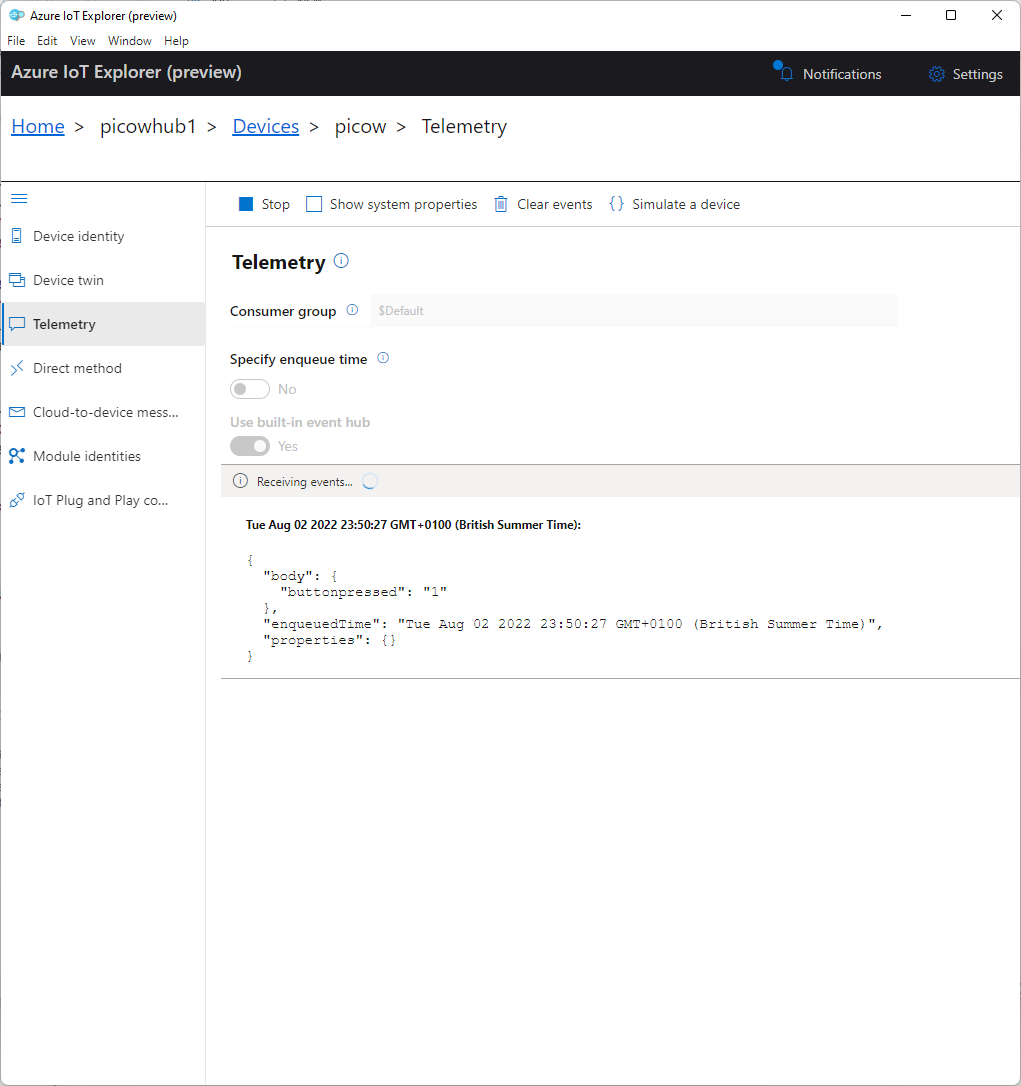
Click the “Telemetry” menu item on the left hand side;
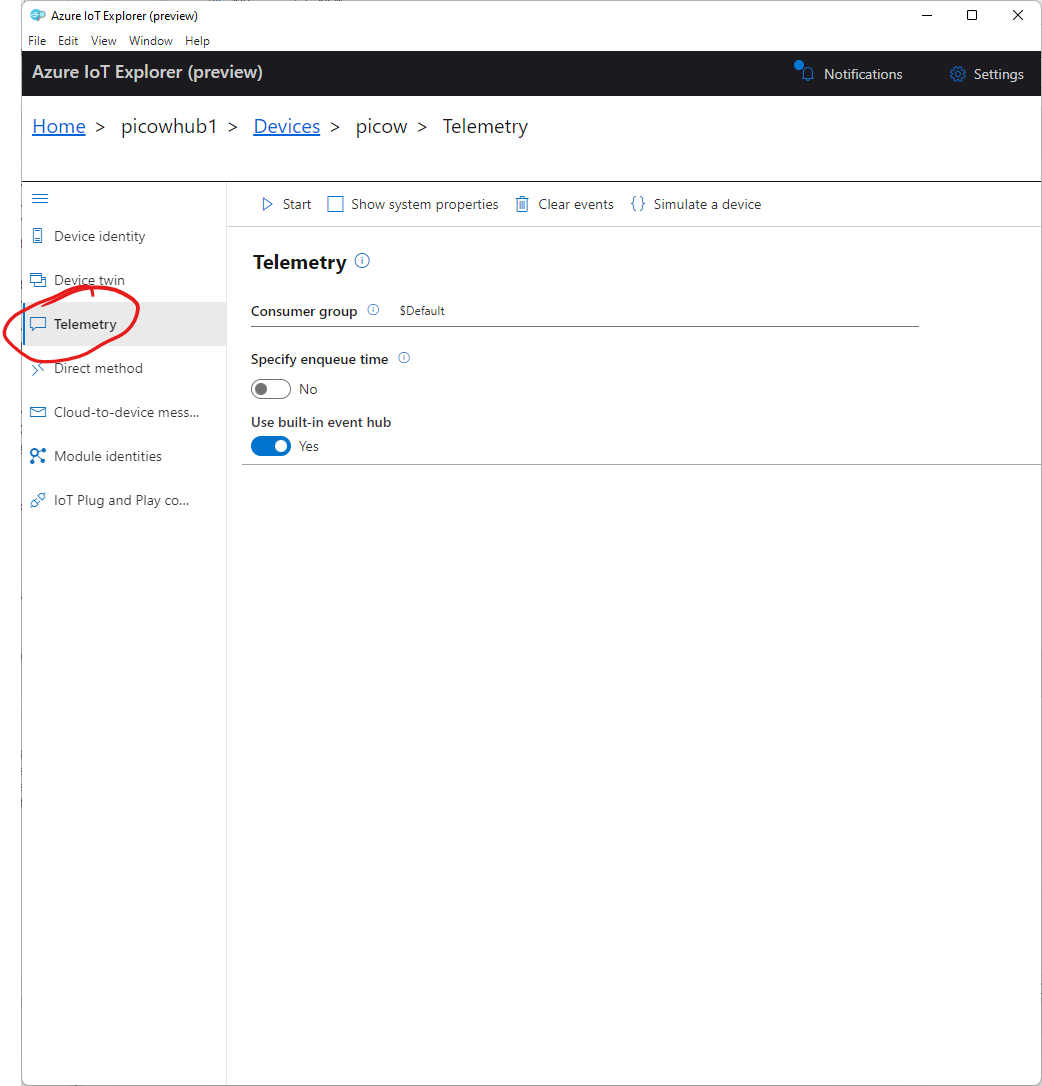
We can now start monitoring the Telemetry we’ll be sending by hitting the “Start” button in the toolbar at the top.
You should now be able to push the button on our breadboard, and a second or two later, the message should appear in the Azure IoT Explorer Telemetry window;
Step 11: Receiving Cloud to Device Messages
Now that we’ve gotten the Pico W sending telemetry messages to the IoT hub over MQTT, we can send a messages from the IoT Hub to the
In the Azure IoT Explorer, press the “Stop” button in the toolbar to stop monitoring telemetry.
Now press the “Cloud-to-device message” item in the menu on the left to show the “Cloud-to-device message” page;
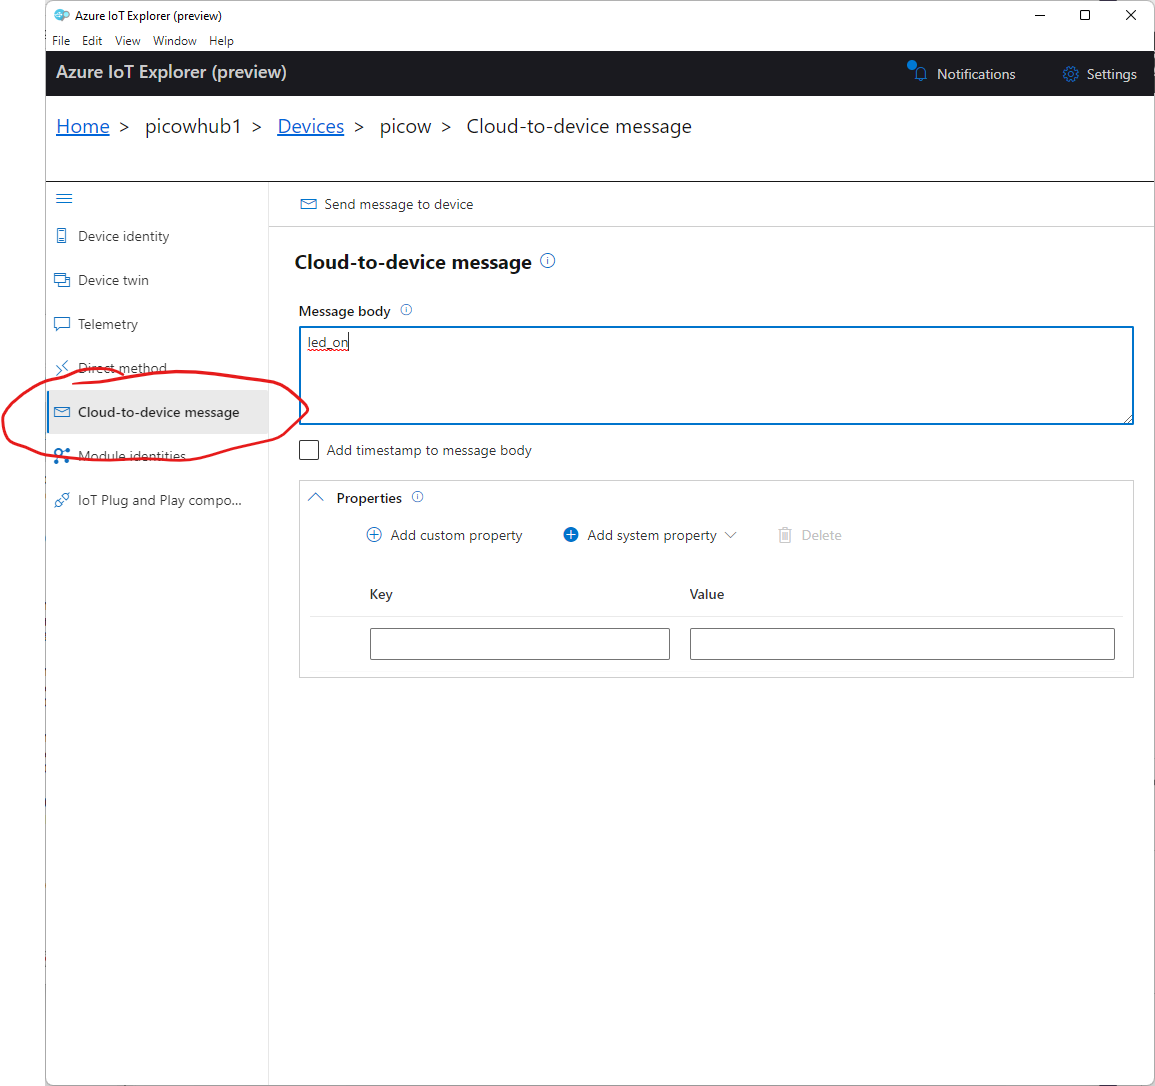
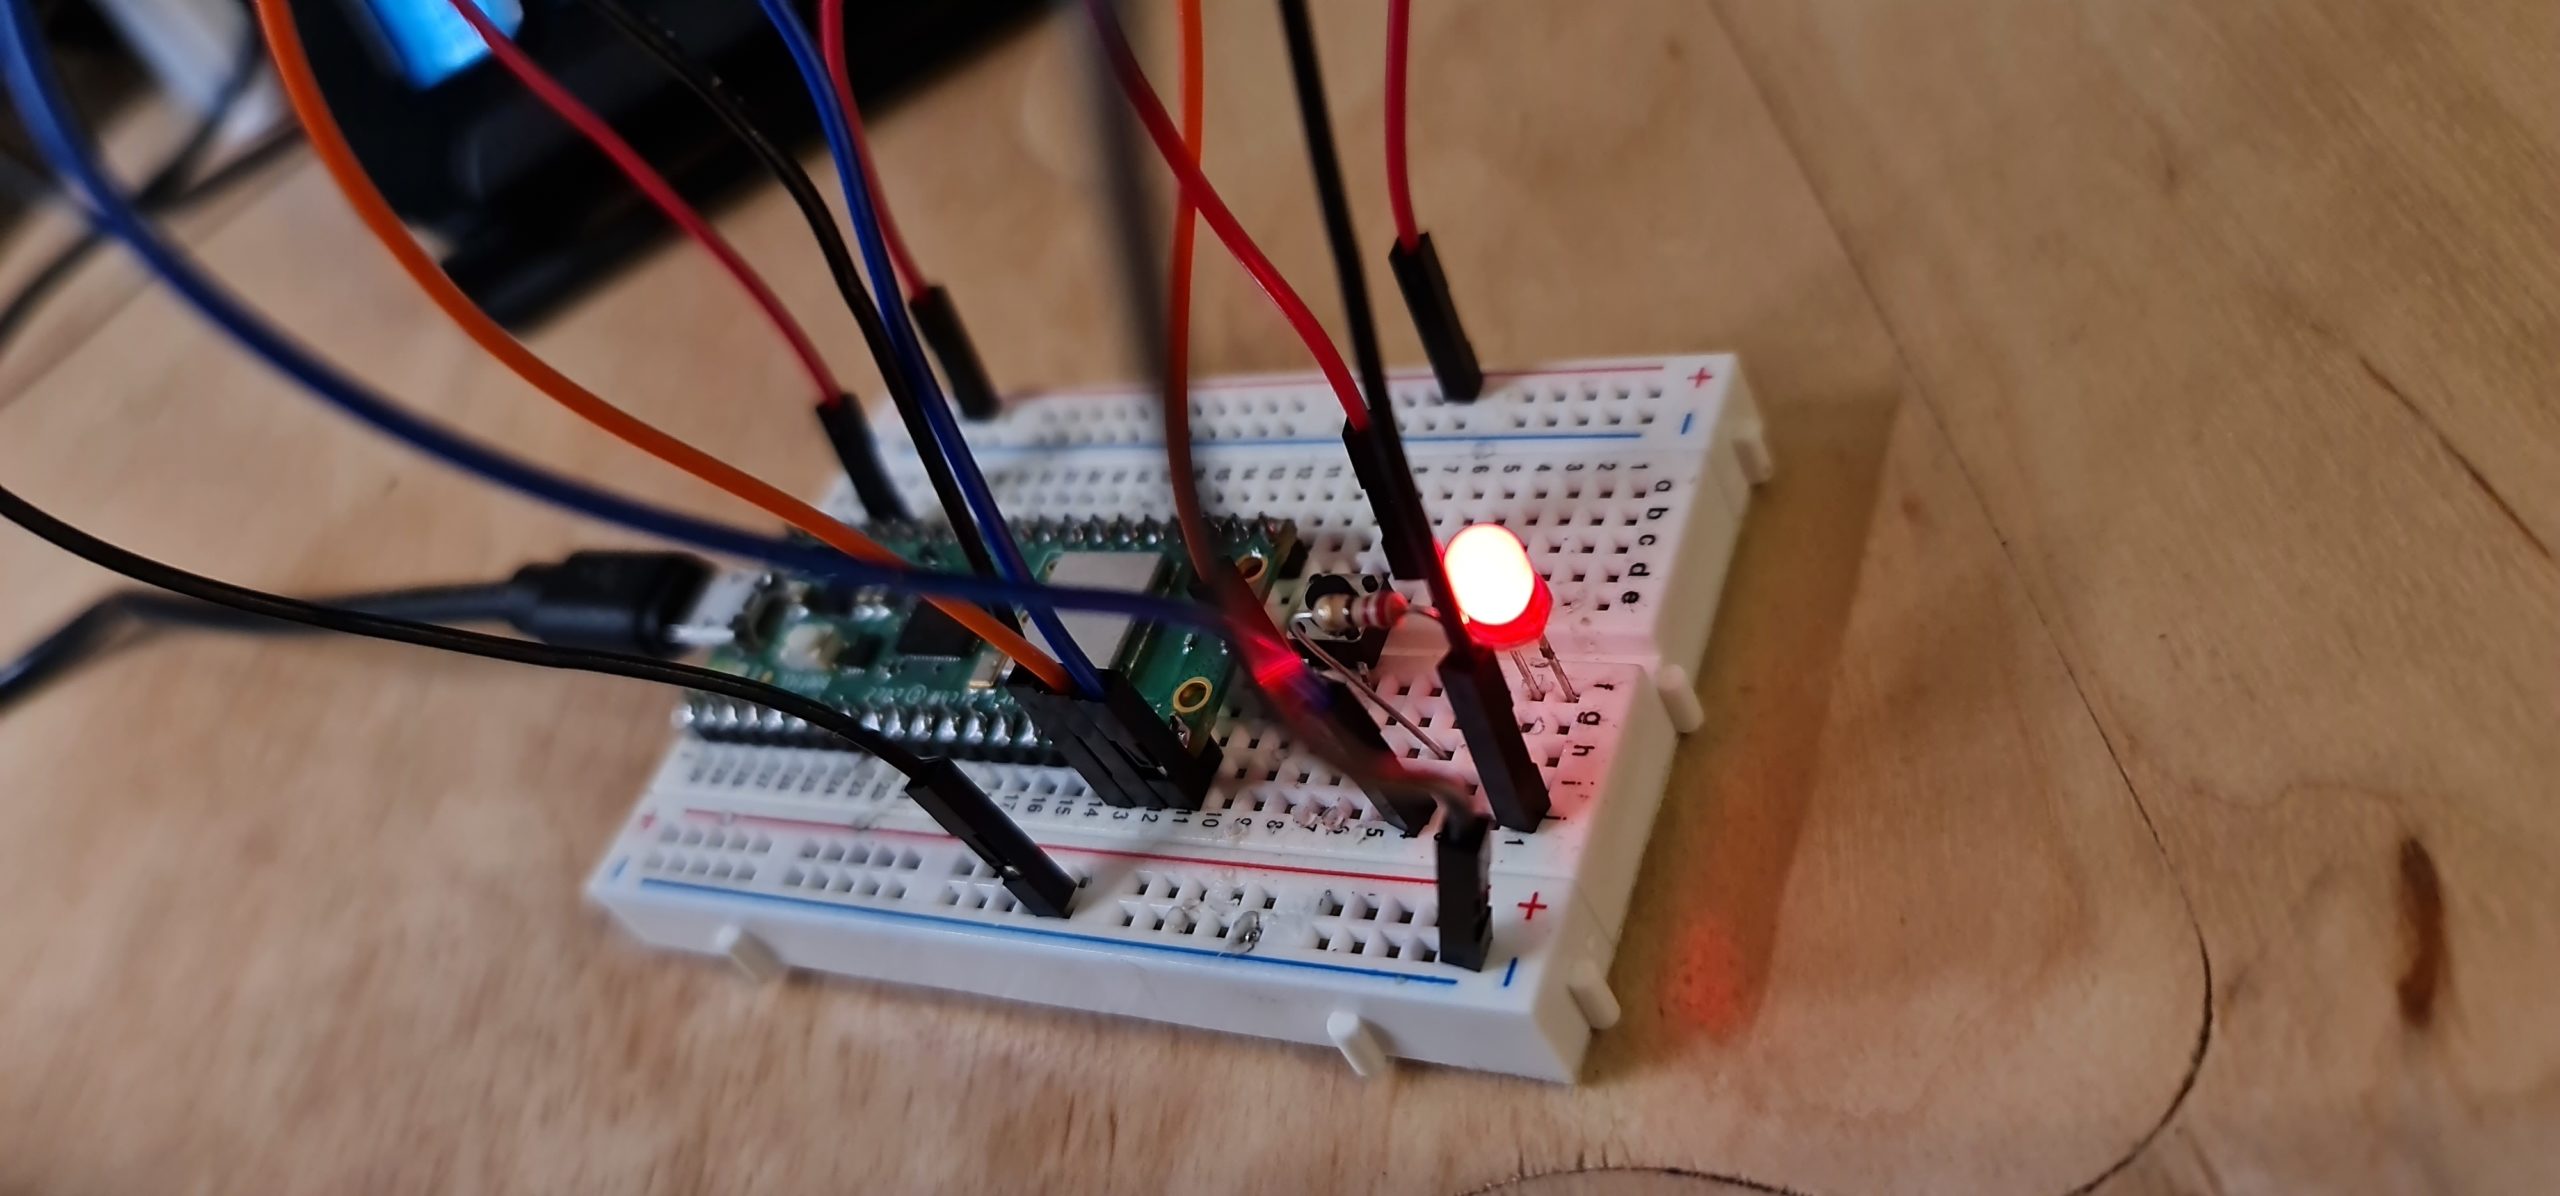
Here, enter “led_on” in the “Message body” box and press the “Send message to device” button in the toolbar.
Your LED should now illuminate;
If you enter “led_off” and press the “Send message to device” button again, your LED should turn off.
Final Thoughts:
With that we now have two way communication between the Pico W and an Azure IoT Hub.
From here you can start sending telemetry from sensors connected to the Pico W to Azure for processing using any of the services at your disposal.
Likewise, you can send commands from the IoT Hub to the Pico to instruct it to perform operations.
I’d love to hear what you make with this code, so please do go ahead and drop me a follow on Twitter and send me a tweet!