This is part 4 of a (at least) 5 part blog series on Dot Net Core on the Raspberry Pi….
You can see Part 1 – Installation and Hello World – right here…
You can see Part 2 – GPIO – right here…
You can see Part 3 – Sending Azure IoT Hub Messages – right here…
You can see Part 5 – Remote Deployment and Debugging – right here…
On September 25th 2019, the Dot Net Team released version 3.0 of the Dot Net Core Framework at .Net Conf.
To join in the fun, I held a special with Notts IoT, the IoT group I organise in Nottingham, where I gave a talk on Dot Net Core 3.0 on the Raspberry Pi.
This blog post is what I’ve learnt along the way to preparing for the talk as well as afterwards…!
Previously on Pete Codes…
In the last blog post we’d created a Console app that read the status of a button and sent a message to an Azure IoT Hub.
In this post we’ll add code to allow us to receive a message back from our IoT Hub that we send from the Microsoft IoT Device Explorer.
What you’ll need
- You’ll need to have completed the steps in the previous blog post – Read that here
- You’ll need an Azure subscription – Grab a trial here
- You’ll need the Azure IoT Device Explorer – Get it here
Putting even more “I” in IoT
If you’ve followed along with the previous blog, you’ll already have installed the Dot Net Core 3.0 binaries and runtimes, and have a console app running that flashes an LED and sends a message to an IoT Hub when you press a button.
Our next step is to write some code which receives messages from the IoT Hub. We can send these messages through the hub using our Azure Device Explorer
Listen up friend
Let’s add a subroutine and some code that will listen for messages from the IoT Hub.
Create the following subroutine beneath our existing SendDeviceToCloudMessageAsync subroutine;
private static async void ReceiveCloudToDeviceMessageAsync()
{

}
We’ll add a Console.WriteLine first so that we know our sub has been called successfully;
Console.WriteLine("Receiving Cloud to Device messages from IoT Hub");Next we’ll sit in a loop waiting for a message to be received from the IoT Hub… This is safe to do because we’re using an Asynchronous Subroutine. This way the rest of the code will continue. Add the following while loop to the subroutine;
while (true)
{
}
Next we need to try receiving a Message from the IoT Hub… We do this by calling the Device Client ReceiveAsync method. Add the following to the while loop;
Message receivedMessage = await deviceClient.ReceiveAsync();If we don’t actually receive any messages from the IoT Hub, the above call will return a Null. So we need to check for this before doing anything else. Add the following below the ReceiveAsync call;
if (receivedMessage != null)
{
}
Next, assuming that we’ve received a valid message from the IoT Hub, we can decode that message in a similair way to how we encoded the message string when we were sending a message to the IoT Hub… Add the following within the if statement which will convert the IoT Hub message into an ASCII String;
string receivedMessageString = Encoding.ASCII.GetString(receivedMessage.GetBytes());We can now spit our message out to the console so we know we’ve received it;
Console.WriteLine("Received message: {0}", receivedMessageString);Next we need to tell the IoT Hub that we’ve received the message successfully. We do this by calling the Device Client CompleteAsync method on our Device Client;
await deviceClient.CompleteAsync(receivedMessage);When the IoT Hub receives the Complete Acknowledgement it sets the message to completed, which in effect deletes the message we received from the Cloud to Device Queue. You can read more about how the Cloud to Device Queue on the Microsoft Docs Website.
The finished subroutine should now look like;
private static async void ReceiveCloudToDeviceMessageAsync()
{
    Console.WriteLine("Receiving Cloud to Device messages from IoT Hub");

    while (true)
    {
        Message receivedMessage = await deviceClient.ReceiveAsync();

        if (receivedMessage != null)
        {
            string receivedMessageString = Encoding.ASCII.GetString(receivedMessage.GetBytes());
            Console.WriteLine("Received message: {0}", receivedMessageString);
            await deviceClient.CompleteAsync(receivedMessage);
        }

    }
}
Finally we need to kick our subroutine off. After our initial Hello World Console WriteLine we can add a call to the subroutine;
ReceiveCloudToDeviceMessageAsync();The finished code should now look like;
using System;
using System.Device.Gpio;
using Microsoft.Azure.Devices.Client;
using System.Text;

namespace rpitest
{
    class Program
    {

        private static readonly string connectionString = "[Connnection String]";
        private static DeviceClient deviceClient;

        static void Main(string[] args)
        {
            Console.WriteLine("Hello World!");

            deviceClient = DeviceClient.CreateFromConnectionString(connectionString);

            ReceiveCloudToDeviceMessageAsync();

            GpioController controller = new GpioController(PinNumberingScheme.Board);
            var pin = 10;
            var buttonPin = 26;
            var buttonPressed = false;

            controller.OpenPin(pin, PinMode.Output);
            controller.OpenPin(buttonPin, PinMode.InputPullUp);

            try
            {
                while (true)
                {
                    if (controller.Read(buttonPin) == false)
                    {
                        controller.Write(pin, PinValue.High);

                        if (buttonPressed == false)
                        {
                            buttonPressed = true;
                            SendDeviceToCloudMessageAsync();
                        }
                    }
                    else
                    {
                        controller.Write(pin, PinValue.Low);
                        buttonPressed = false;
                    }
                }
            }
            finally
            {
                controller.ClosePin(pin);
            }
        }

        private static async void SendDeviceToCloudMessageAsync()
        {
            var messageString = "Button Pressed";
            Message message = new Message(Encoding.ASCII.GetBytes(messageString));

            message.Properties.Add("buttonEvent", "true");

            await deviceClient.SendEventAsync(message);
            Console.WriteLine("Sending Message {0}", messageString);

        }

        private static async void ReceiveCloudToDeviceMessageAsync()
        {
            Console.WriteLine("Receiving Cloud to Device messages from IoT Hub");

            while (true)
            {
                Message receivedMessage = await deviceClient.ReceiveAsync();

                if (receivedMessage != null)
                {
                    string receivedMessageString = Encoding.ASCII.GetString(receivedMessage.GetBytes());
                    Console.WriteLine("Received message: {0}", receivedMessageString);
                    await deviceClient.CompleteAsync(receivedMessage);
                }

            }
        }
    }
}
We can now run the latest version of the application;
dotnet run
Return to the Device Explorer
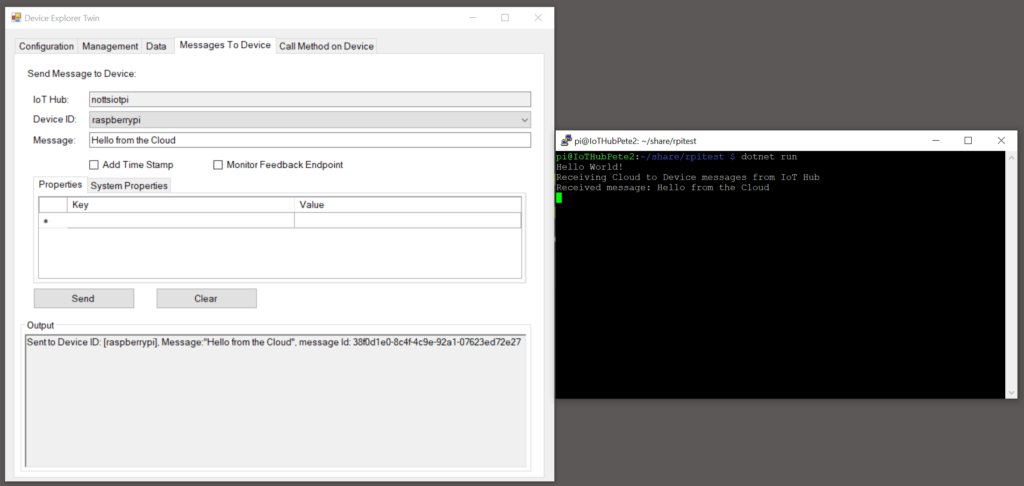
If we now open the Device Explorer Application again and click the “Messages to Device” tab;

Make sure that the IoT Hub and Device ID dropdowns have got the right information in them.
Now enter a message into the “Message” box and press the “Send” Button;

You should then see our Message appearing in the console of our app;

Next Time
In the next post we’ll switch to using our main Development PC to code on, remotely deploying and debugging code direct from VS Code.

