
I recently hosted Dot NET Notts‘ first Virtual Meetup. We’re all living in strange times right now, and in-person meetups are out, so we’re now running things virtually.

Contents
Update 09/05/2020:
In the recent month, Zoom have made a number of important security enhancements to help improve the overall security of the product;
– Meeting Passwords are now enabled by default
– New Meetings now default to a new Meeting ID rather than your Personal ID
– The Waiting Room is now enabled by default
You can read more in their Security Update News Item here.
I’ve also added another couple of setup options to Enable HD Video and also show up to 49 Participants in the Gallery View;
In this post I’ll show you how to sign up for a Zoom Account, upgrade to Pro, change your account settings so that you can run a safe Zoom meeting as well as schedule your first meeting.
This will help you avoid the horrible problem of “ZoomBombing” which is causing Meetup Organisers so much trouble.
If you’ve already created a Zoom Pro Account, and are just interested in setting Zoom up, then feel free to skip to Step 5 – Zoom Settings
1 – What’s Zoom
2 – What’s “ZoomBombing”?
3 – Sign Up for a Zoom Account
4 – Upgrade to a Pro Account
5 – Zoom Settings
6 – Password Protect Meetings
7 – Disable File Transfer
8 – Enable Co-Hosts
9 – Allow Hosts to Put Attendees on Hold
10 – Screen Sharing
11 – Annotation and Whiteboard
12 – Allow Removed Participants to Rejoin
13 – Far End Camera Control
14 – Virtual Background
15 – Waiting Room
16 – Allow Live Streaming Meetings
17 – Scheduling a Meetup in Zoom
18 – Promoting your Meetup
19 – Running your Meetup
20 – HD Video
21 – Display Up to 49 Participants
22 – Scott Hansleman – Setting up your Kit
1- What’s Zoom?

There are a myriad of different ways to move a meetup online, but one of the most popular around at the moment is Zoom.
Zoom is a video conferencing platform similair to Microsoft Teams, Google Hangouts Meet and Cisco WebEx.
It allows for (even on the free tier), up to 100 people in a meeting, and every participant can share their screen simultaneously.
This is one of the features that most drew me to using Zoom in the first place, as it allows for a social time to be allocated before a meetup gets going, sort of simulating how a real meetup works.
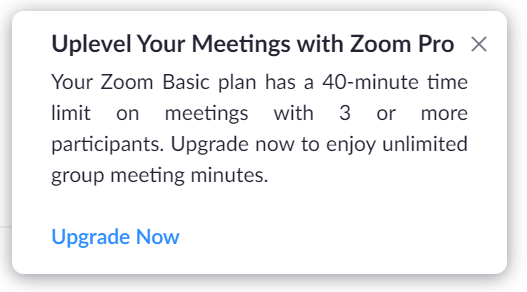
However, it’s worth bearing in mind that, in order to have the controls necessary to run a safe Zoom Meeting, you’re going to need to upgrade to a paid Zoom account.
Least of all, for meetings of more than 3 people, you have a 40 minute time limit, which will make it difficult to run a decent meetup;
2 – What’s “ZoomBombing“?
One of the downsides of running a publicly available Zoom meetup is that, well, it’s public, so anyone at all can join. This leaves the meeting open to any manner of bad actors to get involved and cause a disturbance, mainly by sharing disturbing imagery or sharing viruses via the file sharing options. This has happened to Zoom Meetups recently, and caused them to have to end the meetup prematurely.
3 – Sign up for a Zoom Account
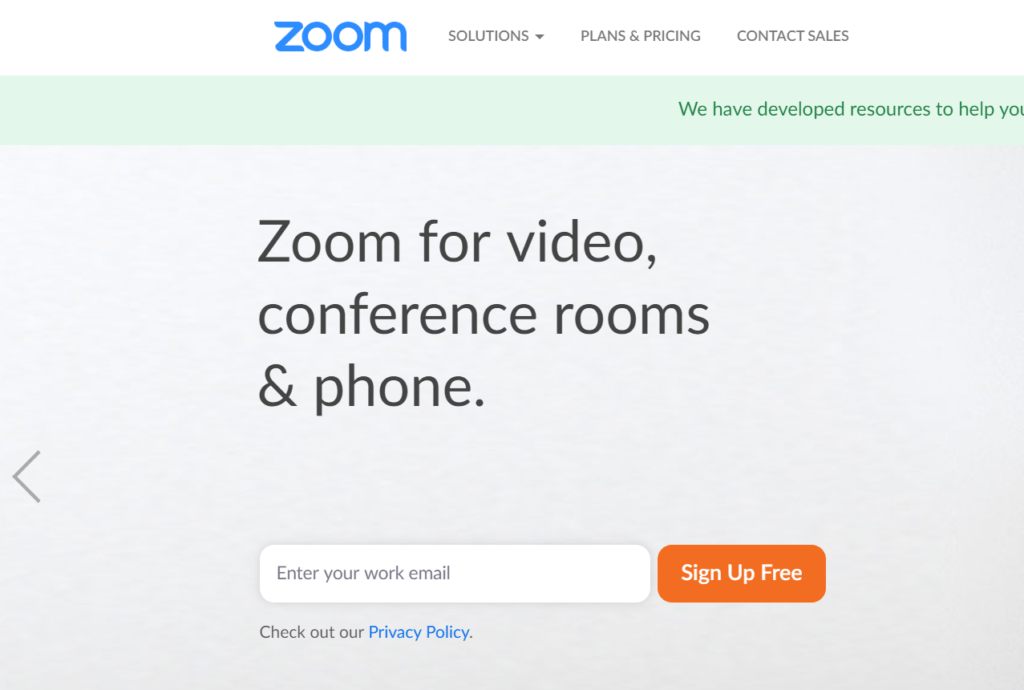
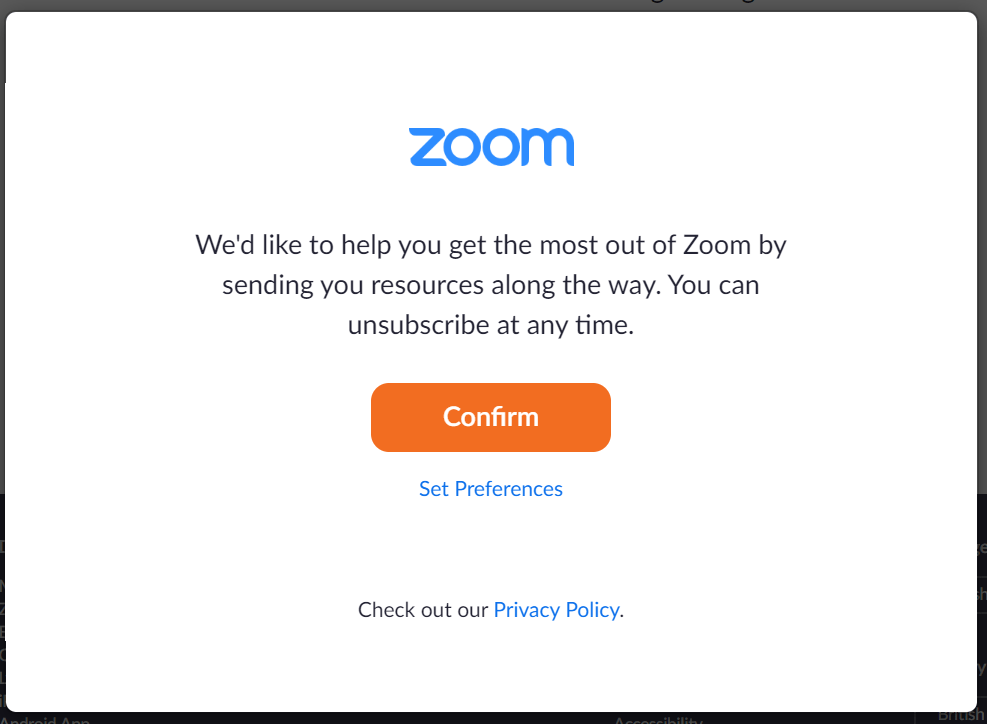
Firstly, head over to zoom.us, enter your email address in the “Enter your work email” box, and hit the orange “Sign Up Free” button.
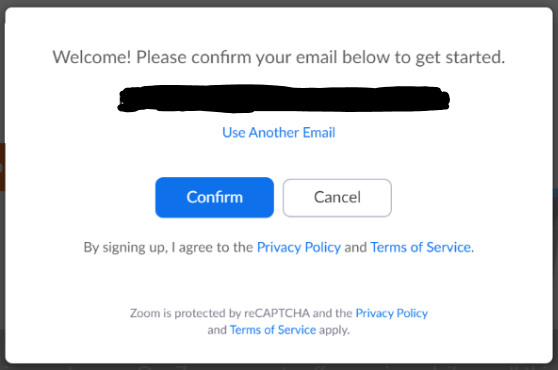
Confirm your email address in the dialog that appears;
Next you can allow Zoom to send you some marketing bumf, or set your preferences;
Zoom will prompt you that they’ve sent you an email to confirm your account;
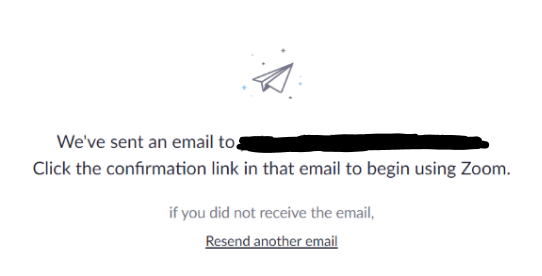
If you go ahead and check your email, you’ll find a confirmation email from zoom;
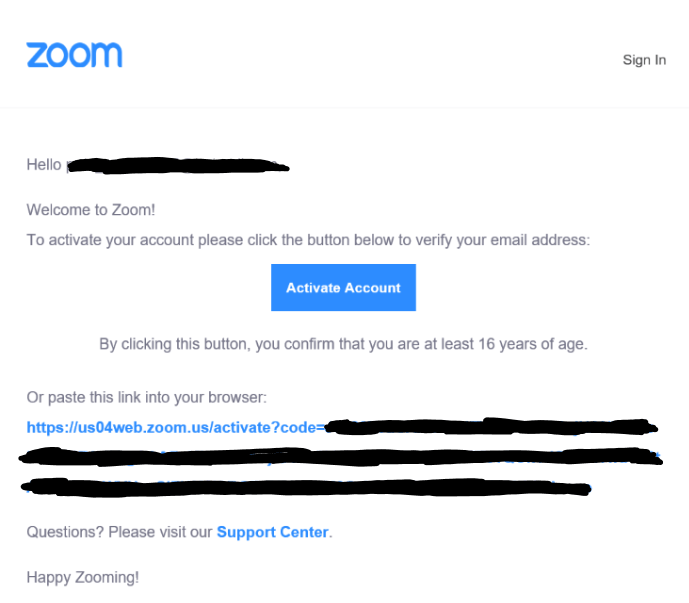
Click the “Activate Account” button to go back to zoom and beginning entering your account information;

Enter your name, choose a password and hit the orange “Continue” button.
If you have any colleagues you wish to invite, you can do this on the second page;

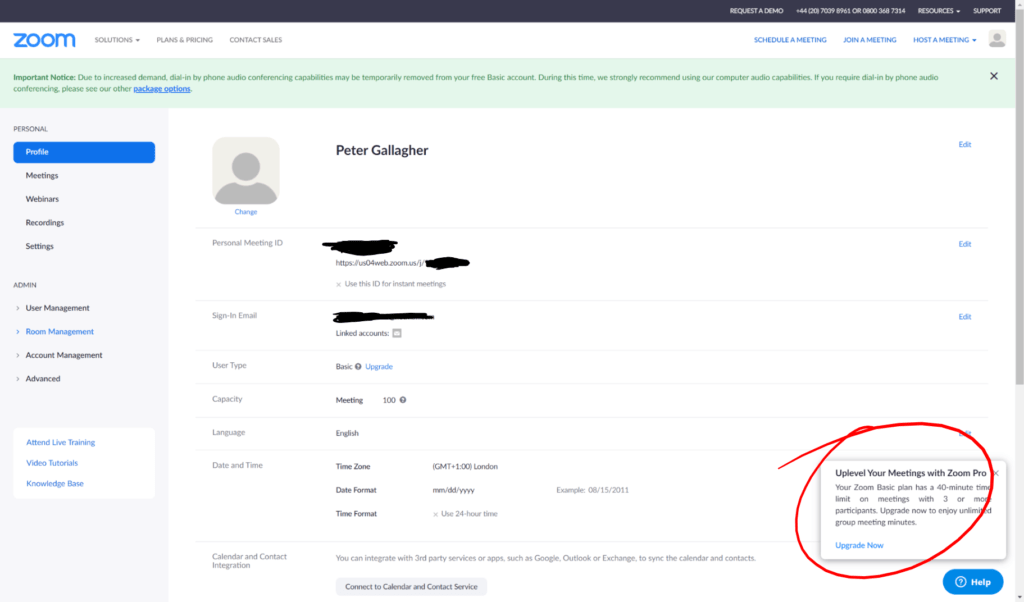
Now that your account has been created, you can go to your account dashboard by pressing the grey “Go to My Account” button.
4 – Upgrade to a Pro Account
The first thing to bear in mind is that, to host a safe Zoom meeting, you’re going to need a Pro Account. This is because you are limited in the options and controls you have on the free tier.
When you first log in to your dashboard, Zoom will likely prompt you to upgrade;
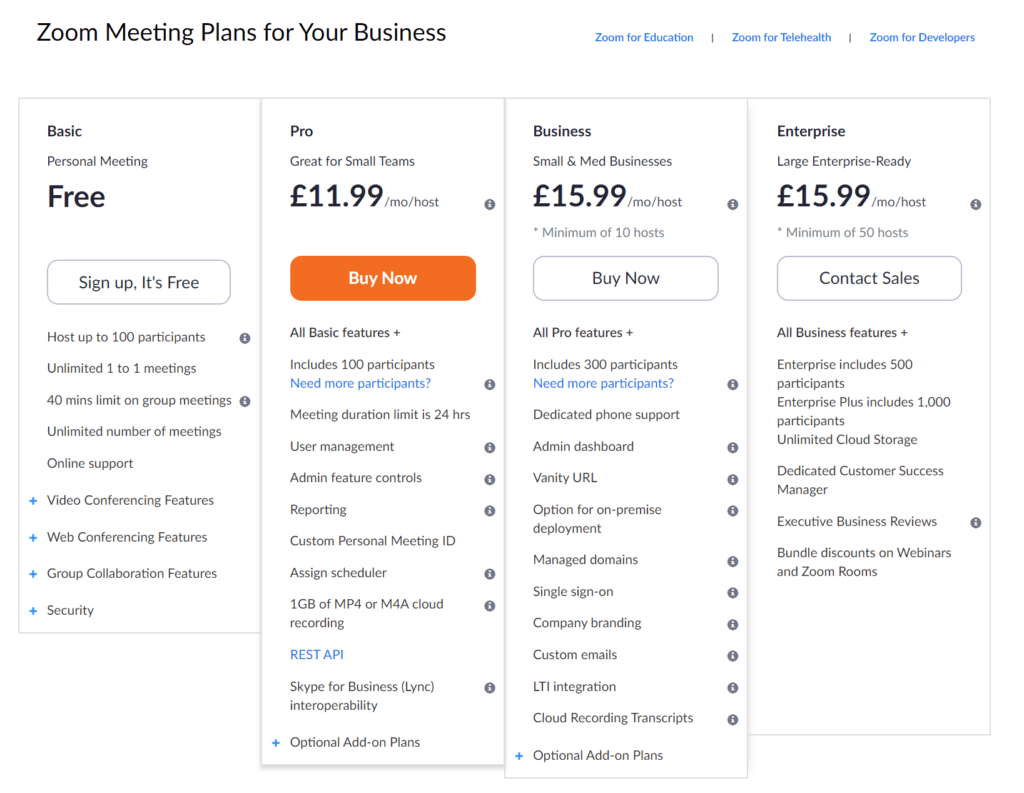
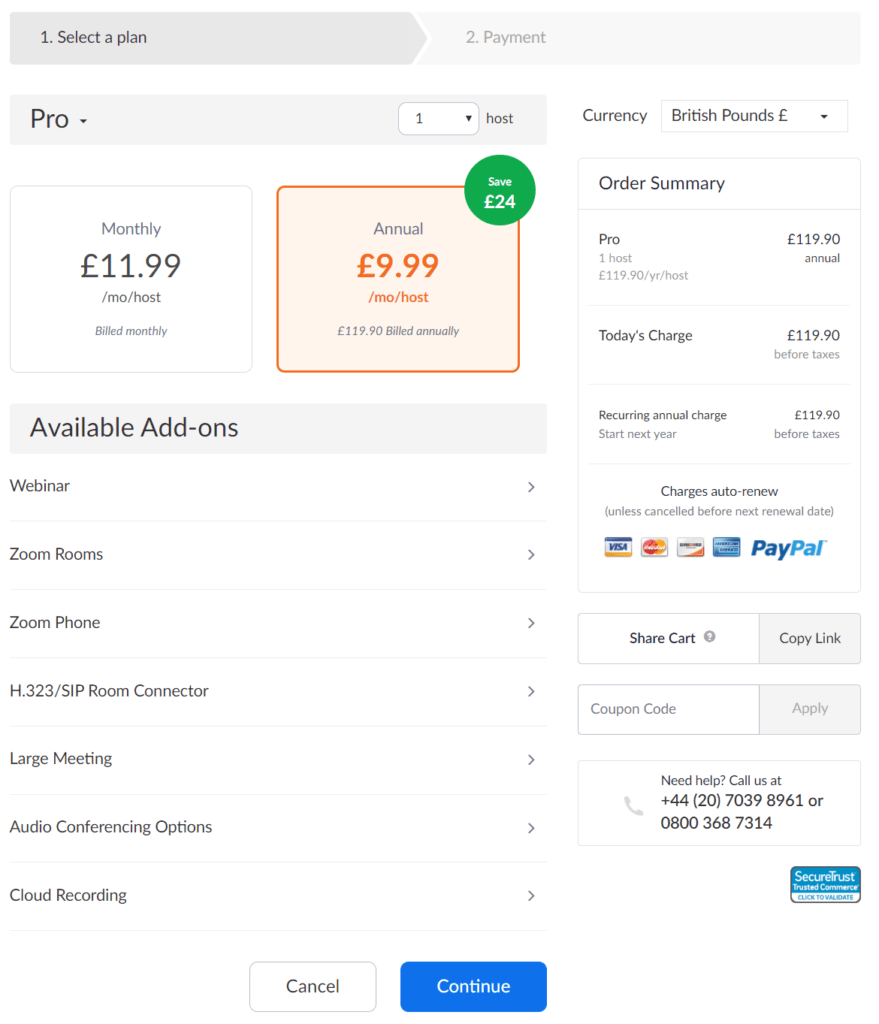
You can get going with a Pro Account from as little as £11.99+VAT (Around £14.39) a month on a rolling monthly contract, or £119.90+VAT (Around £143.88) a year;
If you hit the “Upgrade Now” link in the popup, you’ll be taken to the upgrade page;
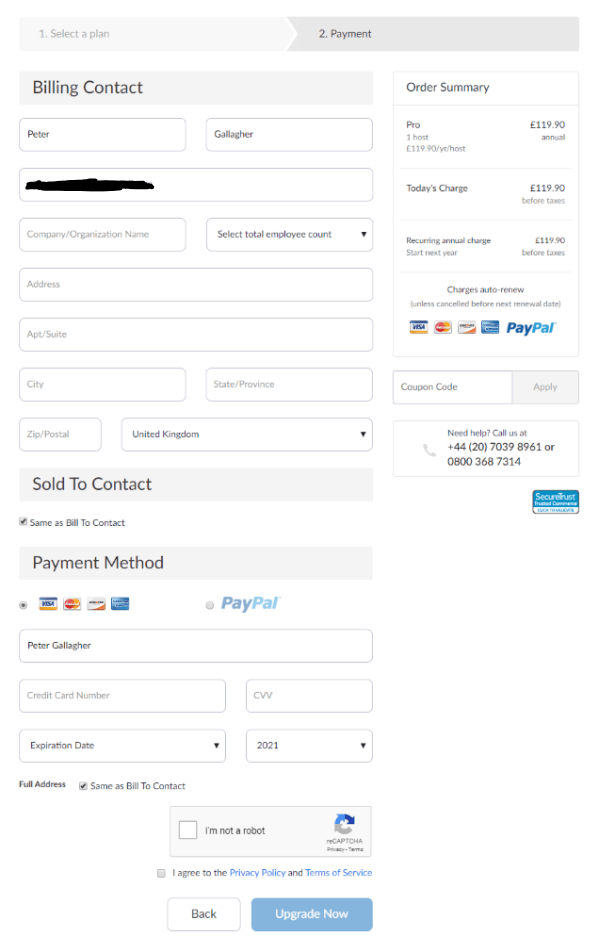
On the next page you can fill in your personal details and choose your payment method, click the CAPTCHA checkbox, agree to the Terms and Conditions and hit the blue “Upgrade Now” button;
You’ll then be shown a confirmation dialog with the full amount, including VAT, that you’ll need to pay. In this case it’s £143.88;
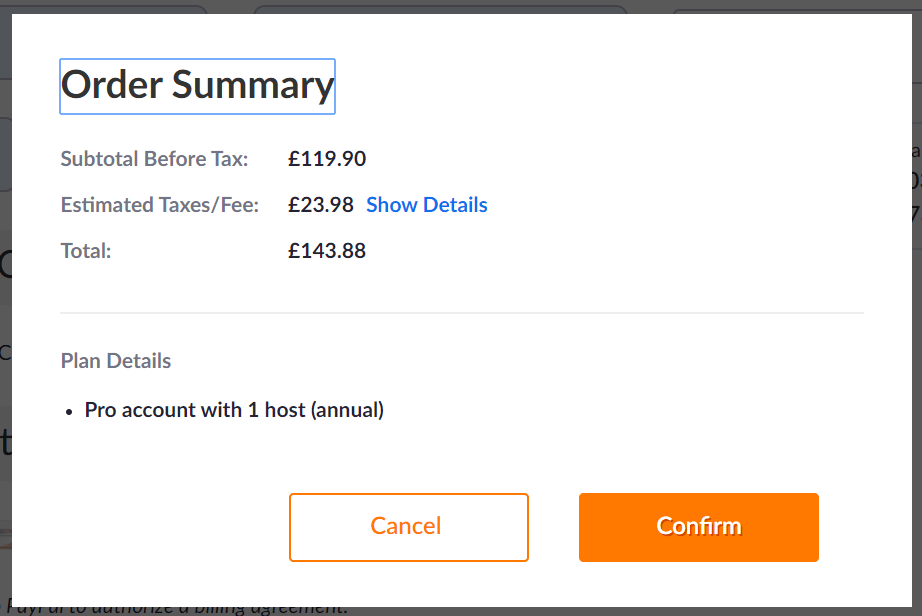
Once you’ve confirmed and paid, you’re account will be upgraded to a Pro Account!
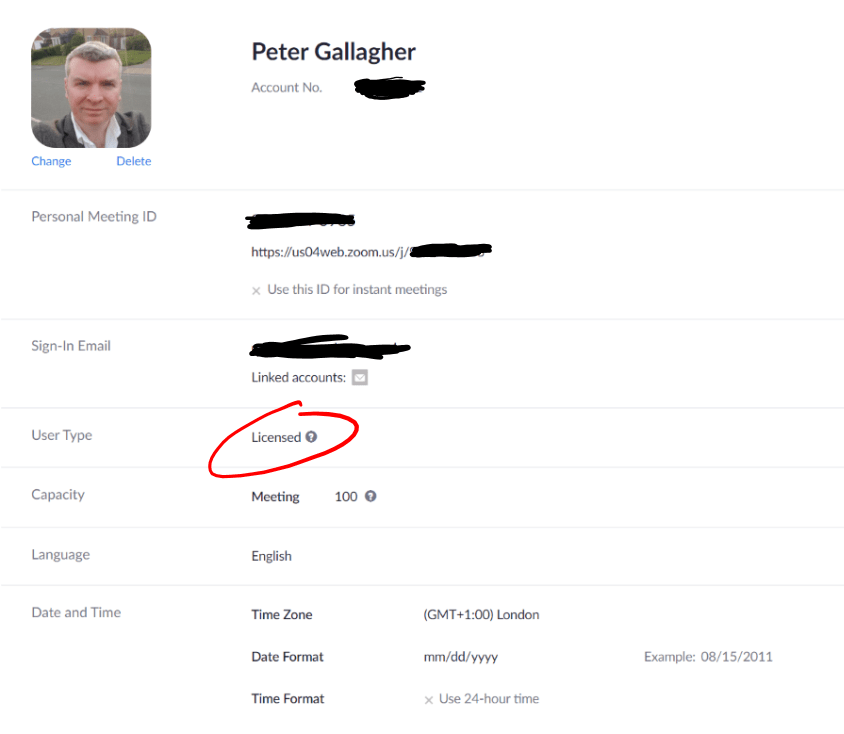
5 – Zoom Settings
Now that we have a Zoom Pro Account, we can stream for up to 24 hours (way longer than any normal meetup I know! Ha).
We now need to setup our Zoom Account so that any meetings we create are safe!
Zoom has a comprehensive array of settings to control exactly how meetups are setup, which gives us the flexibility to mitigate the risks of a meetup being disrupted by an unwelcome guest.
We’ll do this in the settings page. Hit the “Settings” link on the left hand side of the screen;
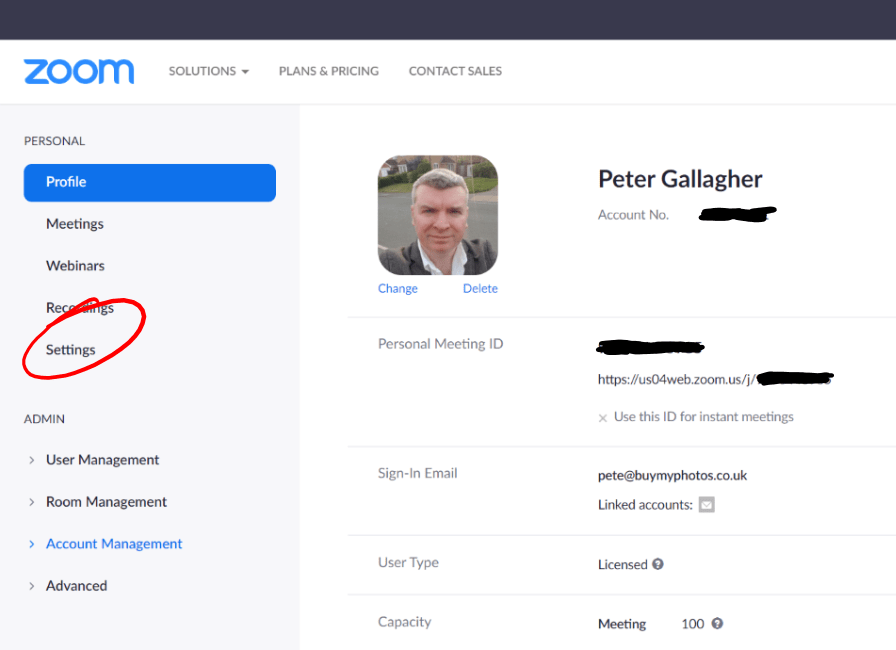
You’ll be taken to the Zoom Settings Screen;
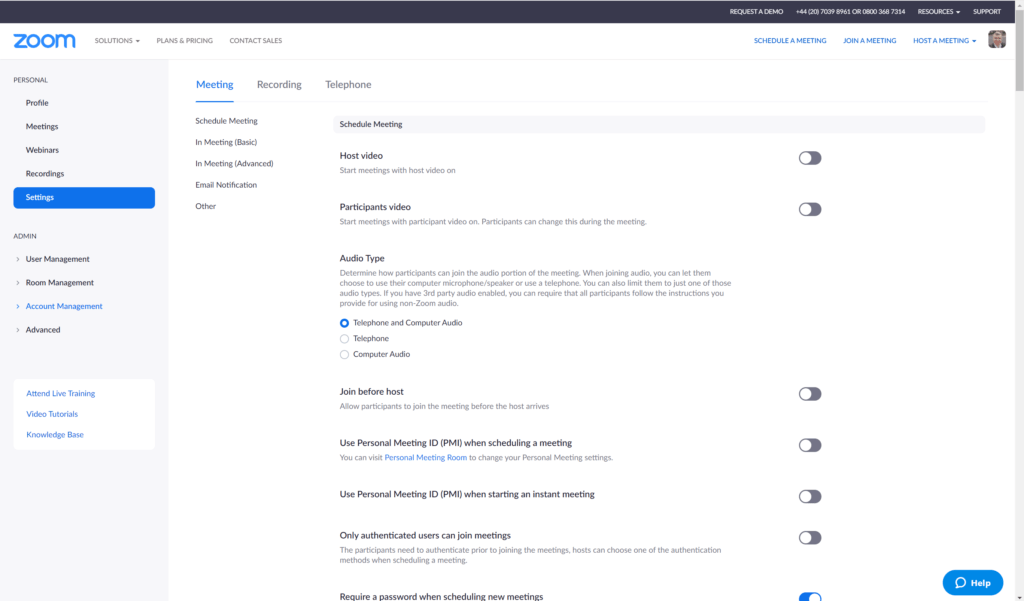
There are a whole heap of options here to play with, however we’re going to concentrate on the most important ones to secure your Zoom Meeting.
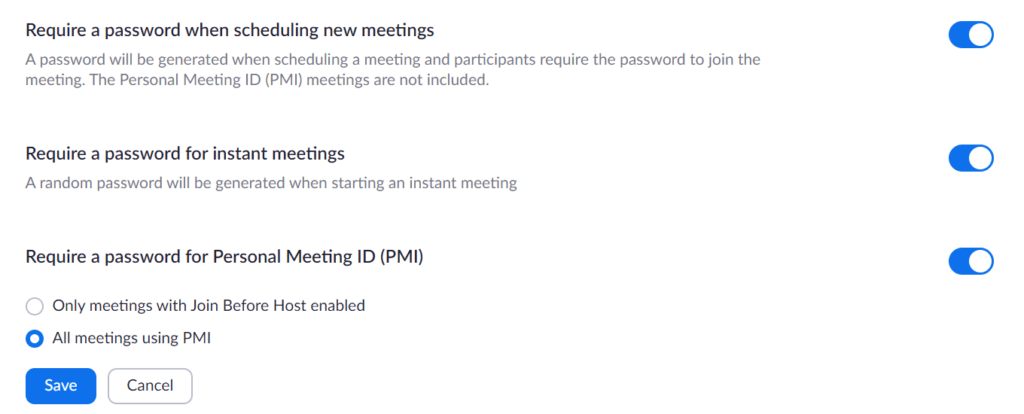
6 – Password Protect Meetings
As of April 5th, this setting should be on by default…
The first settings to ensure are on are “Require a password when scheduling new meetings“, “Require a password for instant meetings” and “Require a password for Personal Meeting ID (PMI)“. Having a password on your meetings is the most important thing we can do to stop uninvited guests from joining our meeting.
It’s important too to enable the password for your Private Meeting ID, just in case you accidentally hold a Cabinet Meeting and tweet out your ID.
7 – Disable File Transfer
Next up is File Transfer… This is a really handy feature for private meetings, but one which can lead to bad people trying to send virus laden files to attendees in public ones. Make sure this is off;

8 – Enable Co-Hosts
Enabling Co-Hosts gives us access to a few ways of running the meetup. Firstly, it allows your speakers to have some amount of control over the meetup too, such as; Allowing attendees into the meetup from the Waiting Room, Muting and Un-Muting Attendees, Sharing their Screen etc. We’ll get to these settings shortly.

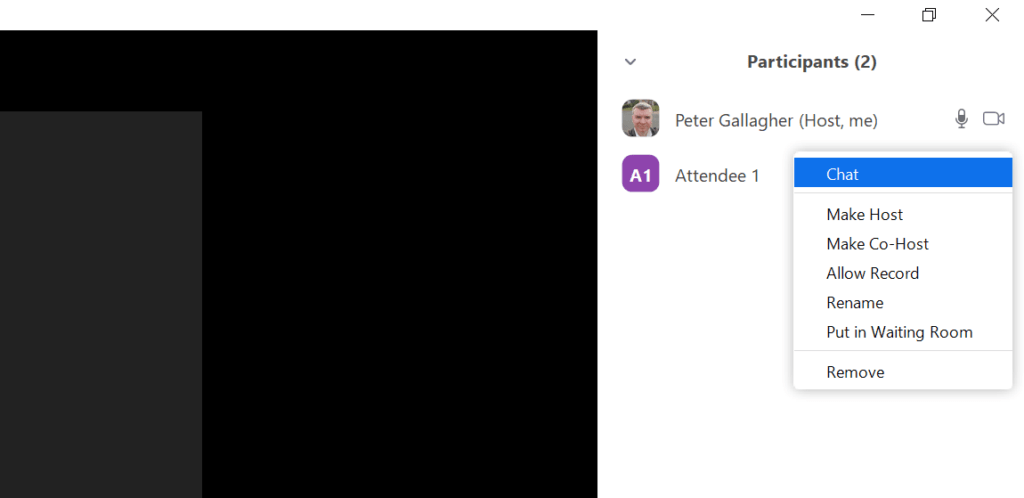
When you’re in a meeting, you’ll then be able to right click on an Attendee and designate them as a Co-Host, giving them most of the same privileges as an actual Host;
9 – Allow Host to Put Attendees on Hold
In order to allow the Host (and co-hosts), to control who is allowed to continue to be in the meeting, enabling the “Allow Host to Put Attendees on Hold” setting will allow the host to evict attendees who are behaving badly.

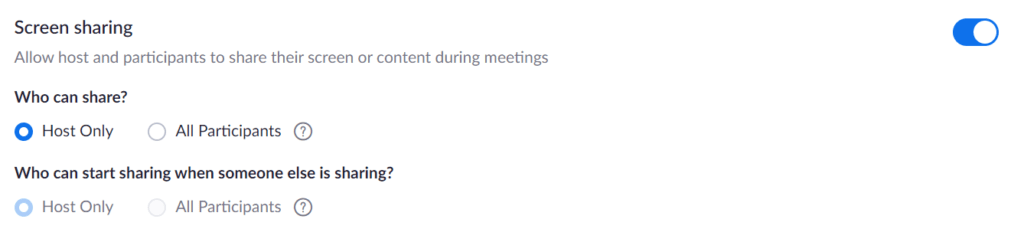
10 – Screen Sharing
Screen Sharing is one of the main issues faced by Meeting Organisers when a bad attendee decides to share something unwanted.
We can disable Screen Sharing for everyone but the Host. Importantly, this still allows Co-Hosts to share their screens, but prevents attendees from doing so.
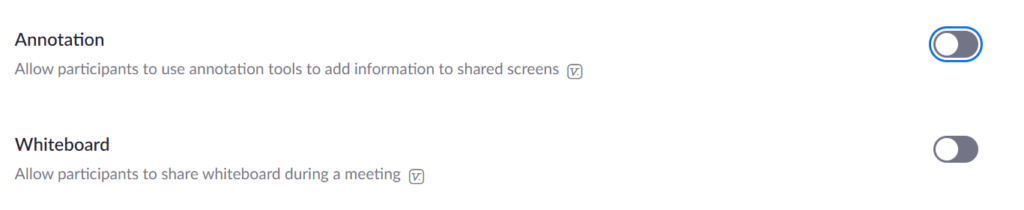
11 – Annotation and Whiteboard
We don’t want other participants being able to draw things on the screen that are unsavoury, so we can disable this functionality by disabling the “Annotation” and “Whiteboard” settings.
12 – Allow Removed Participants to Rejoin
If you need to evict a badly behaving attendee, then the last thing you want to happen, is for them to rejoin again afterwards.
This setting will prevent anyone you’ve evicted from rejoining again, freeing you up to continue running the meetup.

13 – Far End Camera Control
Needless to say, we don’t want people being able to control our camera, so ensure this setting is turned off!

14 – Virtual Background
If you’re intending to broadcast your Zoom Meeting via YouTube (more on this later) especially, then I’d highly recommend that you allow Virtual backgrounds for participants, this way Zoom will remove any identifying backgrounds for you, preventing people watching from using things in your space to identify your location.

15 – Waiting Room
As of April 5th, this setting should be on by default…
In order to allow you to vet people as they join the meeting, Zoom has a virtual Waiting room for Attendees to land in before they’re finally accepted by the Host.
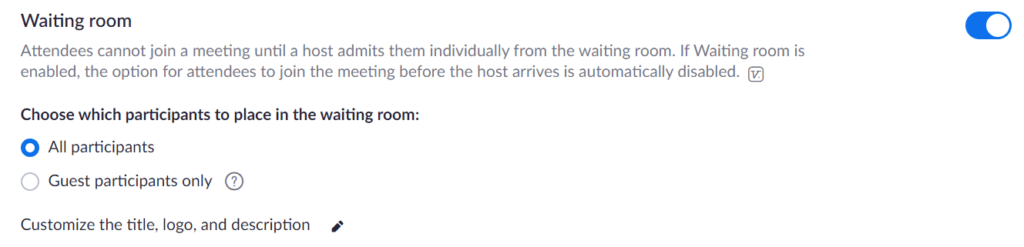
With this setting on, the Host, or indeed co-host, will need to admit users into the main meeting.
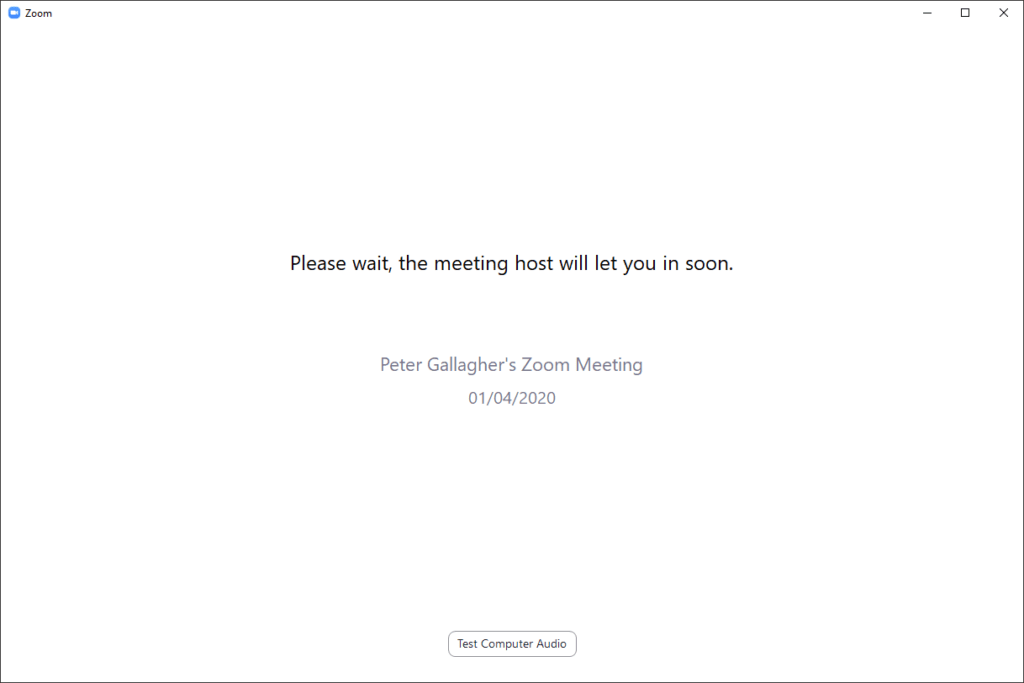
When an attendee joins the meeting, they’ll receive a notification letting them know that the Host will let them in;
On the Host side, the waiting Attendees in the Waiting Room will appear ready for the host to allow them in;
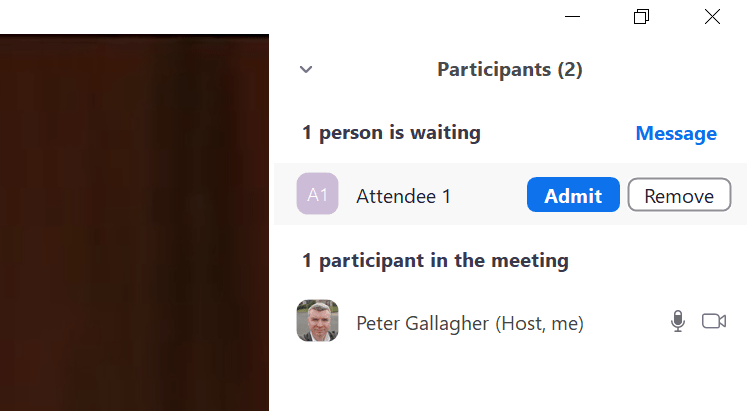
Clicking on the Attendee and hitting the blue “Admit” button will allow the attendee to enter the meeting.
16 – Allow Live Streaming Meetings
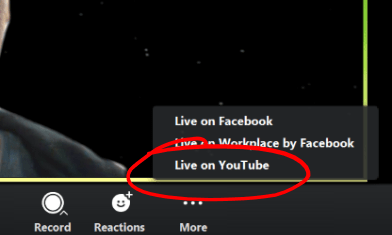
If you intend to stream your meetup to YouTube, and I highly recommend it as it’s a great way to reach more people, then you’ll need to enable Live Streaming;

Once you’re in a meeting, you’ll then have the facility to stream your Meetup directly to YouTube by hitting the More Button in the toolbar at the bottom of the screen;
One thing to bear in mind with this though, is that you need to enable this in your YouTube Account at least 24 hours prior to your meetup, otherwise it won’t work!
Another thing to consider is creating a bit.ly for the stream. You can distribute the bit.ly before hand without actually creating it. Once you start streaming, you can then create your bit.ly from the stream address.
This will allow you to get the YouTube address out ahead of time, which is better for people intending to view via YouTube.
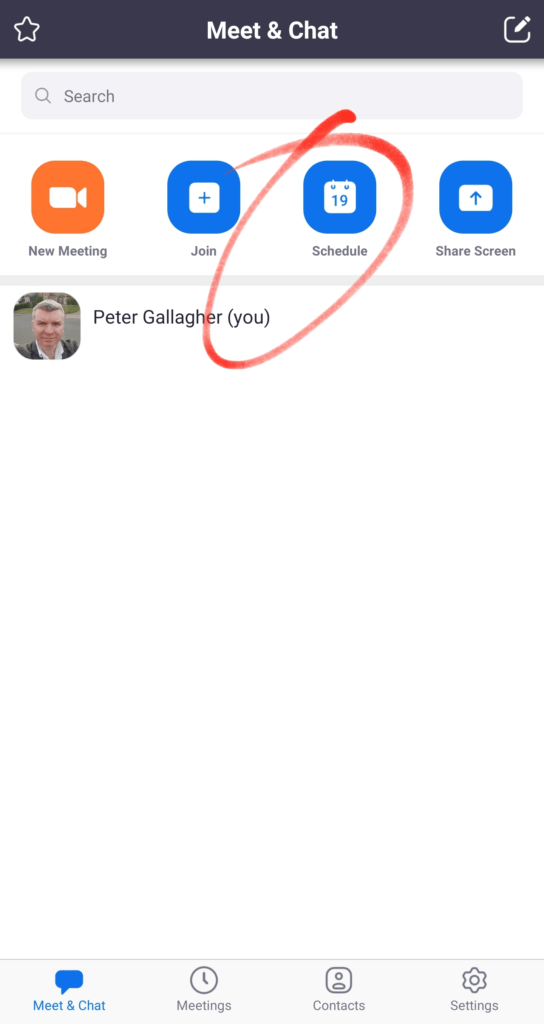
17- Scheduling a Meetup in Zoom
Scheduling a Meetup is the best idea when planning a meetup ahead of time, as it allows you to distribute the Meeting ID to your attendees.
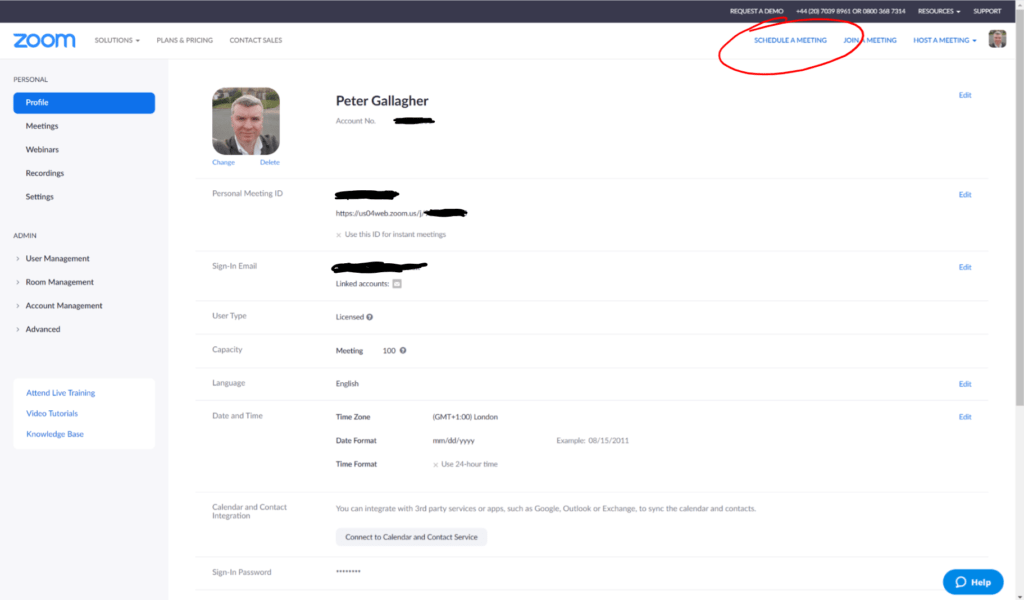
You can do this from various places, from the your profile on the zoom.us website;
Or you can use the PC app;
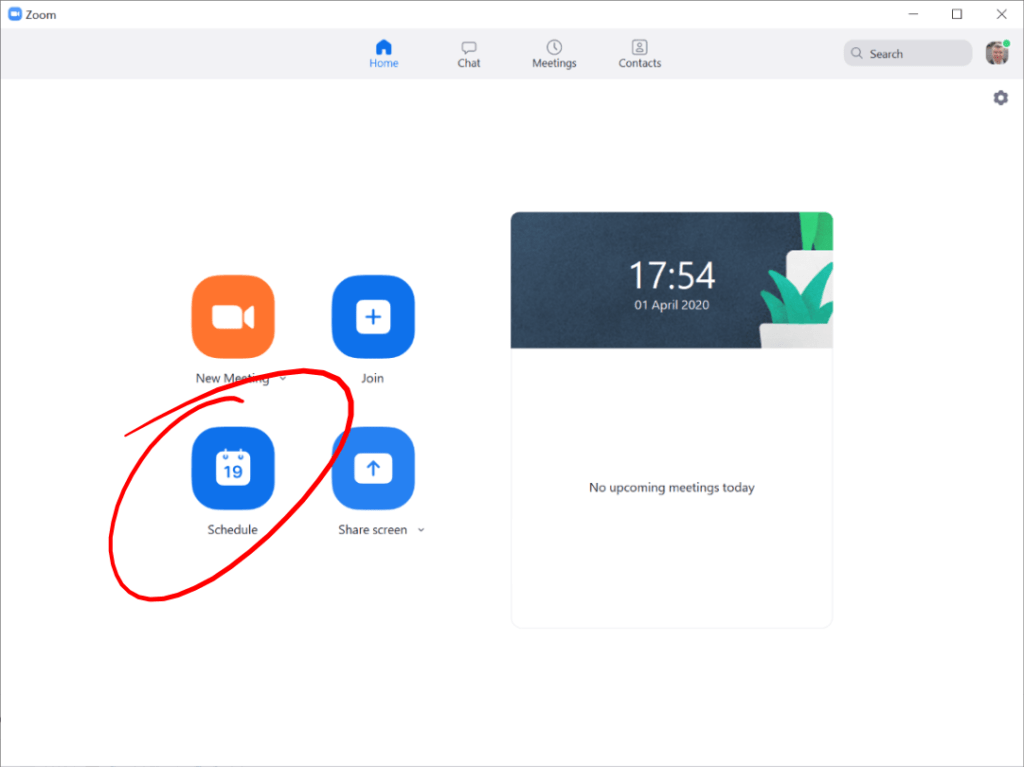
Or the Mobile App;
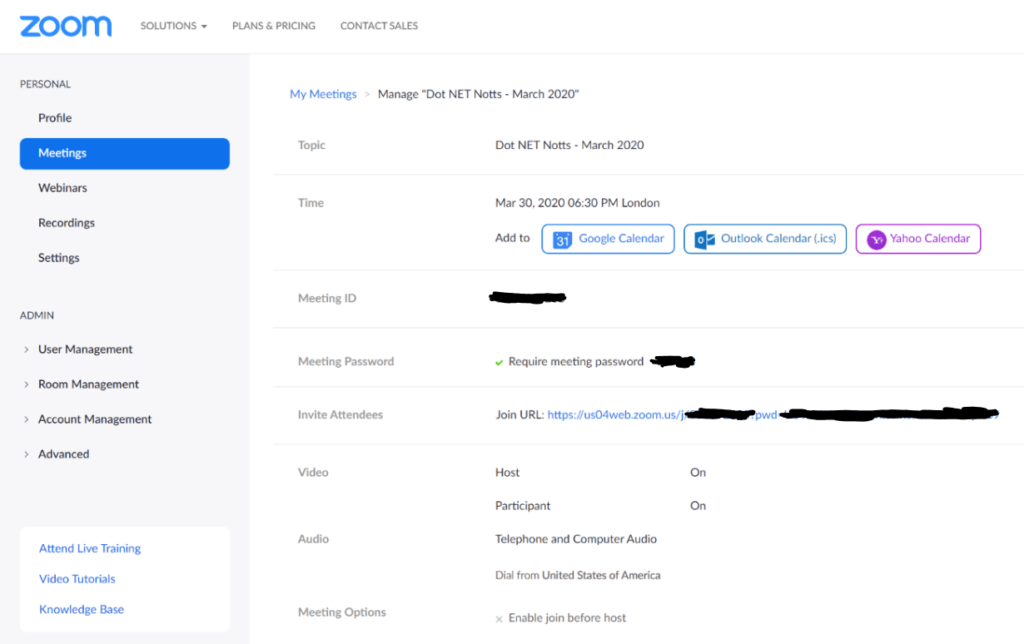
Focusing on the Website version, you will be shown the Schedule a Meeting page;
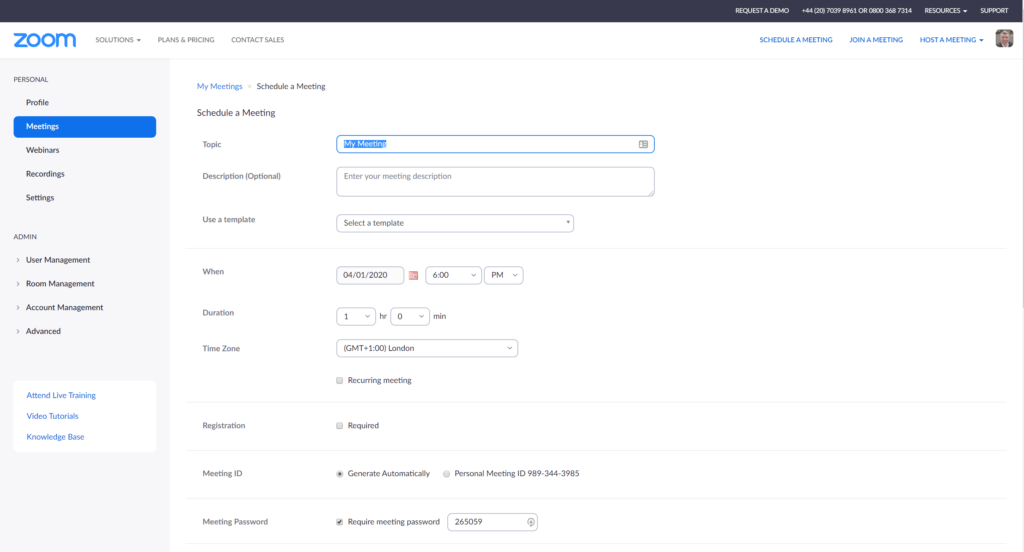
From here you can set a Name for your Meetup using the Topic text box, and give it a description of some sort.
Go ahead and set a date, time and length for your meeting.
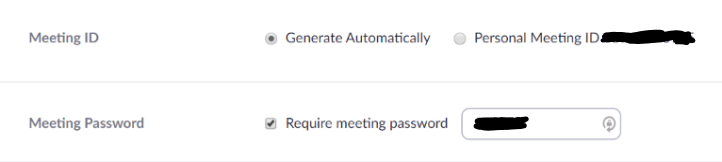
As of April 5th, Zoom should default to a new Meeting ID rather than your Personal Meeting ID…
The next part to set is the Meeting ID and Password. Here I’d recommend that you generate a new ID, rather than using your Personal Meeting ID. This way, if for some reason you have an issue with your ID, you know that next time you’ll have a new ID again.
As mentioned earlier, the primary setting to secure your meeting is the password, make sure you check the “Require meeting password” checkbox.
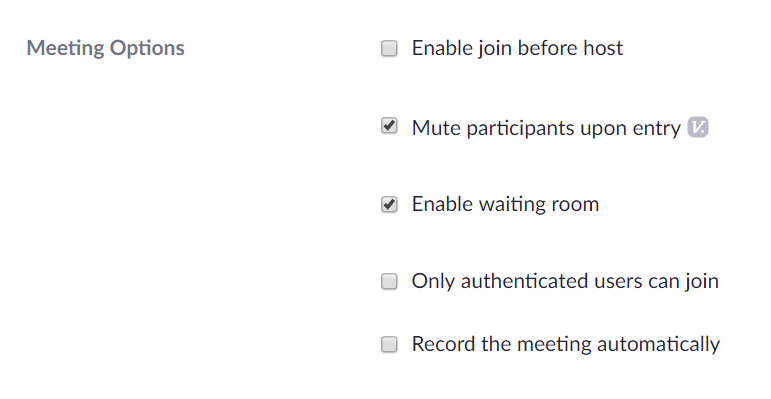
Finally, in the Meeting Options settings area, Disable the “Enable join before host” checkbox, enable the “Mute participants upon entry” checkbox and Enable the “Enable waiting room” checkbox.
Once you’ve completed that, you can press the blue “Save” button to finish scheduling your Meeting!
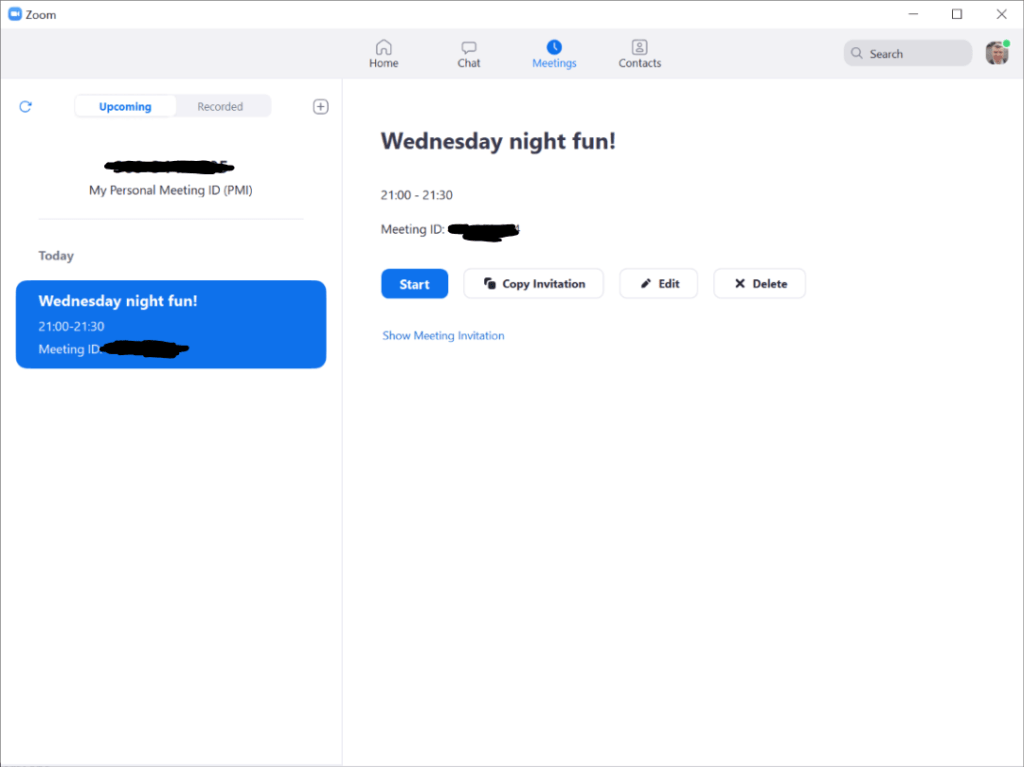
When it comes to start your meeting, you can simply open the app, go to the “Meetings” tab, select your meeting and hit the blue “Start” button.
18 – Promoting your Meetup
You’ll definitely want to let your attendees know about how to join your upcoming meeting.
You can do this through whichever platform you usually use. Obviously, if you’re using something like Meetup or EventBrite, then you can include a link to the zoom meeting there.
You can find the link to your zoom meeting within the scheduled meeting you created above, once it’s saved, however, the link will include a password;
It’s very important however that you don’t share the link and password together, so make sure that you remove the “?pwd=kjsduivhron8490p” section from your link before you add it to the event details. This will help prevent your meeting becoming open.
You can now explain in your event details that you will distribute the password via email, directly to the attendees who have registered, closer to the event time.
When you’re advertising your event elsewhere on social media, you can share a link to your event details, but I wouldn’t share a link to Zoom meeting on social media at all, as this is where a lot of “ZoomBombers” are sourcing the link to the events.
Closer to the event time, you can email your attendees and let them have the full link (and password if you want to cover your bases).
You should also let people know on social media that you will be emailing them, and once the email has been sent you can let everyone know to go and check their inboxes.
You should also tell people to get in touch via social media if they can’t gain access to the meetup. Perhaps only followers via DM, so you can vet people before handing over the password.
19 – Running your Meetup
When it comes to running your meeting, there’ll be a few things you need to take care of.
This will depend how you want to run your meeting, however, I like to have a few minutes of social time before the meeting gets started.
Not only is this good to set the scene, but you can also use this time to explain to the attendees how the meetup will run, your code of conduct, showing intro slides, thanking sponsors etc.
The first thing you’ll need to be aware of though is, as you’ve enabled a Waiting Room, you’ll need to make sure you admit people who are waiting in it. You may need to press the “Manage Participant” button at the bottom of the screen.
Next up, as we’ve set attendees to be muted on entry, you’ll need to remember to un-mute them before they can talk.
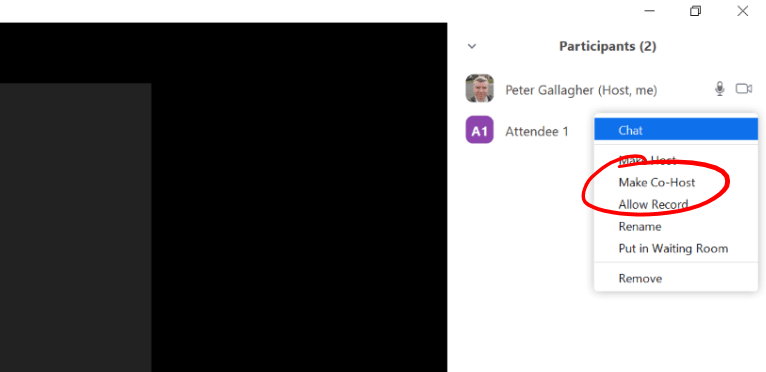
Once your speakers arrive, you’ll need to make them a co-host with the “Make Co-Host” menu item, so that they can share their screens. I’d also recommend that you ask them to help with admitting people as well as moderating the chat room.
When it comes to the time for the speakers to present, it’s best to mute everyone with the “Mute All” button at the bottom of the Participants window. Pressing that will show a dialog asking if you’d like to give participants the ability to un-mute themselves;
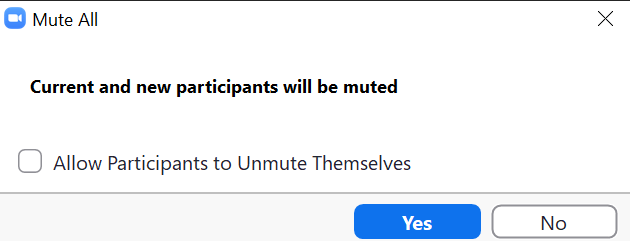
I highly recommend that you disable the “Allow Participants to Unmute Themsleves” so that the speaker doesn’t get interrupted during their talk.
You can use the time before the speakers talk to let attendees know that they should either use the Chat Window to ask questions, or wait until the speaker has finished.
Don’t forget to un-mute your speakers though!
Throughout your meeting, you’ll also need to pay very careful attention to your attendees behaviour. If any of the attendees start doing anything which contravenes your Code of Conduct, then you can either warn them, send them to the waiting room / put them on hold if is just a minor misdemeanour, or remove them entirely if they’re clearly a “ZoomBomber”.
You can enlist the help of everyone there to help you moderate, if anyone at all spots something untoward, you can have them send you a message.
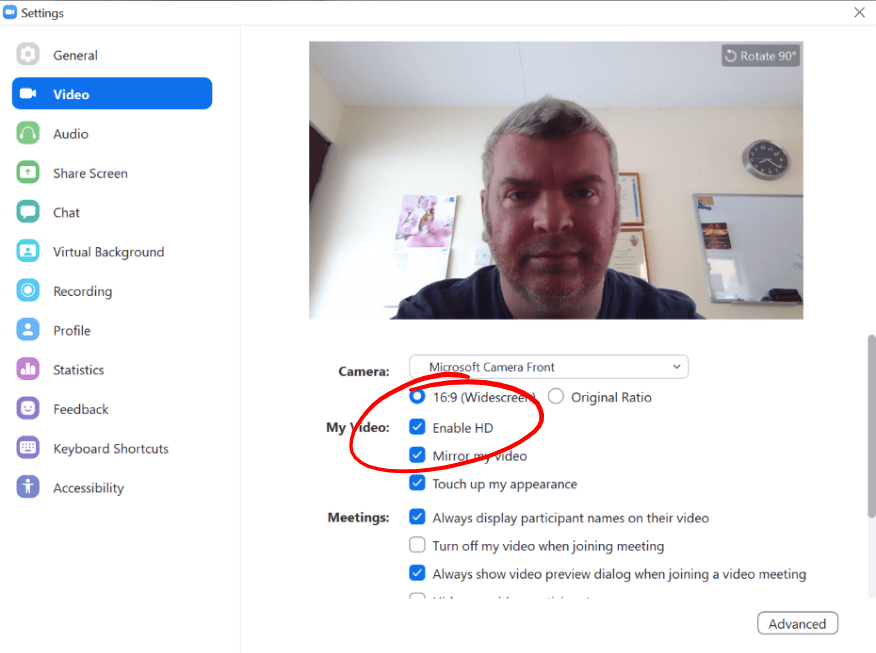
20 – HD Video
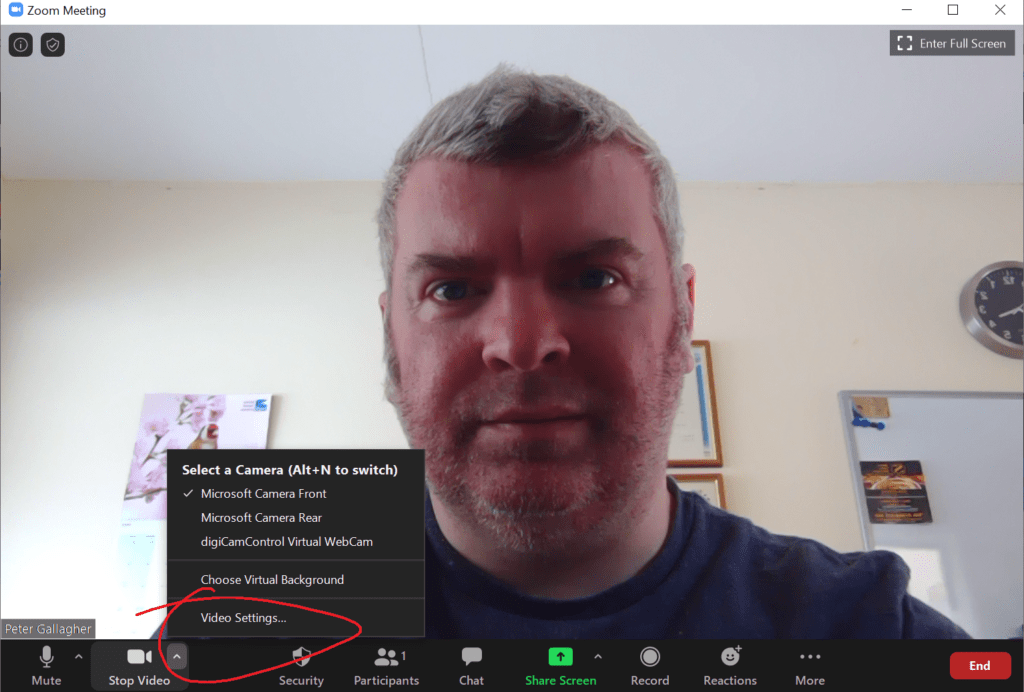
For your Zoom Setup, you can make use of HD Video for your webcam. While the meeting is running, if you click the small up arrow to the right of the Video button, you can click the Video Settings Menu Item;
Next, check the “Enable HD Video” checkbox;
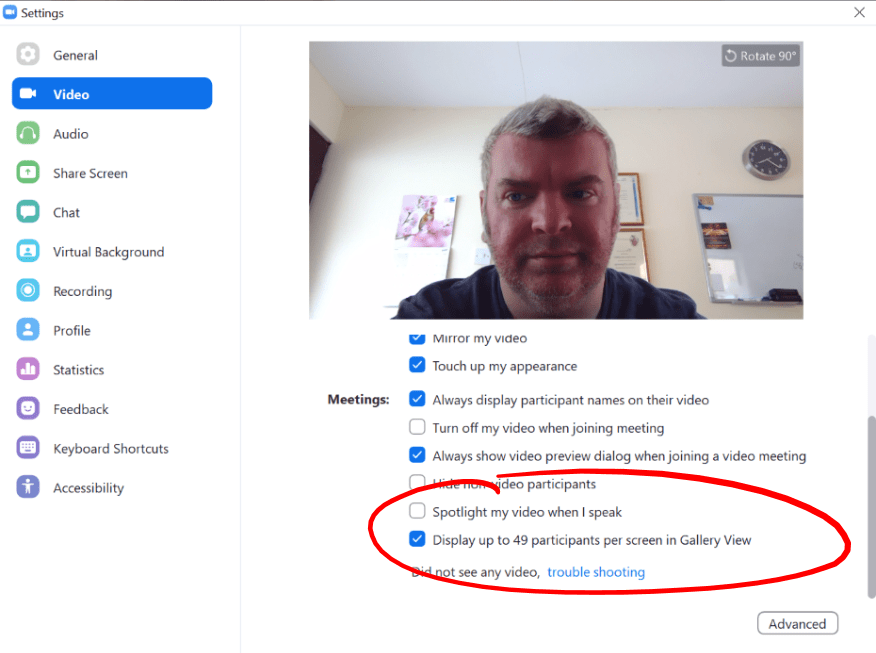
21 – Display up to 49 Participants
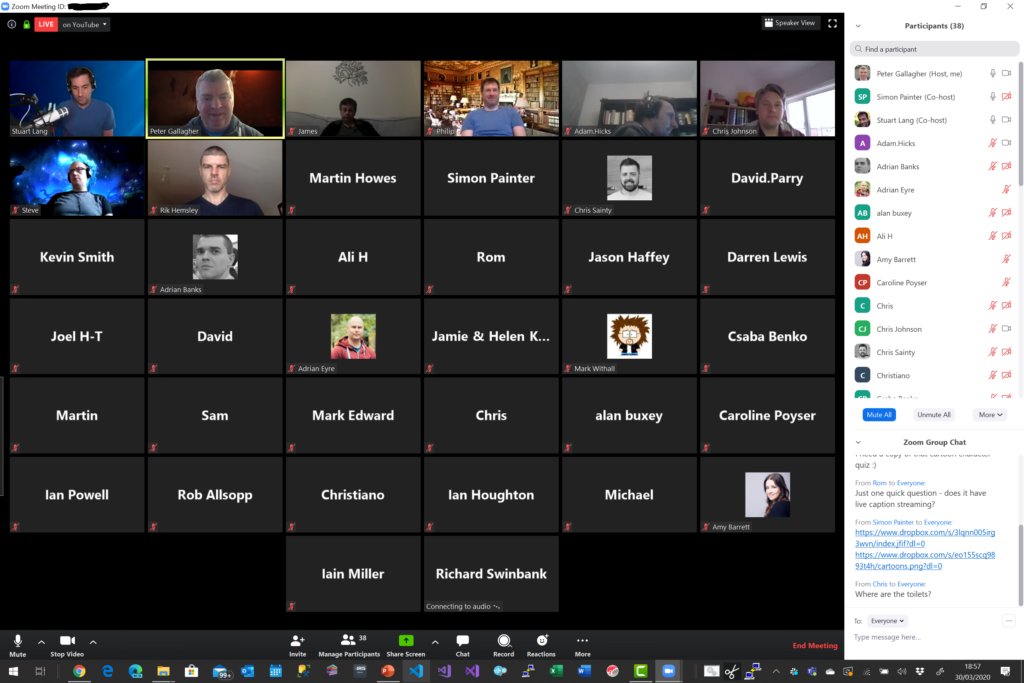
Finally, to maximise the social aspect of the meetup, the more people you can see the better… This, for me at least, is the killer feature of Zoom, and one of the main reasons I prefer Zoom over Teams for instance.
Still in the Zoom Video Settings, scroll towards the bottom of the list and check the “Display up to 49 participants per screen in Gallery View” checkbox;
22 – Setting up your Kit
Thanks to Pete Vickers over on teams, Scott Hansleman has a good video over on YouTube on how to setup your Mic and WebCam for a good Zoom Meeting;
That’s it! Go, take your meetup online!
Let me know if you have anything to add or comment!