
Blazor is the buzzword in SPA frameworks in 2020. Microsoft are all in behind it, and for good reason.
Born out of Knockout and developed off the cuff by Steve Sanderson, Microsoft grabbed his concept and ran with it.
Now one of the better SPA frameworks out there, Blazor is free and open source.
Blazor Types
There are a few different version of Blazor to choose from, and I won’t go into much detail here about each one as there are a myriad of posts around that will discuss that in depth.
The main two are;
Blazor Server:
- Lives on the Server
- Code written in Razor + C#
- Thin client in the Browser
- DOM changes coordinated by the server using SignalR
- Online only
Blazor WebAssembly
- Lives in the browser
- Code written in Razor + C#
- Runs in the Virtual Machine in the Browser
- Executes actual Dot NET core Dlls
- Works offline
Microsoft are working on a few more experimental types too;
Blazor PWA (Progressive Web App)
Blazor Hybrid – Native apps for Mobile Devices using web Technologies
Blazor Native – Fully native Mobile Apps using Native Controls
Blazor Desktop – Electron based Desktop Apps.
You can find more info here… https://visualstudiomagazine.com/articles/2019/09/26/blazor-future.aspx
Blazor WebAssembly Flavours
On top of the various different version of Blazor above, there are a couple of types of Blazor Web Assembly too;
Traditional Blazor WebAssembly
- Single Client-Side Project
- Can reach out to API End points
- WebAssembly
- Dot NET Core in the Browser
ASP Hosted Blazor WebAssembly
- Client-Side, Server-Side and Shared Projects
- Client-Side same as Traditional WebAssembly
- Server-Side Serves Application files and hosts API Endpoints – Dot NET Core
- Shared Project shares Business Logic and Models between Client and Server projects – Dot NET Core
Azure App Service + Web Apps
Azure App Service is a Microsoft offering within Azure which hosts Web Apps written in various languages including Dot NET Core, Node and PHP.
Azure App Service hosts the websites in containers, which means you can pick and choose which platform and operating system you’d like to run your app in.
Each individual application is stored in it’s own Web App hosted in a container in an App Service.
Azure Web App and GitHub Actions
We always want to be working in an agile way, and employing a CI/CD pipeline in our development is definitely what we should be doing along that journey.
One great way we can accomplish this is to combine Azure Web Apps and GitHub Actions.
We can use GitHub as our Source Control Repository and hook up a GitHub action which, whenever code is checked in to the repository, build our website files and publish them to an Azure Web App.
The is all orchestrated in code using a YAML file… This YAML file contains all the required steps as code to build the website, create the artefacts and publish them to the Web App.
Getting Started
There are a few steps we need to run through to get to the finished solution;
- Create a GitHub Repo
- Create an Azure App Service Plan
- Create a Web App
- Create a ASP.NET Hosted Blazor WebAssembly Project
- Publish Code direct from Visual Studio
- Create a GitHub Action
- Check in Code and watch the GitHub action working
- Fix an issue with the web.config file
1: Create a GitHub Repo
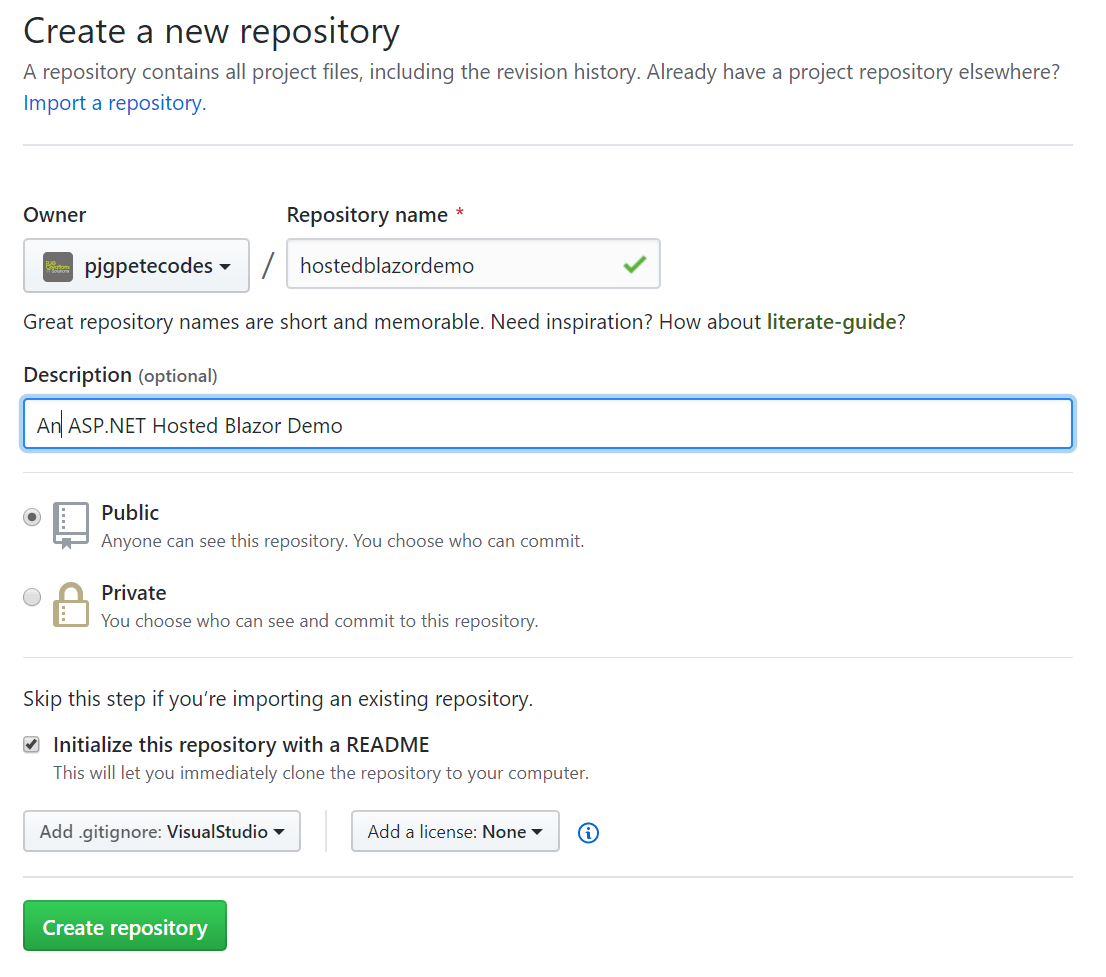
We’ll start out by creating a GitHub repository to house our code.
Head over to GitHub and Sign in. Next up create a new Repository. Make sure to add a README and also a Visual Studio .gitignore, as we’re going to be creating a Dot Net Core based project in Visual Studio. Personally I think this option is a little confusing, and really should be a more specific naming convention.
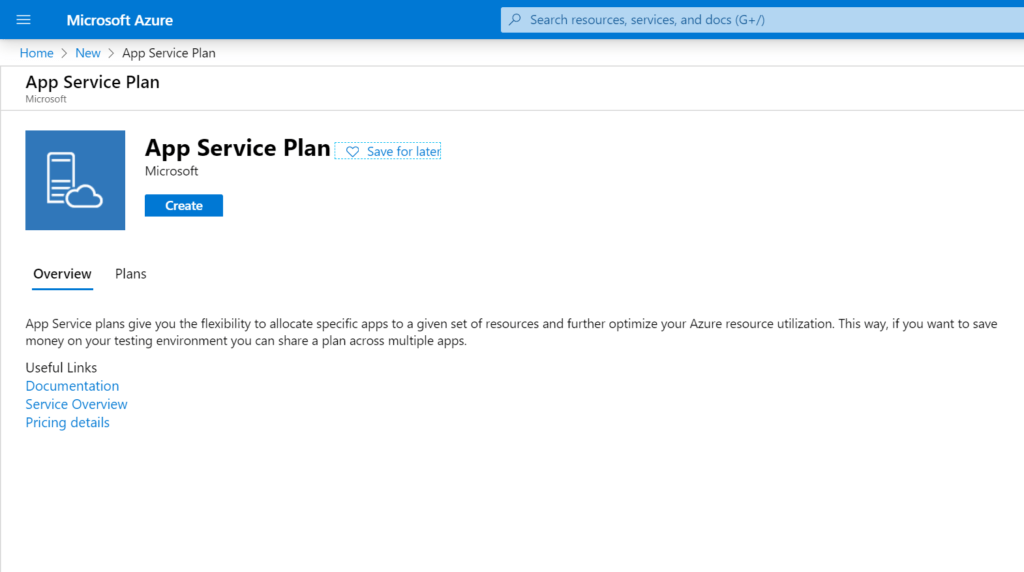
2: Create an Azure App Service Plan
Now head over to portal.azure.com, sign in and click on the “Create a Resource” button to add a new resource;

Enter “App Service Plan” in the search box, and choose that option from the results.
Click the blue “Create” button to create a new Azure App Service Plan;
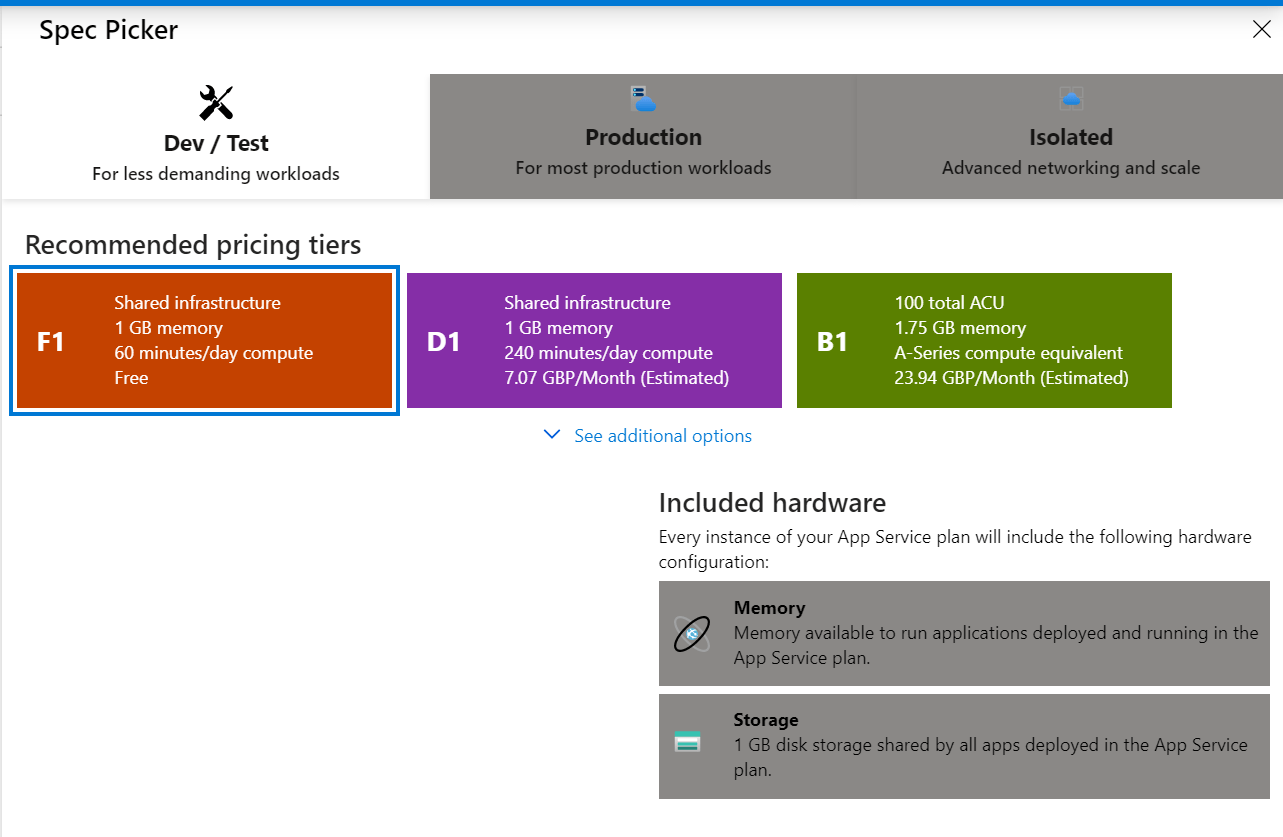
Choose a Subscription, create a new Resource Group to house your new resources and give your App Service Plan a Name, choose the Windows Operating System and a region close to where you are;

Next, choose the “F1” Tier from the “SKU and Size” options;
Finally, hit the blue “Review + Create” button at the bottom of the screen, confirm your setups and create your App Service Plan.
3: Create a Web App
Next, we’ll create a Web App and house it the App Service we created in the last step.
Head back to portal.azure.com and click the “Create a Resource” button again. This time search for “Web App” to begin creating a new Web App.
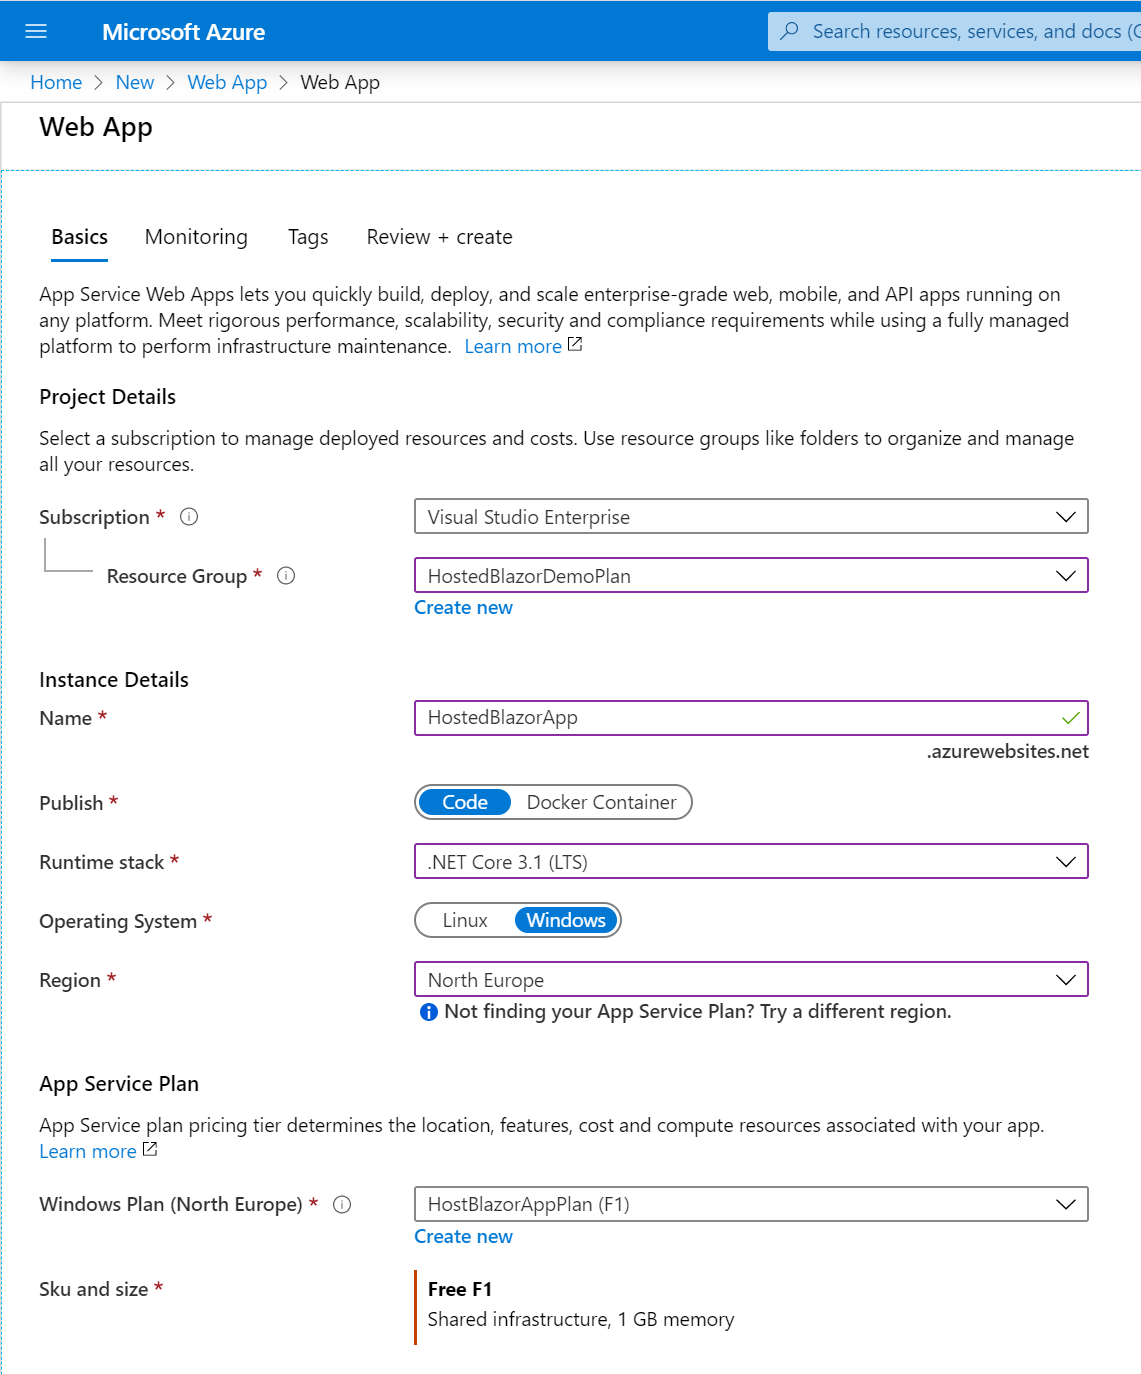
Choose the Subscription and Resource Group you used in Step 2.
Now, give your Web App name. This will form part of the URL you’ll use to access your Web App, so it will need to be unique.
Choose “Code” as the “Publish” method, and “.NET Core 3.1 (LTS)” as the “Runtime Stack“.
This should default the “Operating System” to “Windows“.
Choose the same region as you chose in Step 2 so that you can use the App Service Plan you created in Step 2.
Next, choose the App Service Plan you created in Step 2 from the “Windows Plan” drop down at the bottom of the screen.
Finally, hit the blue “Review and Create” button, review your settings and create your Web App.
4: Create a ASP.NET Hosted Blazor WebAssembly Project
Now let’s head over to Visual Studio 2019 and create our Hosted Blazor WebAssembly App.
You’re going to need the latest VS 2019… So go ahead and grab that from the Microsoft site. The free Community Edition is perfect for this.
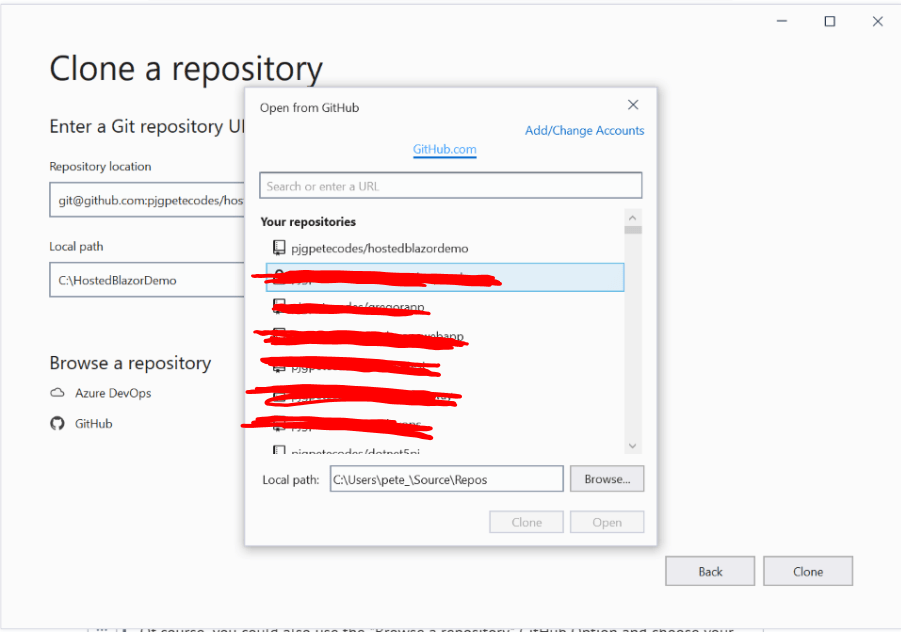
Once you have that downloaded and installed, fire it up and hit the “Clone a Repository” button;

Head back to your GitHub Repository click the “Clone or Download” button and copy the address.

Switch back to the VS2019 Clone Repo Dialog and paste the address into the “Repository Location” box, then choose a location for your repository;

Of course, you could also use the “Browse a repository” GitHub Option and choose your Repository that way too;
Once the repository has finished cloning, click File>Add and choose New Project;

In the “Search for Templates” search box, enter “Blazor App” and choose the “Blazor App” from the list below;
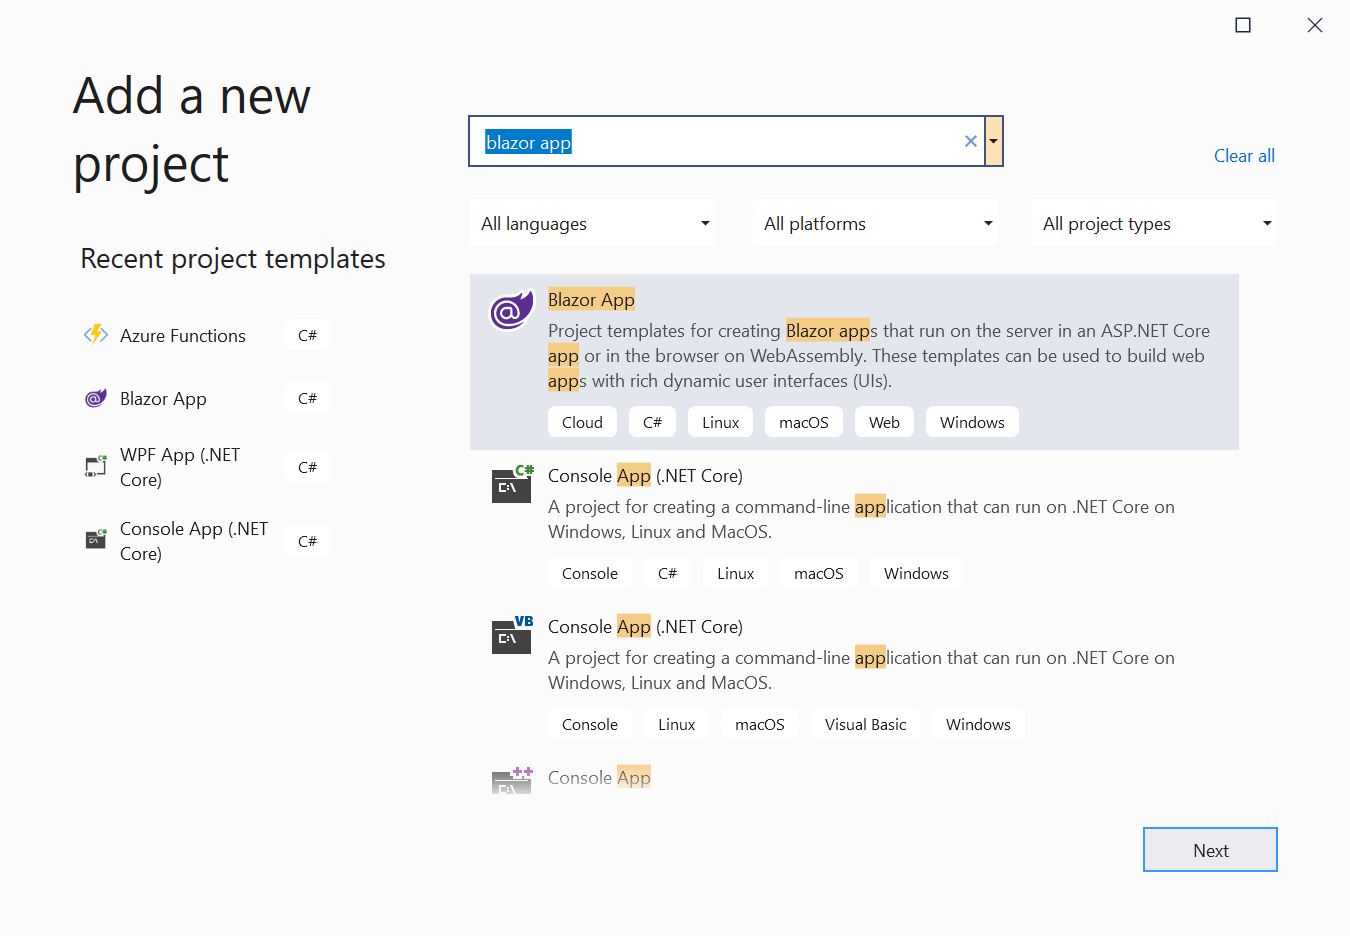
Give your App a name and hit the “Create” button.

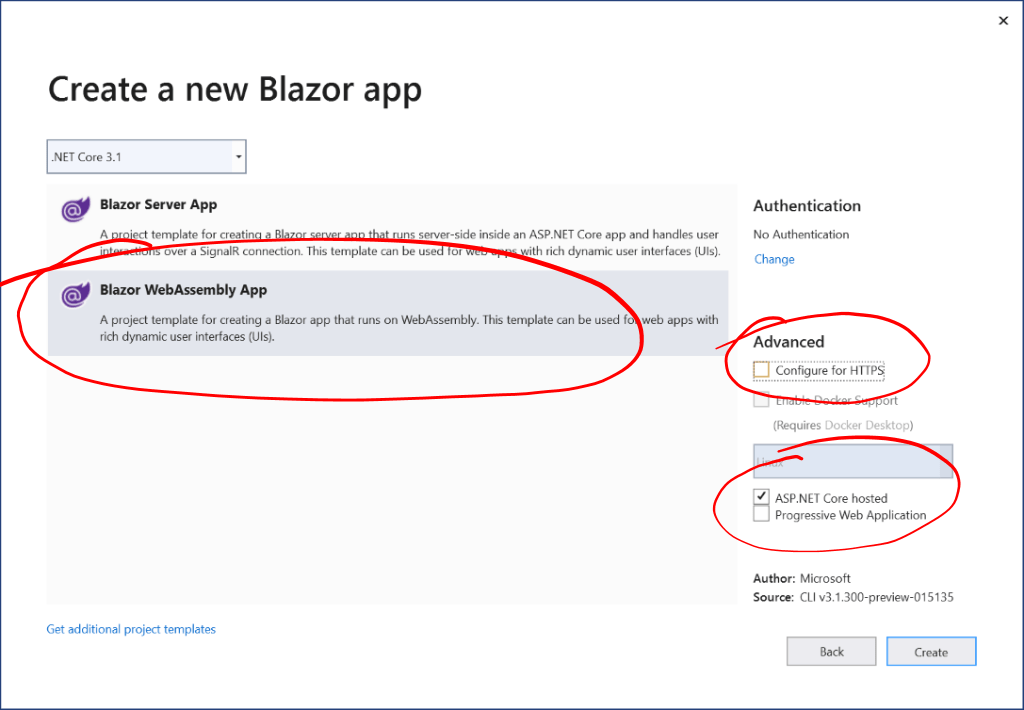
On the next page, select “Blazor WebAssembly App“, deselect “Configure for HTTPS” (we don’t need that for this demo), select “ASP.NET Core hosted” and hit the “Create” button;
I had an issue with permissions at this point, so needed to restart Visual Studio… So go ahead and do that if required.
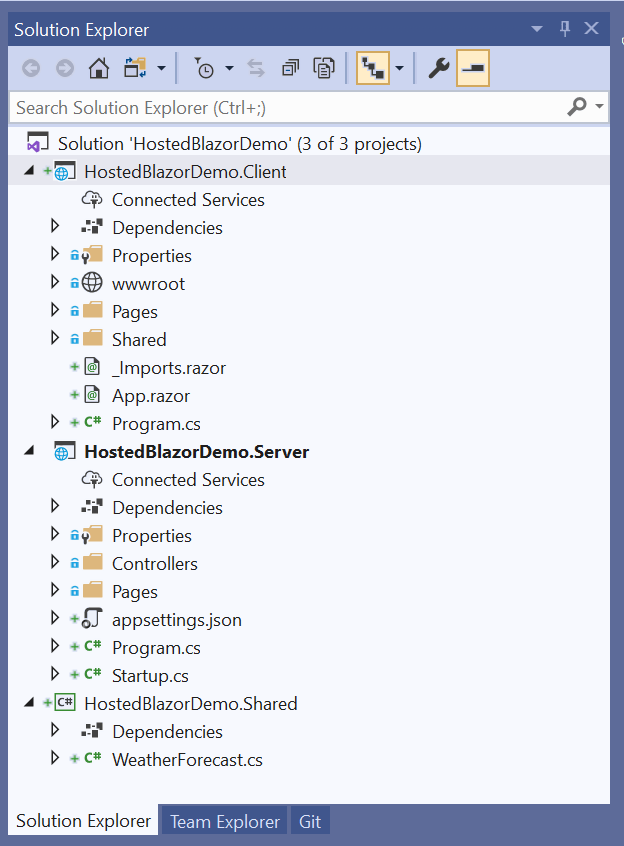
You’ll see in the Solution Explorer that you have three projects; “Client“, “Server” and “Shared“;
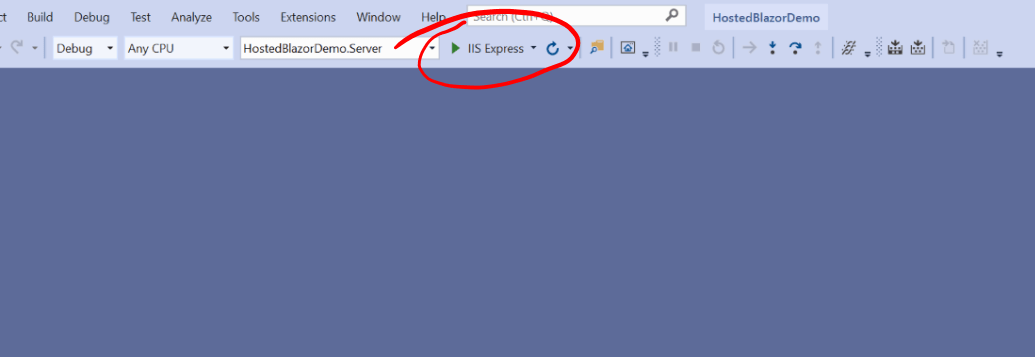
We can give the Web App a quick test by hitting the Run with “IIS Express” Button;
5: Publish Code direct from Visual Studio
Before we get on to using GitHub Actions, let’s make sure that we’ve got the rest of the infrastructure hooked up correctly by publishing our site directly from Visual Studio.
Head back to portal.azure.com and navigate to your Web App. Click the “Get publish profile” button;

This will download a file containing the wherewithal for Visual Studio to be able to connect to and publish our files to the Web App.
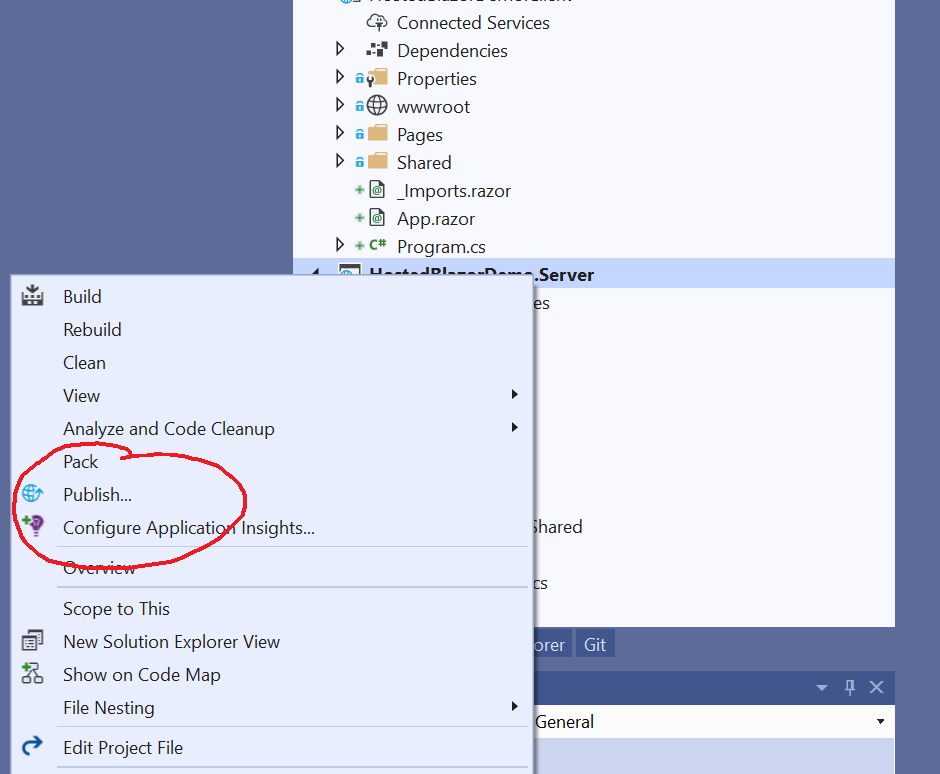
Switch back to Visual Studio and right click on the Server project and click the “Publish” menu item;
From the list of options, select the “Import Profile” option and press the Next button;
On the next page, browse and locate the Publish profile you downloaded earlier and hit the “Finish” Button;

You’ll now have a summary of the Publish Plan, check everything is ok and hit the “Publish” Button;
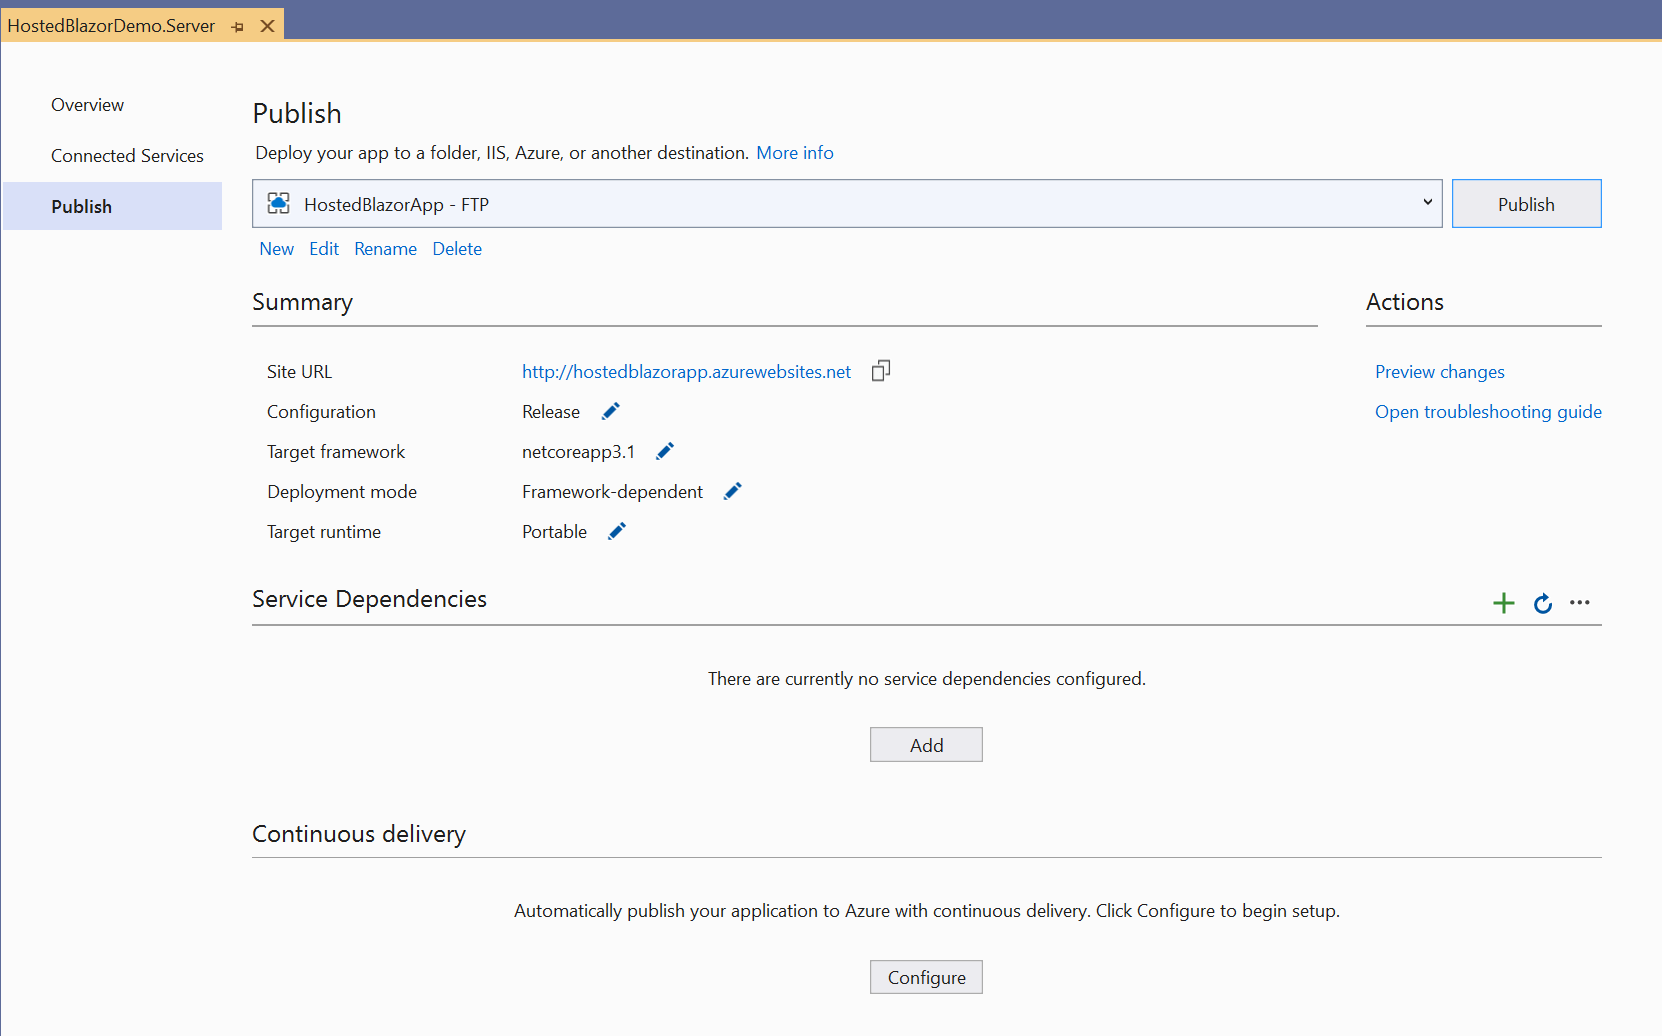
The publish process may take a few minutes to complete;
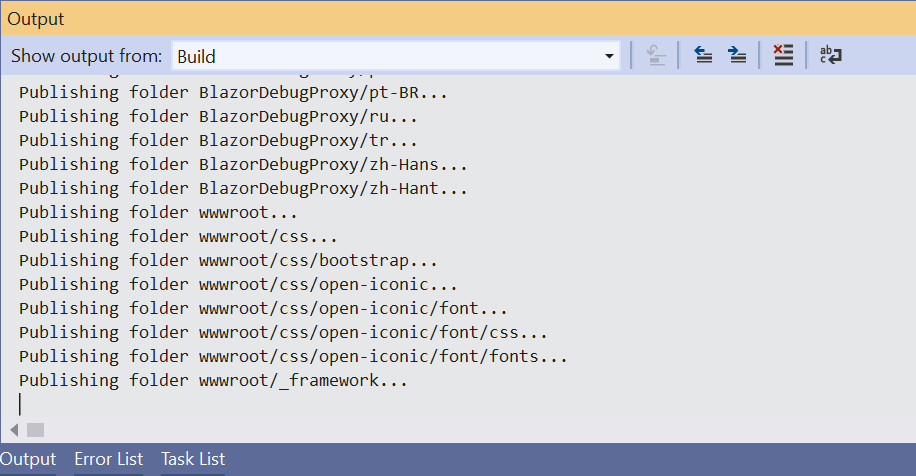
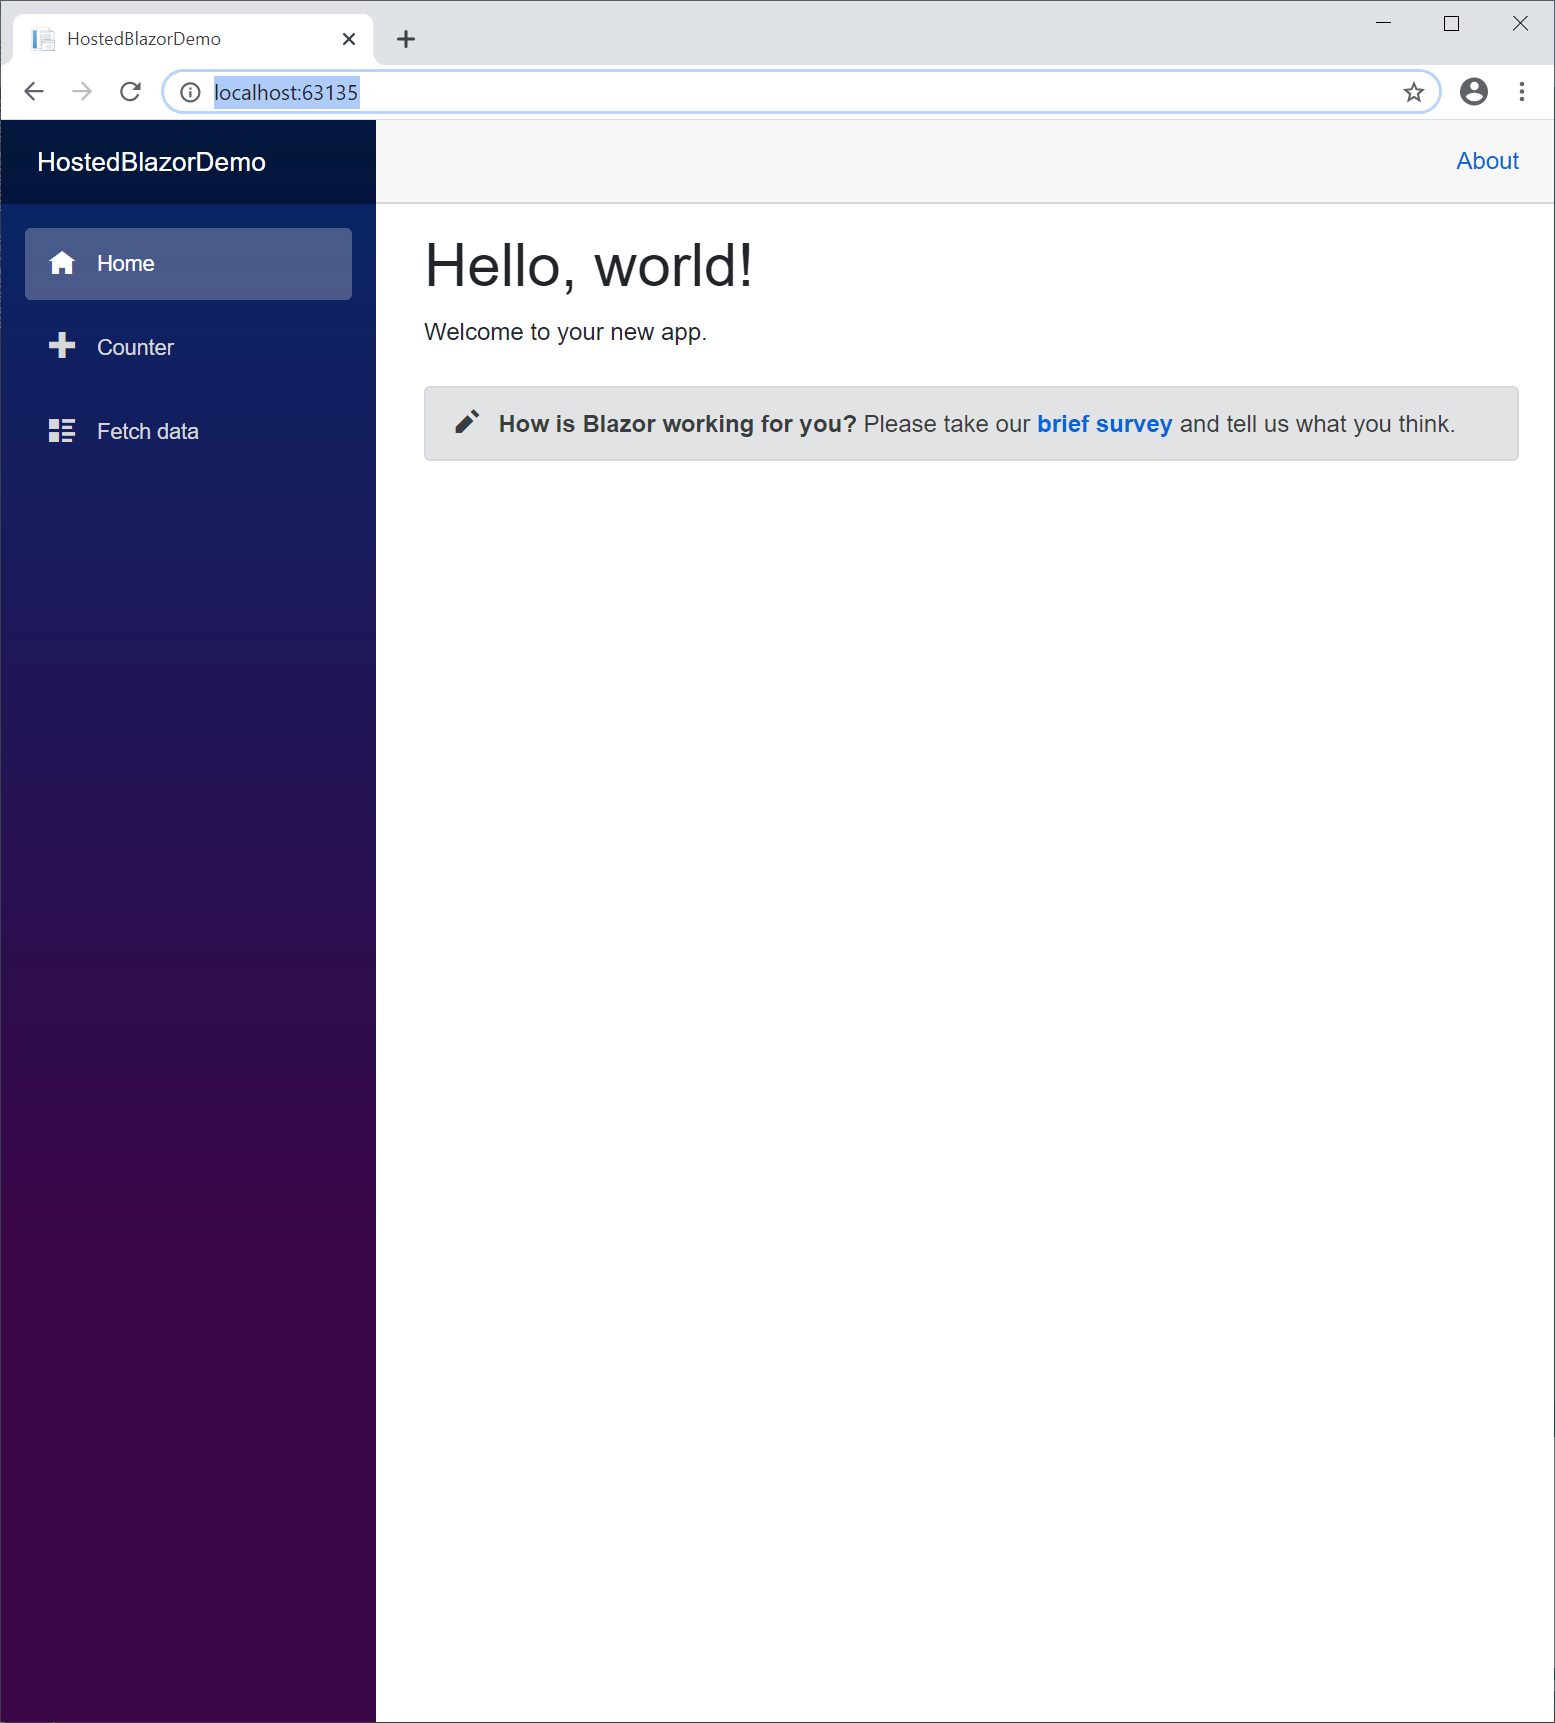
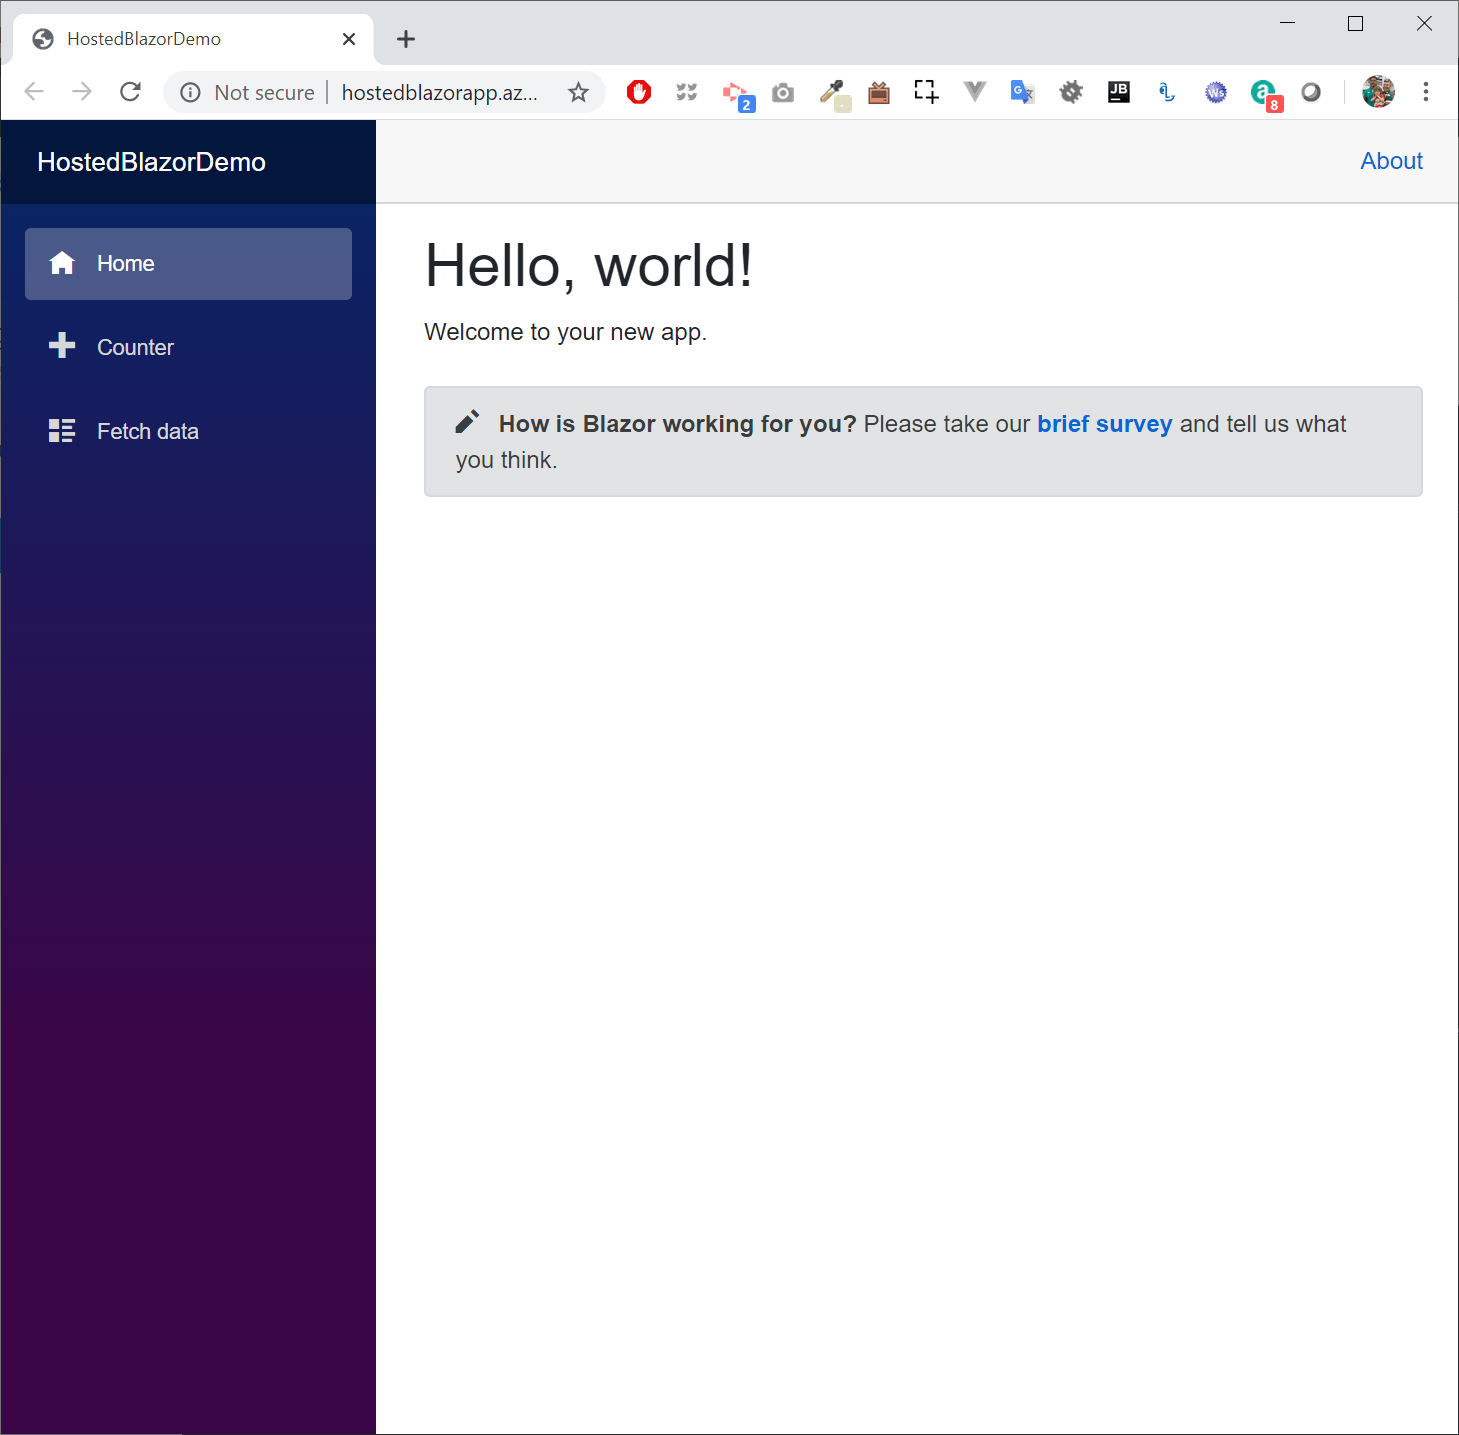
Once the process is complete, a browser window should open with your working Hosted Blazor App!

6: Create a GitHub Action
Now that we’ve confirmed that our infrastructure is all up and running, we can move on to automating deployments to the web app when code is checked in to the GitHub repository.
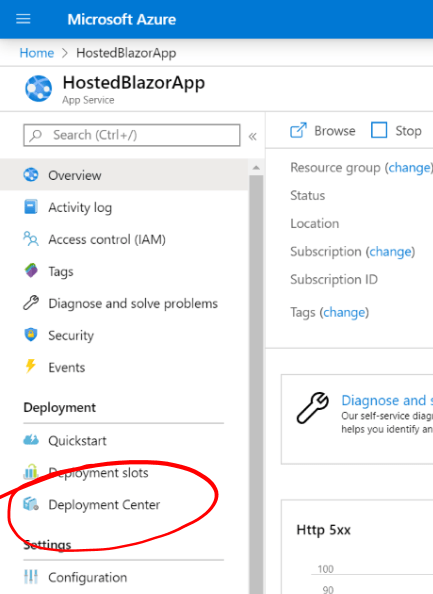
Head back to portal.azure.com and your Web App. Click the “Deployment Centre” menu item on the left;
You’ll see there are quite few different options for deploying to Azure Web Apps, split into CI/CD Pipelines with “Azure DevOps” or “Git” and Manual Deployments with “OneDrive” and “FTP“.
Select the GitHub option and hit the blue “Continue” button. You may of course need to sign in to GitHub here.;

Next we can choose between the “App Service Build Service“, “GitHub Actions” or “Azure Pipelines“. Select “GitHub Actions” and press the blue “Continue” button.

On the next screen, select your GitHub Organisation and the project you created in Step 1 and press the blue “Continue” button;

On the final screen you’ll see the generated YAML file for the GitHub action at the bottom of the page;

Go ahead and press the blue “Finish” button. You’ll notice that the screen says “No Deployment Data Available”, which is because we haven’t actually checked any code in yet.
7: Check in Code and watch the GitHub action working
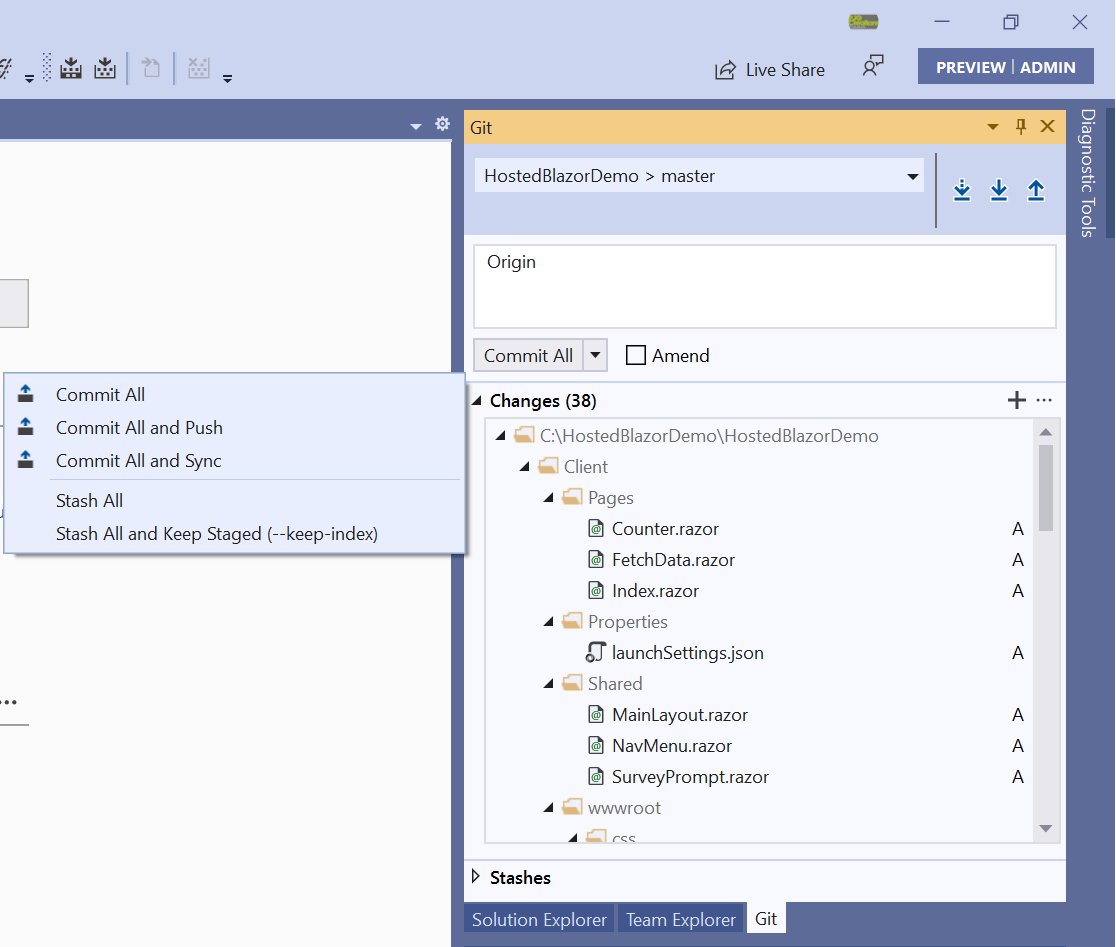
Switch back to Visual Studio, and if it’s not already visible, then open the “View” menu and show the GitHub Window by selecting the “Git Window” Menu Item;

Before we can commit and push our code, we need to pull in the change that creating the GitHub Action has made to the repository.
Click the “Pull” button in the top right of the Git window;

We can now check our code in and push it up to the remote repository. Check through the files we’re going to check in and enter a Commit Message. Clicking the small down arrow next to the “Commit All” button will show a fly out where you can choose “Commit All and Push”;
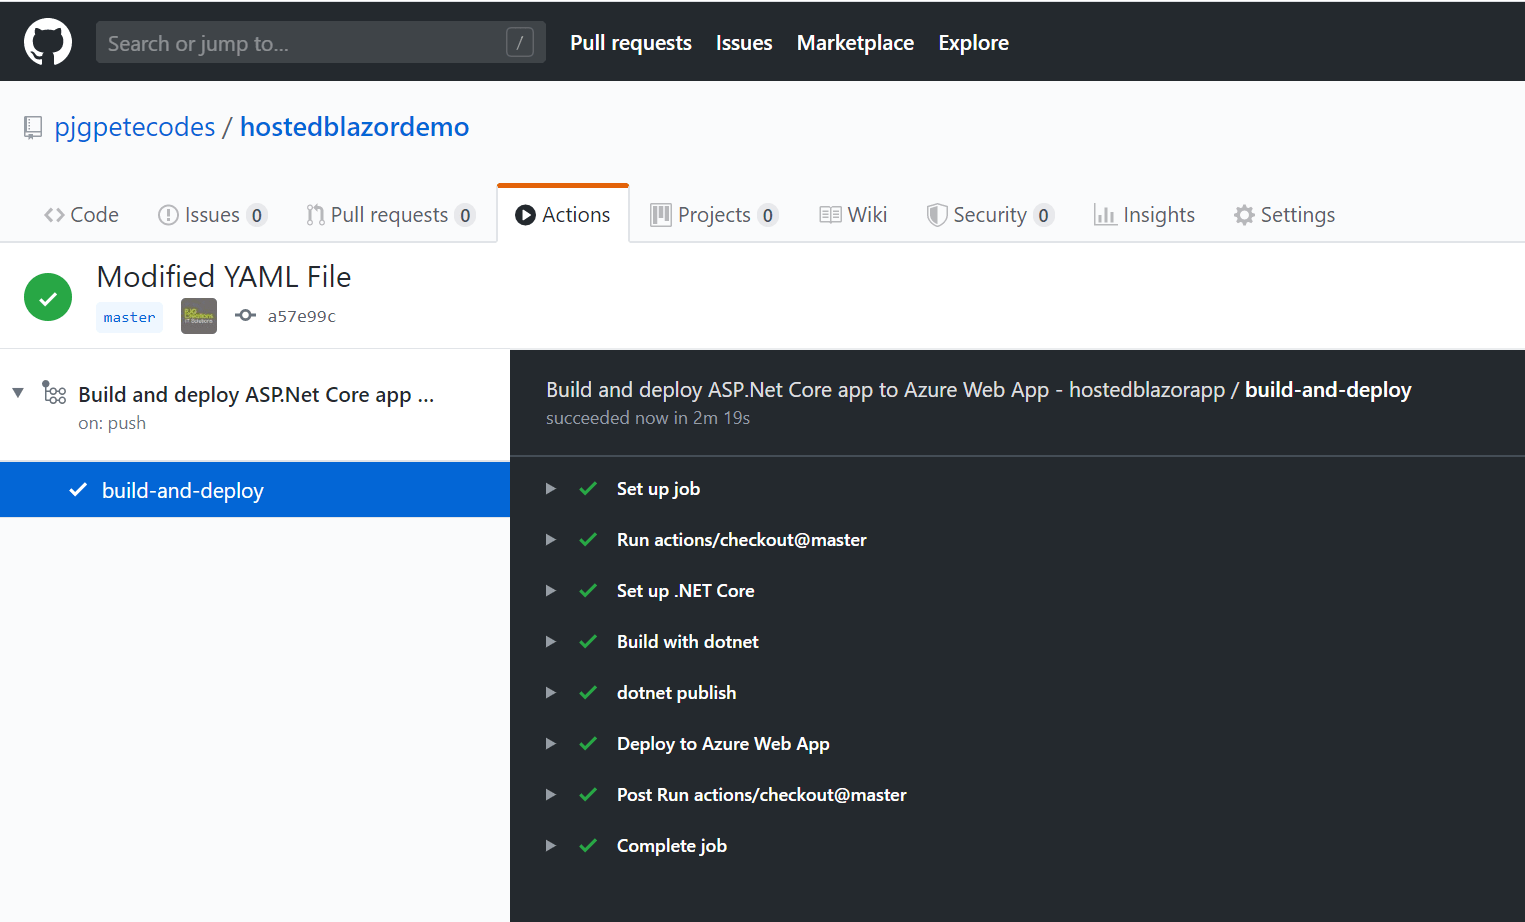
Once the code has been checked in it will kick off the GitHub Action. Return to your GitHub repository. Click the “Actions” item along the top to show the Actions page;
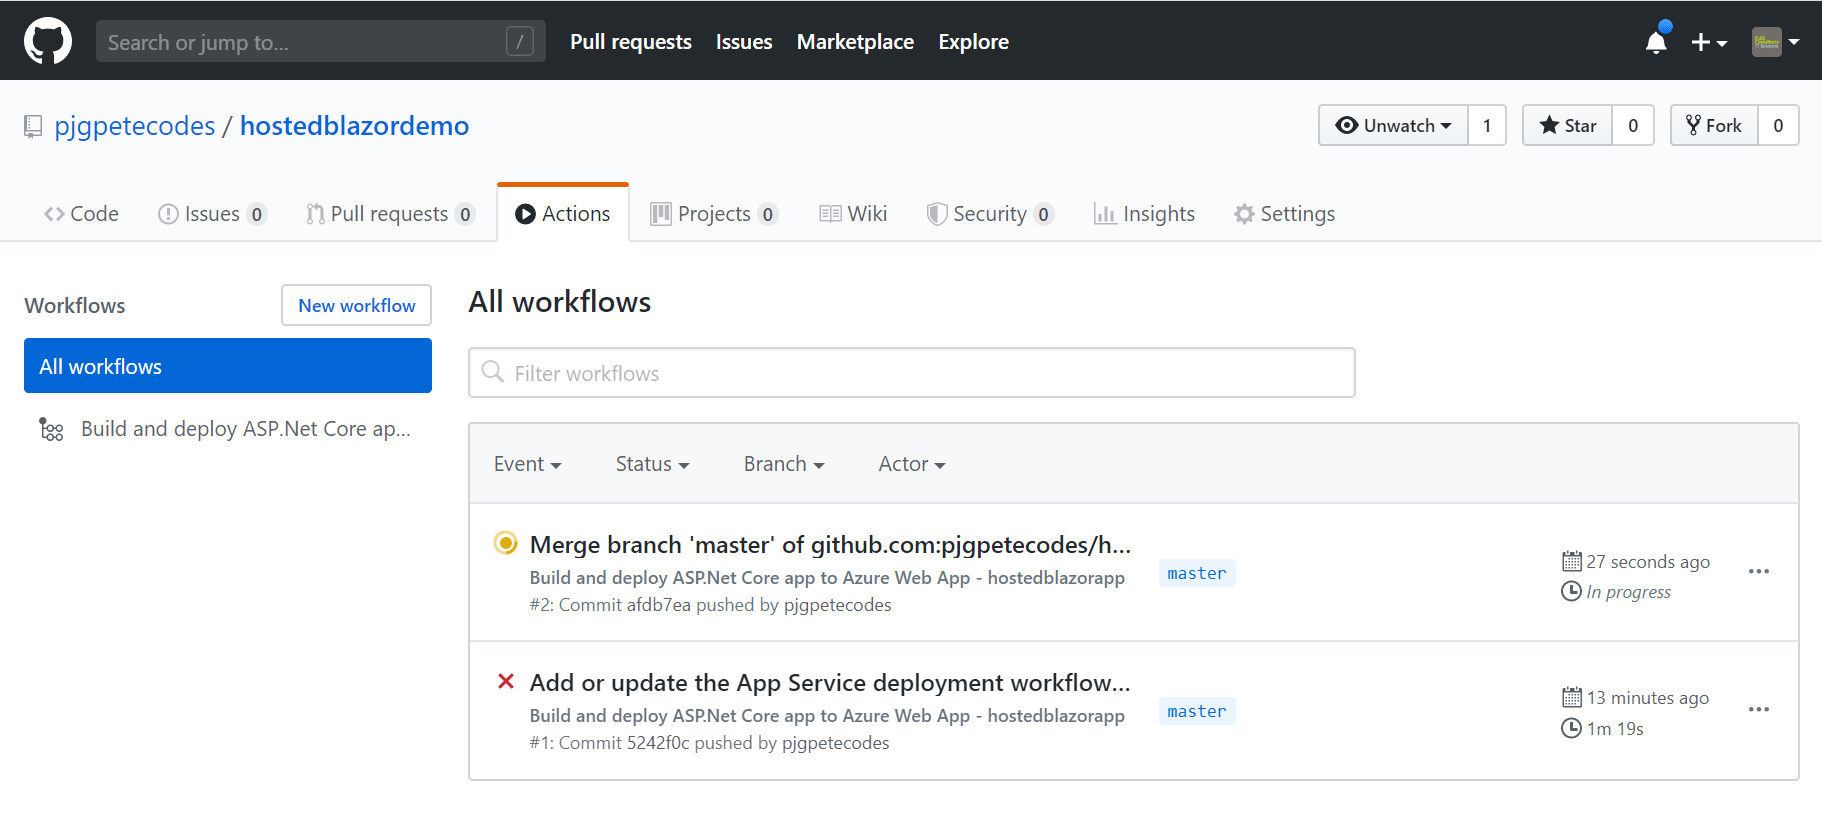
You’ll see the first action which failed as there weren’t any source files for the Action to build when it was first created.
Above that, you’ll see an in progress action. Clicking that will take you to the detail of the currently progressing action;
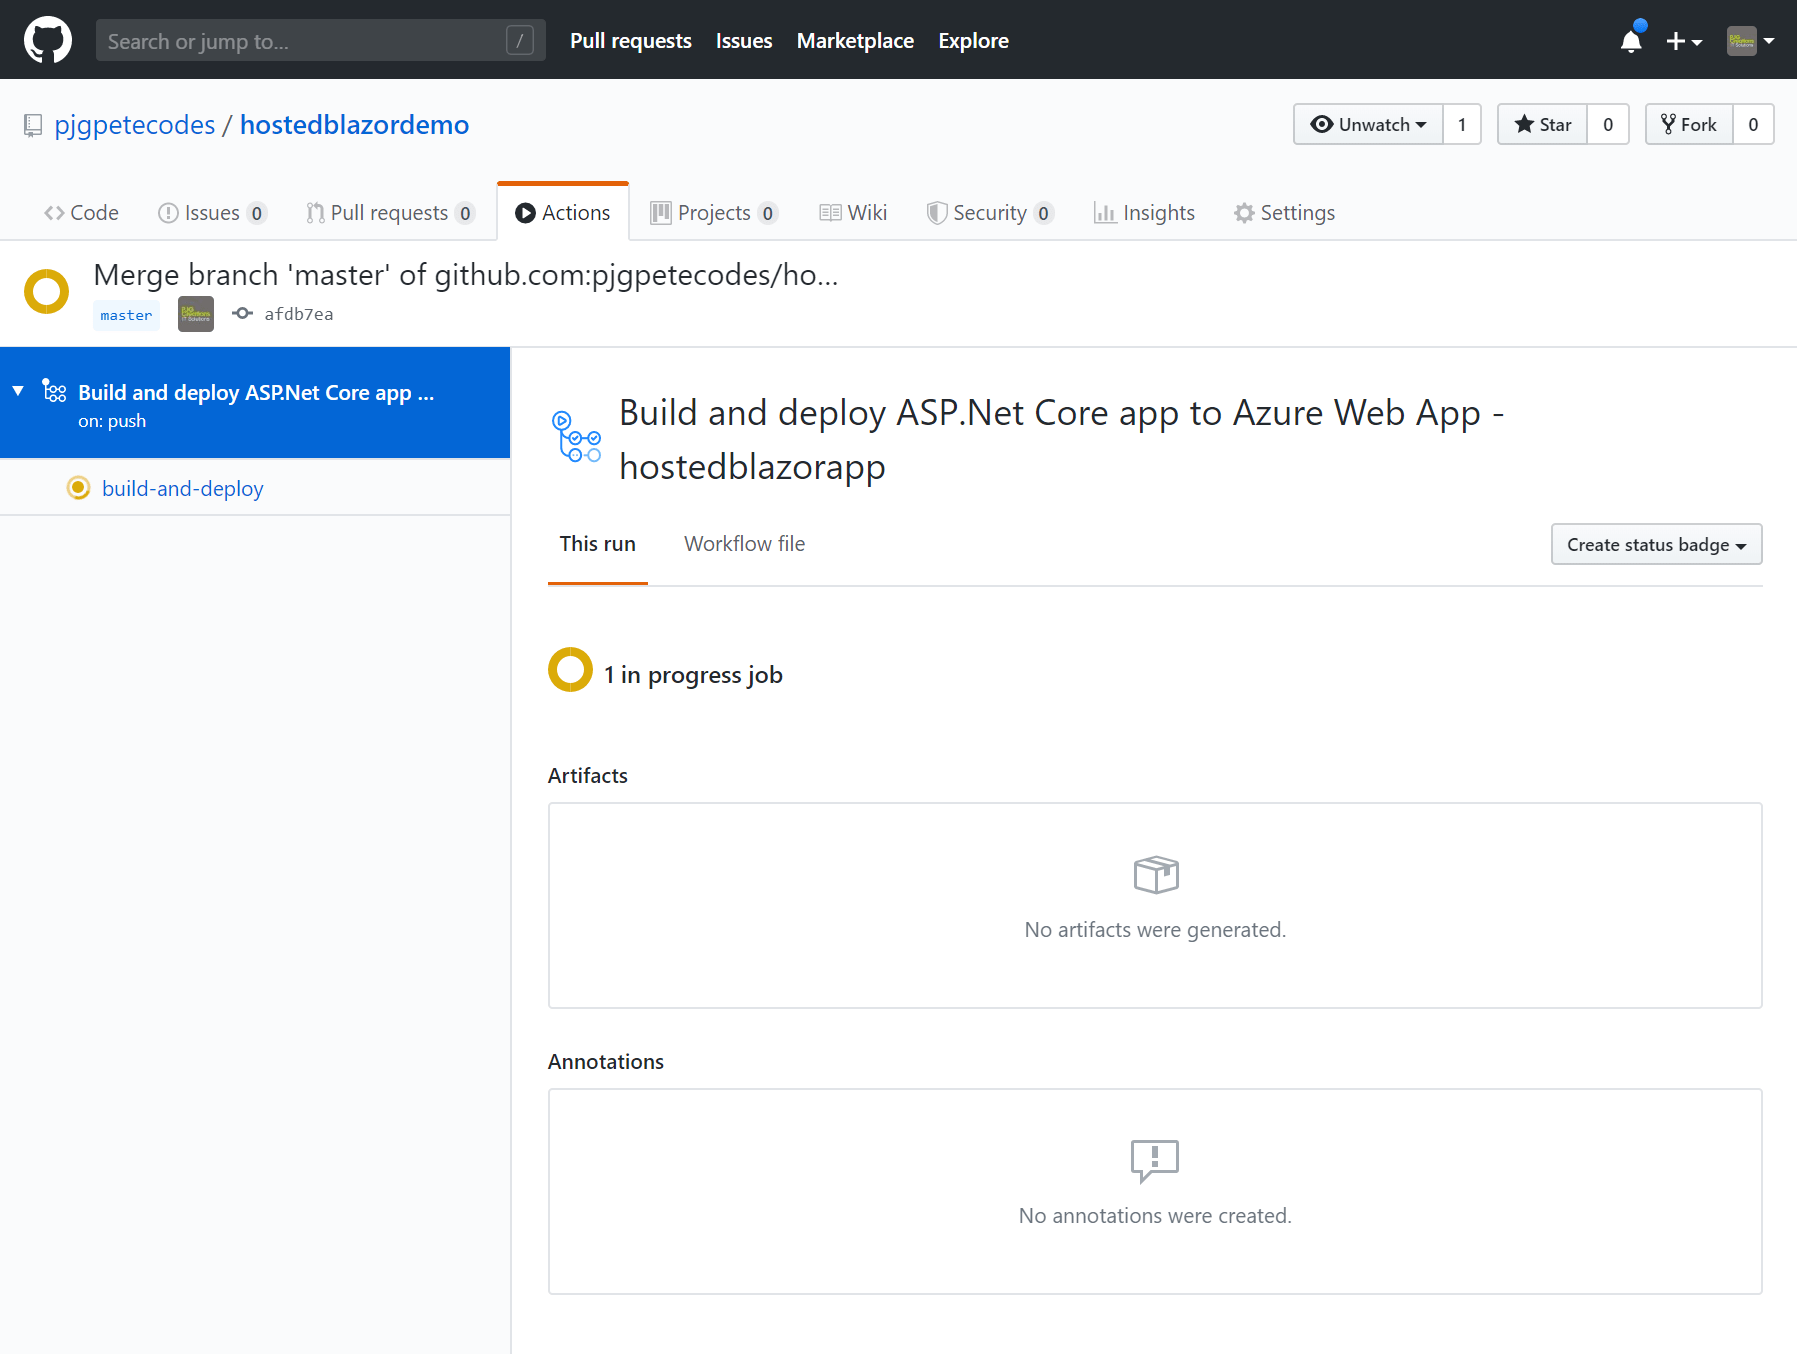
We can monitor the progress of the action by clicking the “Build and Deploy” item on the left;

Depending on how your formatted your solution, you may have an error at the “Build with dotnet” step saying ” MSBUILD : error MSB1003: Specify a project or solution file. The current working directory does not contain a project or solution file.”;
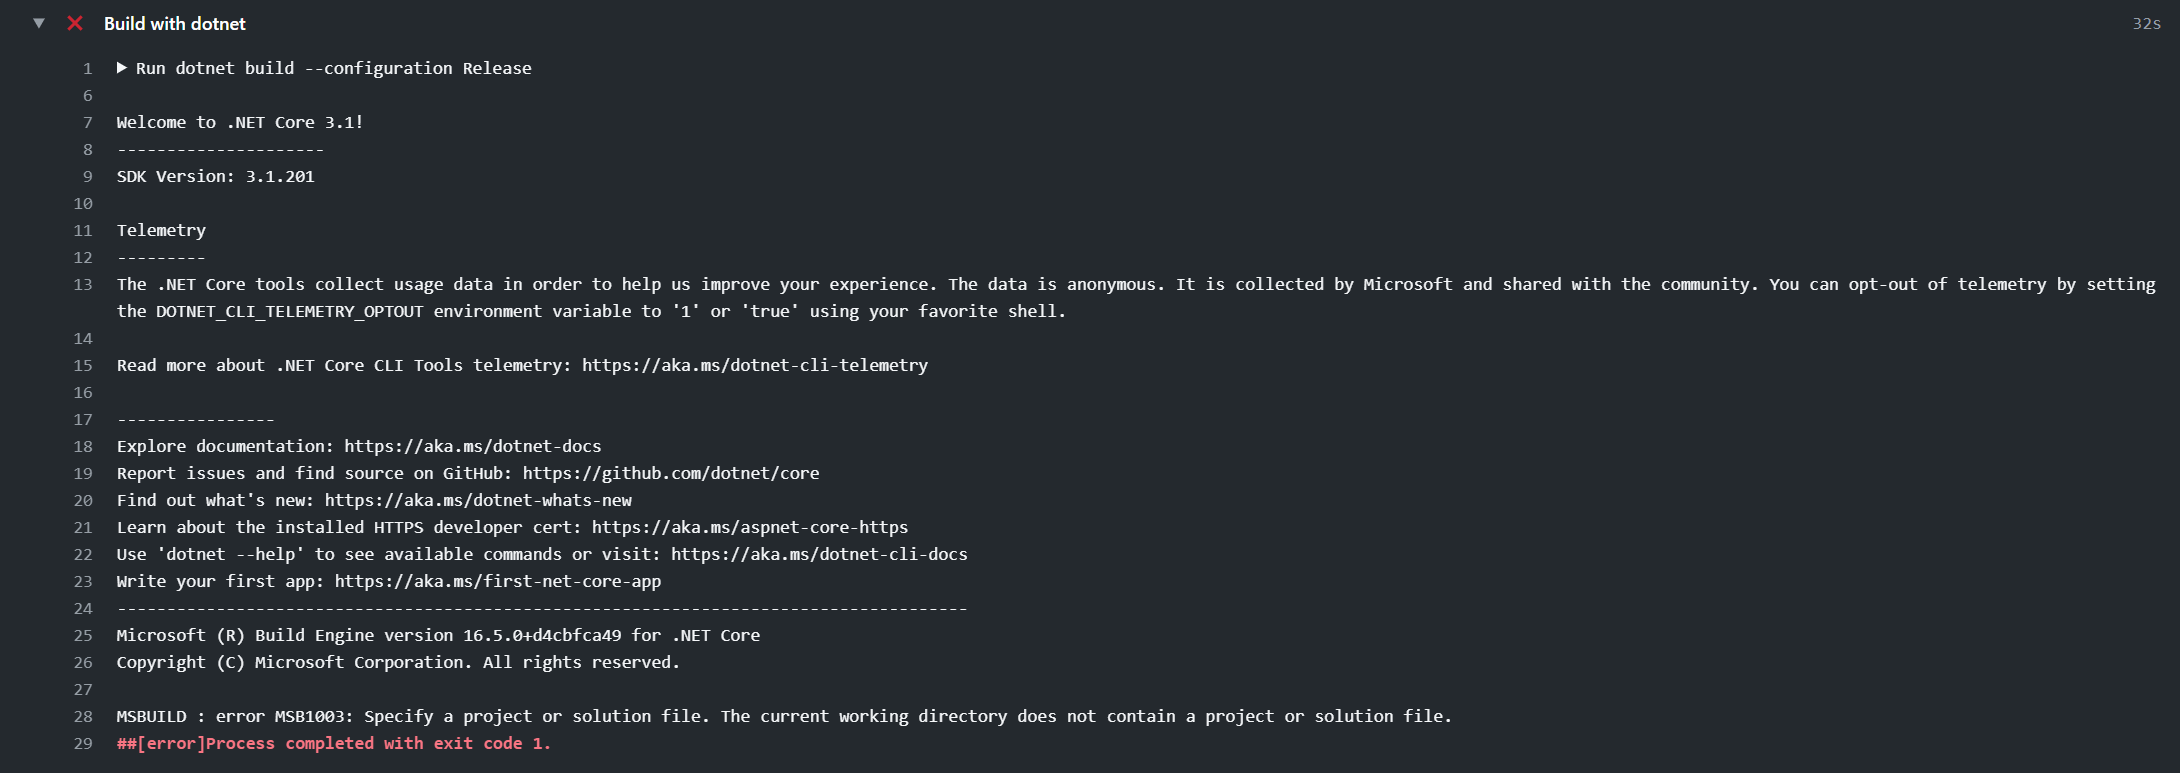
This is because the YAML file is expecting the solution file to be within the root of the repository.
We can make a quick modification to the YAML file to fix this issue.
Back in Visual Studio, include the file in the project by right clicking on the solution and going to Add > “Existing Item“;
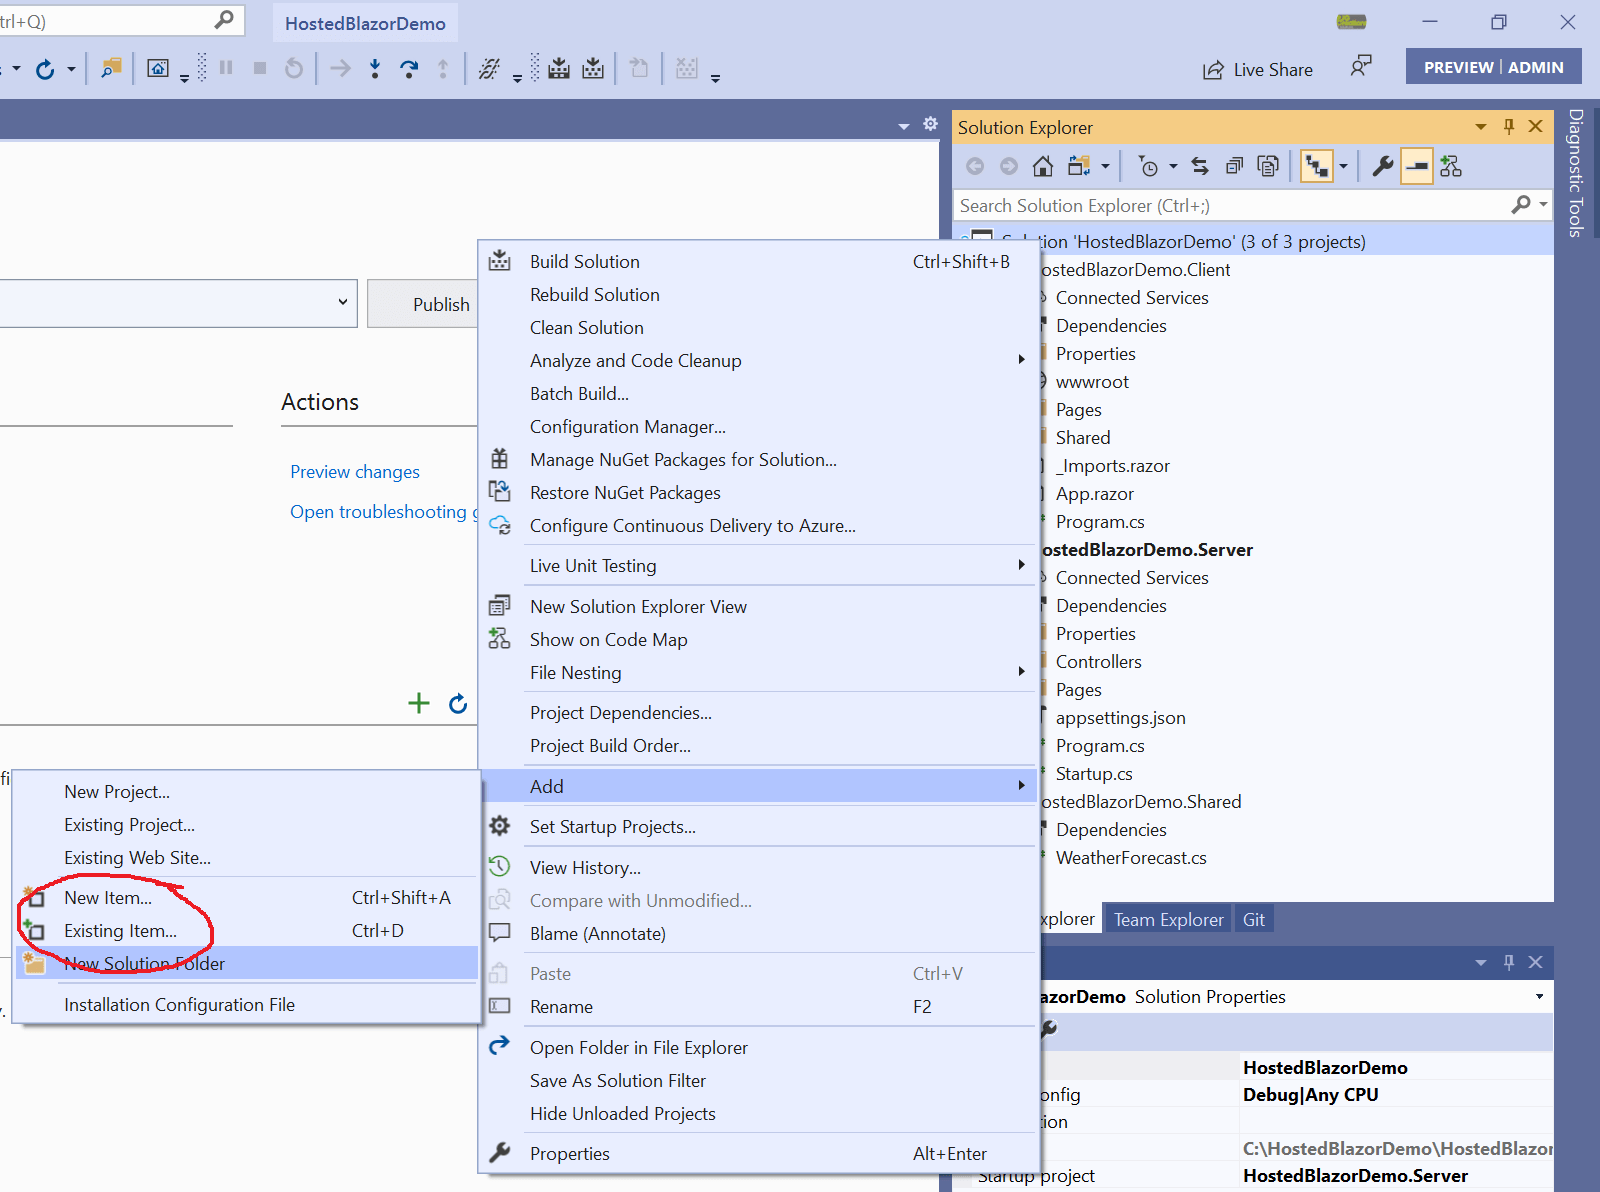
If you navigate to the root of the Solution Directory, there will be a “.github” folder. Within there is a “Workflows” folder, and within that folder you’ll find the “master_hostedblazorapp.yml” GitHib Action YAML File;
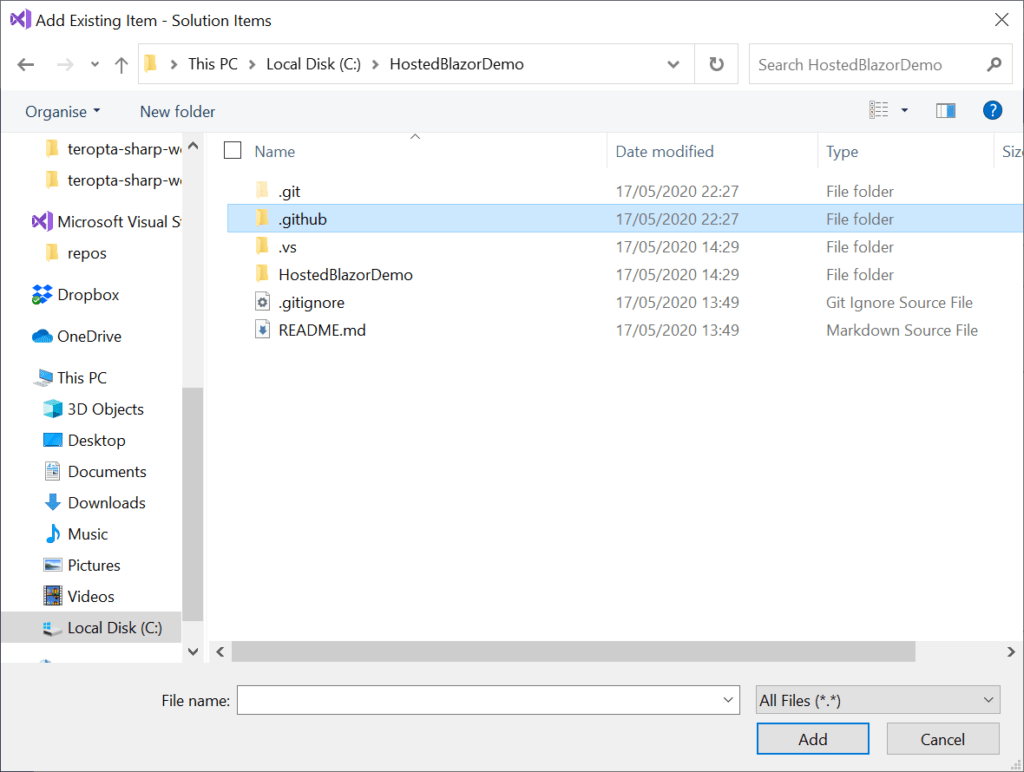
Once you’ve added that file to your project, go ahead and open it.
After the Build and Publish commands, add the name of the directory where your solution is contained followed by a forward slash “/”;
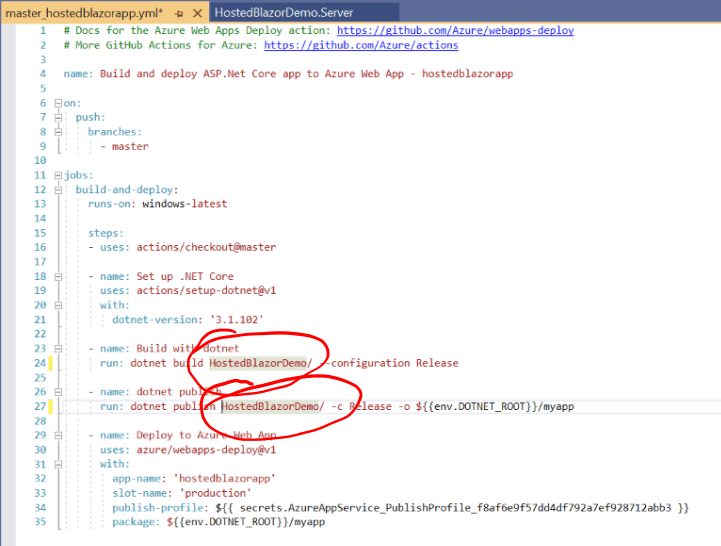
Save the file and return to the Git window. Enter a new commit message and do a “Commit All and Push” again.
If you return to the GitHub actions page and drill down in to the new Action in Progress, you should now see that it passes successfully;
8: Fix an issue with the web.config file
Switching back to your website now, and hitting the refresh will show up an issue with the current GitHub Action YAML for ASP.NET Core Hosted Blazor Web Apps;

This took me and then the awesome Gregor Suttie (Thanks a heap Gregor!) a good long time to pin down, and is because the current GitHub Action YAML generates an incorrect web.config for the project. The generated web.config contains a heap of ignore statements and redirects which bork a Hosted Blazor App.
We can overcome this issue by supplying our own web.config in the Server Project through..
Switch back to Visual Studio and right click on the Server Project in Solution Explorer.
Go to Add > New Item. From the dialog, choose “Web Configuration File” and press the “Add” button.
Replace the contents of the file with the following;
<?xml version="1.0" encoding="utf-8"?>
<configuration>
  <location path="." inheritInChildApplications="false">
    <system.webServer>
      <handlers>
        <add name="aspNetCore" path="*" verb="*" modules="AspNetCoreModuleV2" resourceType="Unspecified" />
      </handlers>
      <aspNetCore processPath="%LAUNCHER_PATH%" stdoutLogEnabled="false" stdoutLogFile="\\?\%home%\LogFiles\stdout" hostingModel="inprocess">
        <environmentVariables>
          <environmentVariable name="ASPNETCORE_HTTPS_PORT" value="44342" />
          <environmentVariable name="COMPLUS_ForceENC" value="1" />
          <environmentVariable name="ASPNETCORE_ENVIRONMENT" value="Development" />
        </environmentVariables>
      </aspNetCore>
    </system.webServer>
  </location>
</configuration>
Save the file and one last time, Commit and push your changes.
Once the GitHub action has completed, you can refresh the Web App page, and all being well, you should now have a fully working app again;
Wrapping Up
In this post you learnt how to Create a GitHub Repo, an Azure App Service Plan and a Web App. We then created an ASP.NET Core Hosted Blazor Web App and published that to our Web App.
Finally, we created a GitHub action and rectified an issue with the web.config which temporarily borked our project.
I hope this has helped you to get started with Hosted Blazor Web Apps and Azure Web Apps…
Cheers and good luck!